P1000 Tried and true cab heat fixes-2018

H

Hp1

New Member
Lifetime Member
Supporting Member
Jan 20, 2019
19
18
3
Wisconsin
Ownership

  1. 1000-5
Rocker switch. It says its good for 20 amps. Which i believe from an earlier post from redfred1 who showed 10 amp fuse would be sufficient, should work fine. And would be easy to run from the battery, with an inline fuse (Right?). And yep, just two wires to the fan.
BLOWER - Blue - STARK 5-PIN Laser Etched LED Rocker Switch Dual Light - 20A 12V ON/OFF
But i still ran it thru a relay, for whatever reason.
Well the 8" fit. Dont have much time on it yet, So we'll see..
Hope this helps.

20200228 180549
 
  • Like
Reactions: TripleB
tincangob

tincangob

Well-Known Member
Nov 30, 2017
200
270
63
Central Wisconsin
Ownership

  1. 1000-3
Neat job for sure - even really clean too. What sized fan did you use, and how did you secure the fan inside the PVC pipe? I may copy your mounting technique. As long as you're describing some details, where did you put the switch (and switch type)? Sorry for the questions, but it really looks like a good job.
 
  • Like
Reactions: Isaiah
Dirtstiffs-1000

Dirtstiffs-1000

Well-Known Member
Lifetime Member
Supporting Member
Nov 3, 2018
1,655
6,029
113
Republican from the wet side of Oregonifornia
hondasxs.com
Ownership

  1. 1000-5
Neat job for sure - even really clean too. What sized fan did you use, and how did you secure the fan inside the PVC pipe? I may copy your mounting technique. As long as you're describing some details, where did you put the switch (and switch type)? Sorry for the questions, but it really looks like a good job.
4" Attwood fan from Azon.
1 12 volt power wire from a spst switch with a 10 amp fuse. I have a dash switch box I used.
Glad to help.
 
  • Like
Reactions: Isaiah
tincangob

tincangob

Well-Known Member
Nov 30, 2017
200
270
63
Central Wisconsin
Ownership

  1. 1000-3
How much of a difference can you tell with the shield thing?
Stepping into your question, I make my own shield out of material from Amazon and it is certainly worth the effort. Our seat is not nearly so hot, but heat does come in behind the seat, and I working on that with some pipe insulation. You want to have some extra length at the back of the seat because that is where the heat comes in after installing the shield, but the shield is worthwhile for sure. Either "Dirtstiffs" bought a commercial shield, which are available, or he did one neat job of cutting out the shield. Mine is not so professional looking.
 
  • Like
Reactions: Isaiah
Dirtstiffs-1000

Dirtstiffs-1000

Well-Known Member
Lifetime Member
Supporting Member
Nov 3, 2018
1,655
6,029
113
Republican from the wet side of Oregonifornia
hondasxs.com
Ownership

  1. 1000-5
I cut up a Walmart window sun shade in the picture, but beneath it is also dynamat heat shield material.
Works good.
I also put heat shield material on the back seat around the air filter box. Helped a bunch too.
 
  • Like
Reactions: Isaiah
Isaiah

Isaiah

Well-Known Member
Dec 30, 2019
2,191
6,964
113
Altamont TN
Ownership

  1. 1000-5
Stepping into your question, I make my own shield out of material from Amazon and it is certainly worth the effort. Our seat is not nearly so hot, but heat does come in behind the seat, and I working on that with some pipe insulation. You want to have some extra length at the back of the seat because that is where the heat comes in after installing the shield, but the shield is worthwhile for sure. Either "Dirtstiffs" bought a commercial shield, which are available, or he did one neat job of cutting out the shield. Mine is not so professional looking.


I cut up a Walmart window sun shade in the picture, but beneath it is also dynamat heat shield material.
Works good.
I also put heat shield material on the back seat around the air filter box. Helped a bunch too.

Thanks for the ideas. I order can mid panel and worried about the heat.
 
S

ScottG

Member
Aug 31, 2018
9
35
13
Far North Idaho
Ownership

  1. 1000-5
4" Attwood fan from Azon.
1 12 volt power wire from a spst switch with a 10 amp fuse. I have a dash switch box I used.
Glad to help.
Just started looking into heat management.... you have a nice setup! Dumb Q, but is there any ducting involved or is the circulation from the fan doing all of the magic? Thanks!
 
  • Like
Reactions: Isaiah
advertisement
michdave

michdave

Active Member
Apr 28, 2019
78
195
33
Maryland
Ownership

  1. 1000-5
So, I used this thread and others to battle heat control in the cab. Here's what I did...

First was the Honda "fix" which included the rubber pieces (mine was updated right before I purchased it).

Next I added a layer of the foil insulation between the rubber and seat (not sure if that helped or not).

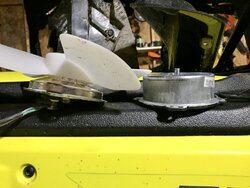
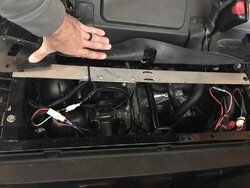
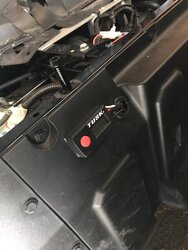
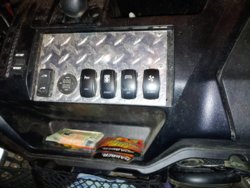
Then I added one 5.5 inch SPAL blower fan below the seat that is controlled by a Tusk dirt bike radiator fan control switch. The thermometer is mounted on the intake tube directly above the headers. The programable switch is mounted below the passenger seat, right between where the passenger legs would sit. I also installed an override switch on the dash.

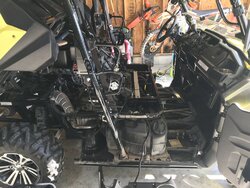
The blower fan worked pretty good, but I honestly felt that all it was doing was creating "dirty" air beneath the seat; meaning that it was moving air, but it was very effective at exhausting the hot air. So, I picked up a 6 inch 90º PVC elbow, a flush mount (for a gutter drain) and mounted a second 5.5 inch puller SPAL fan in that. A little work with the Dremel and some epoxy worked nicely. I mounted the fan about 1 1/2 inches inside the topside of the elbow. I exited the wires through the top part of the elbow. I then mounted all of that to my skid plate, right near the header exhaust shield, beneath the rear passenger side entry plate (in front of the right rear wheel). I drilled about 10, 1/2 inch holes in the headed guard to aid in air flow. That fan was also then wired into the thermo-switch and override switch. To make it match, I used back petroleum dye (eBay for $10) to dye the PVC elbow black. It took about 6 coats to really soak in and turn black.

I keep the thermo-switch programmed for 140º.

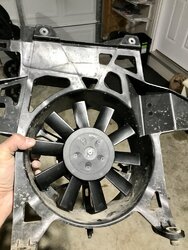
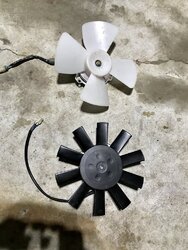
Next I added the SPAL upgraded fan for the radiator to keep things cooler in front of the cab, since I figured a lot of that heat was blowing back. The factory fan is slow and sort of weak. The larger and more powerful fan moves a lot more air and at a faster rate.

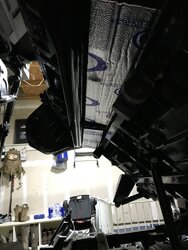
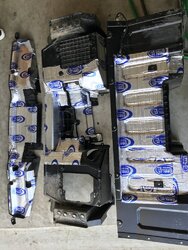
I ordered up some Thermo Tec sound and heat insulation from Amazon and pulled all of the factory covering, and lined everything that touches the engine bay, or exhaust route. (PS: I was concerned on how that stuff would hold, but after pulling everything, cleaning it with alcohol and letting it al sit in the sun before installing...it has incredible hold! I was very impressed).

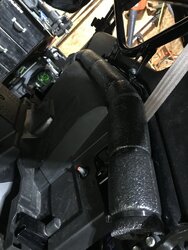
And finally, I installed a large black pipe insulation on the bed release bar. I had to get fancy with the razor knife to try and provide the most sung fit I could get without interfering with the dump beds operation, but it worked. I used heavy duty zip-ties to secure that.

Combined, it all made a HUGE difference in not only heat reduction, but sound. You don't hardly hear the engine and transmission from inside the cab. If anything, I really just hear the exhaust note now. Of all the mods/add-ons....the puller fan made the biggest difference. My speculation of the the blower fan simply dirtying the air up seemed to be correct. Before the puller fan was installed, it would take the pusher fan upwards of a minute to cool the engine bay enough to trip the switch off; sometimes it would just keep running if it was really warm outside. After installing the puller fan and duct, I haven't had it run consistently more than 15-20 seconds. If I'm sitting still, it'll only take 10-12 seconds to cool it down. You can still feel the seat belt area on the passenger side get warm to the touch, but nothing like it did when it was new.

It took a lot of time, but it was worth it in my opinion. Hope this helps!
60998549582  6E5CFE99 0634 489F B983 E92BDDA89FB3 60998551952  02F7805B 8D57 4D69 9429 AE217F25EDEA IMG 7069 IMG 7029 IMG 7031 IMG 7032 IMG 7033 IMG 7030 IMG 7212 IMG 7232 61109436995  D8556E6D 1D57 4F96 86D3 220040E8FDFD IMG 7331
 
Dirtstiffs-1000

Dirtstiffs-1000

Well-Known Member
Lifetime Member
Supporting Member
Nov 3, 2018
1,655
6,029
113
Republican from the wet side of Oregonifornia
hondasxs.com
Ownership

  1. 1000-5
Last edited:
  • Like
Reactions: Davagail and Isaiah
Dirtstiffs-1000

Dirtstiffs-1000

Well-Known Member
Lifetime Member
Supporting Member
Nov 3, 2018
1,655
6,029
113
Republican from the wet side of Oregonifornia
hondasxs.com
Ownership

  1. 1000-5
Just started looking into heat management.... you have a nice setup! Dumb Q, but is there any ducting involved or is the circulation from the fan doing all of the magic? Thanks!

No dumb questions.
Tomorrow actually, I'm going to add about 4-6' of 4" heavy ducting to a point beyond the headers.
My thought is the fan maybe just circulating hot air around, so I'm going to try exhausting the fan.
Others have tried with unsatisfactory result, but I'm a see for myself guy..hard headed more likely.
More to come if successful.
 
  • Like
Reactions: TripleB and Isaiah
michdave

michdave

Active Member
Apr 28, 2019
78
195
33
Maryland
Ownership

  1. 1000-5
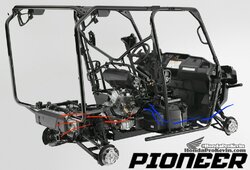
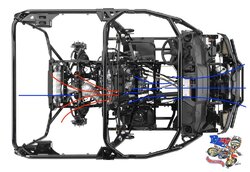
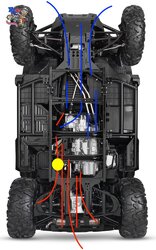
For what it's worth, my exhaust fan made a a huge difference. But, not that my solution is 100% perfect, I think having the exhaust fan that moves with the air flow that the machine was designed to have will yield the best results. If you have an exhaust van with a duct pulling hot air forward to exhaust (such as the kit offered by DEI) the opposite direction that the naturally forced air is pushing through the engine bay, it's going to be less effective. The results, I feel, will only be worse if you have full skid plates that even further limit the air movement through the engine bay.

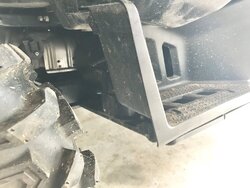
Ideally, I think a 4 inch exhaust fan mounted and ducted at the rear of the headers and engine bay near the bottom of the machine would have been the most effective (see the yellow circle on my image attache below). I didn't go this route because I had already ordered a 6 inch fan that simply wouldn't fit in that area. So, the 6 inch with a duct near the rear of the header was the next best choice. The 6 inch fan pulls a TON of air and with the aid of the 6inch pusher fan in front of the engine, it effectively exhaust the heated air. If anything, I'm tempted to cut more of the exhaust shield off in front of the fan to allow even more air flow.

I've attached a fee images of our chassis that helped me "see" how natural air flow would effect cooling.

Just my two cents.

401E1C48 EF47 4436 A7F2 CF12098ABEE2 1 201 a B46B72C1 508D 44EA 98E0 B60C6E0A0674 1 201 a 582810B1 0485 4107 B19F 26D0069AFC20 1 201 a
 
  • Like
Reactions: Isaiah and TripleB
H

HondaTech

Guest
Best setup I've ever seen was two fans mounted overhead that blew your hair off at full wack.

Sort of loud though... 😁
 
  • Like
Reactions: Isaiah
Dirtstiffs-1000

Dirtstiffs-1000

Well-Known Member
Lifetime Member
Supporting Member
Nov 3, 2018
1,655
6,029
113
Republican from the wet side of Oregonifornia
hondasxs.com
Ownership

  1. 1000-5
No dumb questions.
Tomorrow actually, I'm going to add about 4-6' of 4" heavy ducting to a point beyond the headers.
My thought is the fan maybe just circulating hot air around, so I'm going to try exhausting the fan.
Others have tried with unsatisfactory result, but I'm a see for myself guy..hard headed more likely.
More to come if successful.
So,
I added about a 1.5 - 2' of insulated duct, only because the angle of my bilge wouldn't allow going under the header, with out modifying the bilge mount.

So I ended up discharging just at the base of the manifold at a 90 degree down angle.

Honestly on today's ride as the copilot, I COULD definately feel a noticeable reduction in the passenger back seat temperature with the fan on and ducted 90 degrees down.

I have a thermometer in the buggy but never thought about looking at it. Doubt it be a degree or 2.
Ya, I think it was worth the effort.
 
Last edited:
Bradley-Thornton

Bradley-Thornton

Well-Known Member
Lifetime Member
Nov 6, 2017
684
1,649
93
Hattiesburg MS
Ownership

  1. 1000-5
For what it's worth, my exhaust fan made a a huge difference. But, not that my solution is 100% perfect, I think having the exhaust fan that moves with the air flow that the machine was designed to have will yield the best results. If you have an exhaust van with a duct pulling hot air forward to exhaust (such as the kit offered by DEI) the opposite direction that the naturally forced air is pushing through the engine bay, it's going to be less effective. The results, I feel, will only be worse if you have full skid plates that even further limit the air movement through the engine bay.

Ideally, I think a 4 inch exhaust fan mounted and ducted at the rear of the headers and engine bay near the bottom of the machine would have been the most effective (see the yellow circle on my image attache below). I didn't go this route because I had already ordered a 6 inch fan that simply wouldn't fit in that area. So, the 6 inch with a duct near the rear of the header was the next best choice. The 6 inch fan pulls a TON of air and with the aid of the 6inch pusher fan in front of the engine, it effectively exhaust the heated air. If anything, I'm tempted to cut more of the exhaust shield off in front of the fan to allow even more air flow.

I've attached a fee images of our chassis that helped me "see" how natural air flow would effect cooling.

Just my two cents.

View attachment 208746 View attachment 208747 View attachment 208748

My thoughts on this and test I have and am running. Thanks for the pics.

 
T

tzink

New Member
Jul 5, 2020
14
10
3
indiana
Ownership

  1. 1000-5
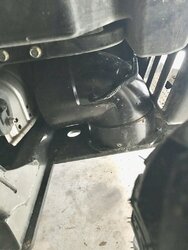
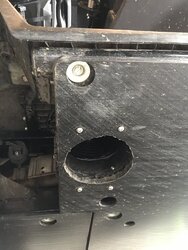
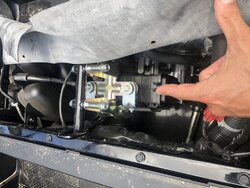
I’m trying to do the bilge fan too but this is in the way. Any ideas on what to do or what it is? It’s a 2020

6A58F402 CD7C 483A 9E9E 9D7E78F04BBB
 
michdave

michdave

Active Member
Apr 28, 2019
78
195
33
Maryland
Ownership

  1. 1000-5
I’m trying to do the bilge fan too but this is in the way. Any ideas on what to do or what it is? It’s a 2020

View attachment 213288

Hmm. My 2018 Deluxe does not have that. Is yours an LE by chance? Or possible a California green sticker model? Almost looks like another emissions piece.
 
T

tzink

New Member
Jul 5, 2020
14
10
3
indiana
Ownership

  1. 1000-5
Hmm. My 2018 Deluxe does not have that. Is yours an LE by chance? Or possible a California green sticker model? Almost looks like another emissions piece.
[/QUOTE
I’m not sure what an Le is I bought it in Illinois so I wouldn’t think it would have any different emission equipment???
 
advertisement

About us

  • Our community has been around for many years and pride ourselves on offering unbiased, critical discussion among people of all different backgrounds. We are working every day to make sure our community is one of the best.

User Menu

Buy us a beer!

  • Lots of time and money has gone into making sure the community is running the best software, best designs, and all the other bells and whistles. Care to buy us a beer? We'd really appreciate it!

    Beer Fund!

    Club Membership!