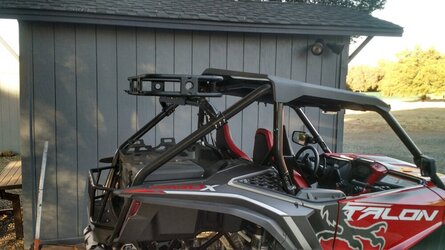
Custom Talon tire carrier

B

BrianM

Active Member
Aug 14, 2020
63
164
33
Tulsa, OK
Ownership

  1. Talon X4
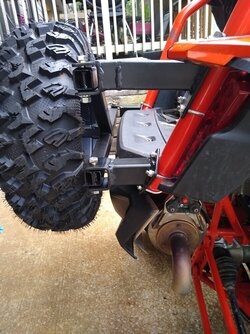
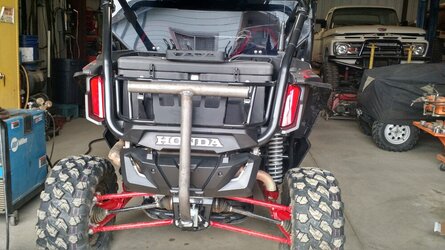
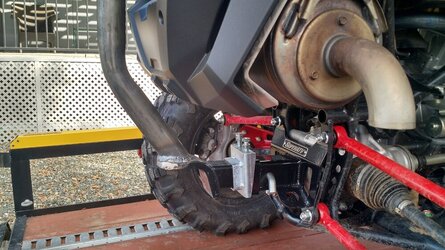
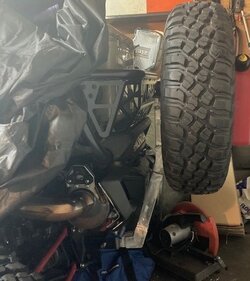
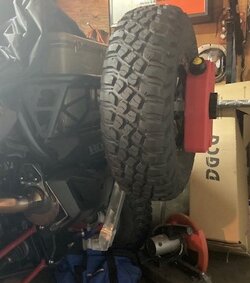
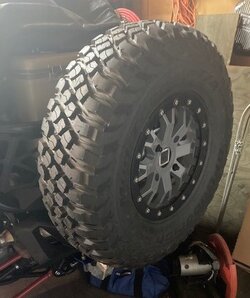
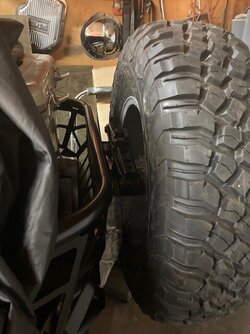
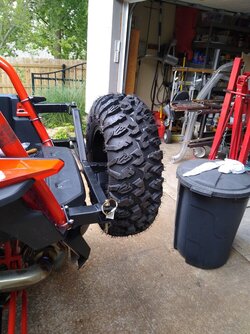
I built a new spare tire carrier for my Talon and I thought I would share it since I'm pretty happy with it. The first one I built was a rush job. It worked ok but the tire took up storage space. It didn't block my view though it was always in the way of other gear. Originally I thought I could rotate this out towards the back but it just didn't work out well. These first 2 pics are the old tire bracket that I replaced.
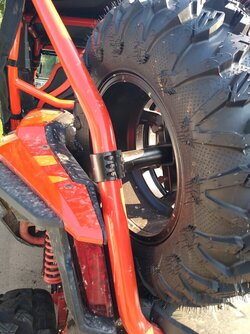
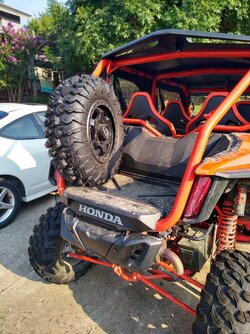
IMG 20210719 182844835 IMG 20210719 182837419 HDR

Now, on to the new carrier.

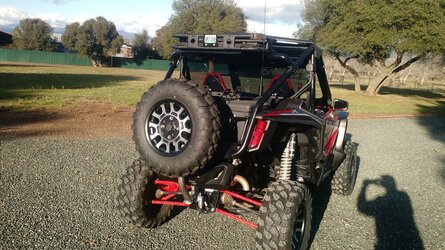
I considered purchasing one that is fastened above the bed by a tube that connects on both sides but that wasn't really what I wanted either. I wanted one that was behind the bed and swung out similar to what some Jeep spares do. At first I was concerned about heat from the exhaust but then it occurred to me if the Honda plastic with the logo and the rear bed plastic can take the heat and they are in between the tire an the exhaust then I don't have anything to worry about.

I built the carrier mostly from scrap steel I had left over from some other projects. All my decisions about what to use were based on what I had available at the time. I had both scrap pipe and square tube. I picked the square tube for no particular reason.

On the hinge side I used 2 hinges because I thought that all the trail bouncing would create a lot of twisting stress. Now, I think I could
have accomplished the same thing just by making the bracket that attaches to the Talon a little taller and spread out the u-bolts a little more.
Still I like the way it looks and it doesn't sag when you open it up.
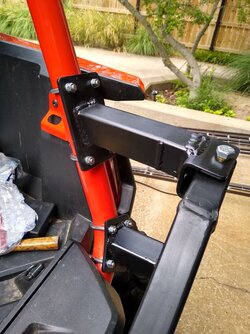
IMG 20210808 144013000 HDR

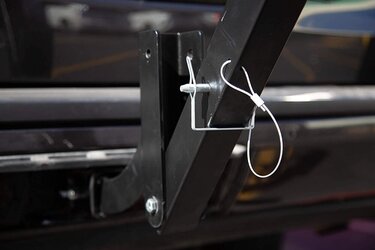
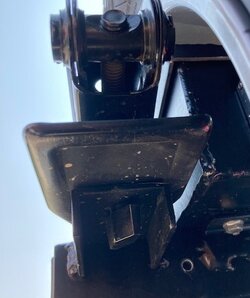
The mount plates are made from some scrap 1/4 inch steel and fastened to the Talon with 5/16 u-bolts 2 inches in diameter. The square tube attached to the mount plates is 1-1/2 x 3/16 thick. The brackets used for the hinges and the latch are made from trailer leaf spring hangers. They are called short hangers at the trailer parts supply I bought them at. They were $3.40 each. They are heavy duty. The holes for the pins are slightly larger than 1/2 inch to accommodate a 1/2 wheel stud type of bolt which is pressed or pounded in. I didn't want to have the crossbar on there permanently so I used regular 1/2 inch bolts with a lock washer and nut. To keep the thing from rattling I used a 1/2 inch copper compression ferrule between the bolt head and the bracket. This worked very well to stop any rattle. Time will tell if this was a good idea or not and once the bolts were tightened down I probably didn't need them at all. For the crossbar I used 1-1/4 x 1/8 inch square tube. If I wouldn't have used 2 hinges I might have used 3/16 inch tube.

In the crossbar, where I drilled the 1/2 inch holes for the hinges and the latch I welded on a small square tab of what was probably 11 gauge steel on each side to beef up the holes some. I would have preferred to use some plain steel 1/2 washers but didn't have any so I just chopped some small tabs instead. This may have been overkill but better safe than sorry. Also the short hangers are wider than 1-1/4 so this made the hinge a little tighter fitting. I hate rattles. For the last piece of tube that the tire is bolted to I used some 1x3/16 square tube welded into a T shape and then butt welded to the crossbar. I don't always trust butt welds (at least mine) so I added some small tabs and angle chunks to the T to create lap welds on top of both butt joints.
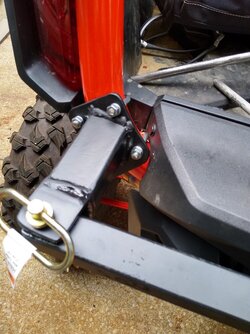
IMG 20210808 144008622 HDR

If you decide to build one like this, here are a couple of tips. The square tube brackets are all cut at a 70 degree angle from the mount plates Since the Talon back tube is at an approximate 20 degree angle from vertical as close as I could tell. I built the bottom bracket and tube and fastened it on. I used a level to get the hinge bracket horizontal and tack welded it. I took it off to finish the weld so I wouldn't boil the paint off the Talon. I then took a 1/2 inch rod long enough to go through both hinge brackets to keep them straight and inline so that they wouldn't bind when opening/closing. If you don't do this it's nearly impossible to line the hinges up correctly. I welded the top bracket to the tube and then put it back on the Talon to tack weld on the top hinge bracket to make sure it was perfectly in line. Getting the 1/2 inch rod to go through both hinges is now more important than the top bracket being perfectly horizontal so no need for a level on the second hinge bracket. Once the hinges are complete, install the crossbar and mark where the hole should be drilled for the latch.

Once I had everything primed and painted I did the final install I just finger tightened the bracket u-bolts until the crossbar hinges were tightened and the latch pin was installed. I then tightened down the bracket u-bolts with everything lined up like I wanted.

Here is a couple of pictures of the finished carrier before I attached the wheel.
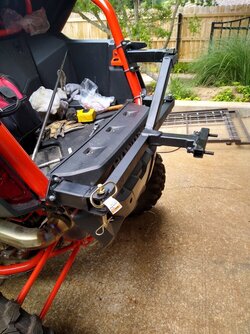
IMG 20210808 144002125 HDR IMG 20210808 144025814 HDR

Here are some shots with the spare tire installed.

IMG 20210808 144806215 IMG 20210808 144814370 IMG 20210808 144826323
 
lowranger

lowranger

Well-Known Member
Supporting Member
Sep 23, 2020
455
2,474
93
Northern California
Ownership

  1. Talon X
Bent the roll bar tubing to the shape of the back of the Talon.

IMG 20210130 145319221 HDR
 
  • Like
Reactions: CID
lowranger

lowranger

Well-Known Member
Supporting Member
Sep 23, 2020
455
2,474
93
Northern California
Ownership

  1. Talon X
I like the simplicity of that....plus the price. Haha. Do you think you need a strap at the top somewhere to keep it from bouncing and flexing? Just thinking back to a bad experience I had with a hitch mount bike carrier long ago.
I have an anti-rattle bracket on the 2" receiver and a nylon strap at the top. Solid as a rock!
 
lowranger

lowranger

Well-Known Member
Supporting Member
Sep 23, 2020
455
2,474
93
Northern California
Ownership

  1. Talon X
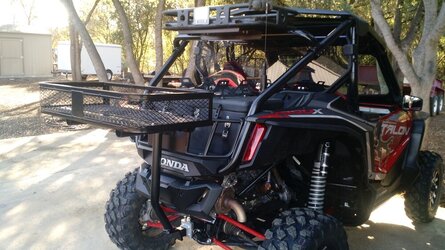
If I decide I need more storage space on a trip, I take off the spare tire bracket and bolt on the basket.

IMG 20210213 151706723
 
B

BrianM

Active Member
Aug 14, 2020
63
164
33
Tulsa, OK
Ownership

  1. Talon X4
If I decide I need more storage space on a trip, I take off the spare tire bracket and bolt on the basket.

View attachment 288934
That's cool. You could maybe even carry the spare on that thing under the basket. Have you ever thought modifying the thing to do something like they do on bike carriers to drop the whole thing out of the way so you can get in the back easier? Something like this... 71xaSPvmb2L AC SL1500
 
lowranger

lowranger

Well-Known Member
Supporting Member
Sep 23, 2020
455
2,474
93
Northern California
Ownership

  1. Talon X
That's cool. You could maybe even carry the spare on that thing under the basket. Have you ever thought modifying the thing to do something like they do on bike carriers to drop the whole thing out of the way so you can get in the back easier? Something like this... View attachment 288940
I have, but I have no problem getting into the box in the back. I also didn't want the tire that low.
 
  • Like
Reactions: CID
Montecresto

Montecresto

Montecresto el segundo
Lifetime Member
Supporting Member
Club Contributor
Jan 17, 2016
22,587
34,173
113
Eastern oklahoma
Ownership

  1. Other Brand

  2. 500

  3. 1000-3

  4. 1000-5

  5. Talon X4
I built a new spare tire carrier for my Talon and I thought I would share it since I'm pretty happy with it. The first one I built was a rush job. It worked ok but the tire took up storage space. It didn't block my view though it was always in the way of other gear. Originally I thought I could rotate this out towards the back but it just didn't work out well. These first 2 pics are the old tire bracket that I replaced.

View attachment 288672 View attachment 288671

Now, on to the new carrier.

I considered purchasing one that is fastened above the bed by a tube that connects on both sides but that wasn't really what I wanted either. I wanted one that was behind the bed and swung out similar to what some Jeep spares do. At first I was concerned about heat from the exhaust but then it occurred to me if the Honda plastic with the logo and the rear bed plastic can take the heat and they are in between the tire an the exhaust then I don't have anything to worry about.

I built the carrier mostly from scrap steel I had left over from some other projects. All my decisions about what to use were based on what I had available at the time. I had both scrap pipe and square tube. I picked the square tube for no particular reason.

On the hinge side I used 2 hinges because I thought that all the trail bouncing would create a lot of twisting stress. Now, I think I could
have accomplished the same thing just by making the bracket that attaches to the Talon a little taller and spread out the u-bolts a little more.
Still I like the way it looks and it doesn't sag when you open it up.

View attachment 288675

The mount plates are made from some scrap 1/4 inch steel and fastened to the Talon with 5/16 u-bolts 2 inches in diameter. The square tube attached to the mount plates is 1-1/2 x 3/16 thick. The brackets used for the hinges and the latch are made from trailer leaf spring hangers. They are called short hangers at the trailer parts supply I bought them at. They were $3.40 each. They are heavy duty. The holes for the pins are slightly larger than 1/2 inch to accommodate a 1/2 wheel stud type of bolt which is pressed or pounded in. I didn't want to have the crossbar on there permanently so I used regular 1/2 inch bolts with a lock washer and nut. To keep the thing from rattling I used a 1/2 inch copper compression ferrule between the bolt head and the bracket. This worked very well to stop any rattle. Time will tell if this was a good idea or not and once the bolts were tightened down I probably didn't need them at all. For the crossbar I used 1-1/4 x 1/8 inch square tube. If I wouldn't have used 2 hinges I might have used 3/16 inch tube.

In the crossbar, where I drilled the 1/2 inch holes for the hinges and the latch I welded on a small square tab of what was probably 11 gauge steel on each side to beef up the holes some. I would have preferred to use some plain steel 1/2 washers but didn't have any so I just chopped some small tabs instead. This may have been overkill but better safe than sorry. Also the short hangers are wider than 1-1/4 so this made the hinge a little tighter fitting. I hate rattles. For the last piece of tube that the tire is bolted to I used some 1x3/16 square tube welded into a T shape and then butt welded to the crossbar. I don't always trust butt welds (at least mine) so I added some small tabs and angle chunks to the T to create lap welds on top of both butt joints.

View attachment 288679

If you decide to build one like this, here are a couple of tips. The square tube brackets are all cut at a 70 degree angle from the mount plates Since the Talon back tube is at an approximate 20 degree angle from vertical as close as I could tell. I built the bottom bracket and tube and fastened it on. I used a level to get the hinge bracket horizontal and tack welded it. I took it off to finish the weld so I wouldn't boil the paint off the Talon. I then took a 1/2 inch rod long enough to go through both hinge brackets to keep them straight and inline so that they wouldn't bind when opening/closing. If you don't do this it's nearly impossible to line the hinges up correctly. I welded the top bracket to the tube and then put it back on the Talon to tack weld on the top hinge bracket to make sure it was perfectly in line. Getting the 1/2 inch rod to go through both hinges is now more important than the top bracket being perfectly horizontal so no need for a level on the second hinge bracket. Once the hinges are complete, install the crossbar and mark where the hole should be drilled for the latch.

Once I had everything primed and painted I did the final install I just finger tightened the bracket u-bolts until the crossbar hinges were tightened and the latch pin was installed. I then tightened down the bracket u-bolts with everything lined up like I wanted.

Here is a couple of pictures of the finished carrier before I attached the wheel.
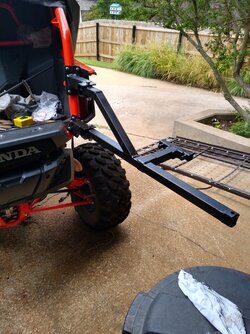
View attachment 288673 View attachment 288674

Here are some shots with the spare tire installed.
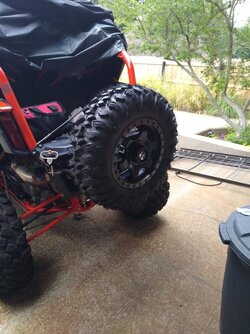
View attachment 288680 View attachment 288681 View attachment 288682
Very nice fabrication Brian….😊👍
 
B

BrianM

Active Member
Aug 14, 2020
63
164
33
Tulsa, OK
Ownership

  1. Talon X4
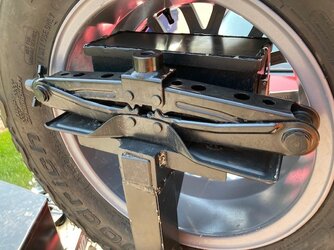
I admire your ability to weld aluminum 👍. I would have to have some more practice before I would trust anything aluminum I welded. Can you give me a better look at how you attached your tire jack to your carrier?
 
906UP

906UP

Well-Known Member
Lifetime Member
Supporting Member
Club Contributor
Jul 6, 2017
12,981
120,951
113
da Yoop
Ownership

  1. 1000-3

  2. Talon X
I built a new spare tire carrier for my Talon and I thought I would share it since I'm pretty happy with it. The first one I built was a rush job. It worked ok but the tire took up storage space. It didn't block my view though it was always in the way of other gear. Originally I thought I could rotate this out towards the back but it just didn't work out well. These first 2 pics are the old tire bracket that I replaced.

View attachment 288672 View attachment 288671

Now, on to the new carrier.

I considered purchasing one that is fastened above the bed by a tube that connects on both sides but that wasn't really what I wanted either. I wanted one that was behind the bed and swung out similar to what some Jeep spares do. At first I was concerned about heat from the exhaust but then it occurred to me if the Honda plastic with the logo and the rear bed plastic can take the heat and they are in between the tire an the exhaust then I don't have anything to worry about.

I built the carrier mostly from scrap steel I had left over from some other projects. All my decisions about what to use were based on what I had available at the time. I had both scrap pipe and square tube. I picked the square tube for no particular reason.

On the hinge side I used 2 hinges because I thought that all the trail bouncing would create a lot of twisting stress. Now, I think I could
have accomplished the same thing just by making the bracket that attaches to the Talon a little taller and spread out the u-bolts a little more.
Still I like the way it looks and it doesn't sag when you open it up.

View attachment 288675

The mount plates are made from some scrap 1/4 inch steel and fastened to the Talon with 5/16 u-bolts 2 inches in diameter. The square tube attached to the mount plates is 1-1/2 x 3/16 thick. The brackets used for the hinges and the latch are made from trailer leaf spring hangers. They are called short hangers at the trailer parts supply I bought them at. They were $3.40 each. They are heavy duty. The holes for the pins are slightly larger than 1/2 inch to accommodate a 1/2 wheel stud type of bolt which is pressed or pounded in. I didn't want to have the crossbar on there permanently so I used regular 1/2 inch bolts with a lock washer and nut. To keep the thing from rattling I used a 1/2 inch copper compression ferrule between the bolt head and the bracket. This worked very well to stop any rattle. Time will tell if this was a good idea or not and once the bolts were tightened down I probably didn't need them at all. For the crossbar I used 1-1/4 x 1/8 inch square tube. If I wouldn't have used 2 hinges I might have used 3/16 inch tube.

In the crossbar, where I drilled the 1/2 inch holes for the hinges and the latch I welded on a small square tab of what was probably 11 gauge steel on each side to beef up the holes some. I would have preferred to use some plain steel 1/2 washers but didn't have any so I just chopped some small tabs instead. This may have been overkill but better safe than sorry. Also the short hangers are wider than 1-1/4 so this made the hinge a little tighter fitting. I hate rattles. For the last piece of tube that the tire is bolted to I used some 1x3/16 square tube welded into a T shape and then butt welded to the crossbar. I don't always trust butt welds (at least mine) so I added some small tabs and angle chunks to the T to create lap welds on top of both butt joints.

View attachment 288679

If you decide to build one like this, here are a couple of tips. The square tube brackets are all cut at a 70 degree angle from the mount plates Since the Talon back tube is at an approximate 20 degree angle from vertical as close as I could tell. I built the bottom bracket and tube and fastened it on. I used a level to get the hinge bracket horizontal and tack welded it. I took it off to finish the weld so I wouldn't boil the paint off the Talon. I then took a 1/2 inch rod long enough to go through both hinge brackets to keep them straight and inline so that they wouldn't bind when opening/closing. If you don't do this it's nearly impossible to line the hinges up correctly. I welded the top bracket to the tube and then put it back on the Talon to tack weld on the top hinge bracket to make sure it was perfectly in line. Getting the 1/2 inch rod to go through both hinges is now more important than the top bracket being perfectly horizontal so no need for a level on the second hinge bracket. Once the hinges are complete, install the crossbar and mark where the hole should be drilled for the latch.

Once I had everything primed and painted I did the final install I just finger tightened the bracket u-bolts until the crossbar hinges were tightened and the latch pin was installed. I then tightened down the bracket u-bolts with everything lined up like I wanted.

Here is a couple of pictures of the finished carrier before I attached the wheel.

View attachment 288673 View attachment 288674

Here are some shots with the spare tire installed.
View attachment 288680 View attachment 288681 View attachment 288682
Nice job sir!
 
CID

CID

Well-Known Member
Lifetime Member
Supporting Member
Oct 27, 2019
5,016
22,384
113
SE Denver-ish
Ownership

  1. Talon R
B

BrianM

Active Member
Aug 14, 2020
63
164
33
Tulsa, OK
Ownership

  1. Talon X4
Welcome to the site from SE ish Denver.

Is that secured to the tailgate too? I think that would add a lot of support at the top end of the 'lever arm'. Aluminum is prone to cracking when subjected to cyclic loading, my buddy's alum snowmobile trailer was cracked in a half dozen places.
I've had a steel bike rack that fastened in the hitch. All the bouncing caused the clevis pin hole on the hinge, that lets it drop out of the way of the tailgate, to get wallowed out letting it bounce even more until it failed. I stopped at a weld shop on the way for an emergency repair and he welded it into one piece and told me to use a top strap to keep it from bouncing. This was on a car, so no trail bouncing either.
 
  • Like
Reactions: CID

About us

  • Our community has been around for many years and pride ourselves on offering unbiased, critical discussion among people of all different backgrounds. We are working every day to make sure our community is one of the best.

User Menu

Buy us a beer!

  • Lots of time and money has gone into making sure the community is running the best software, best designs, and all the other bells and whistles. Care to buy us a beer? We'd really appreciate it!

    Beer Fund!

    Club Membership!