P500 Torq Locker Install Advice

KyGal83

KyGal83

KGB, SNS, Duchess Sheldon, Ms. Daisy, Natasha
Lifetime Member
Feb 3, 2021
9,217
90,528
113
Kentucky
Ownership

  1. 500
I seem to remember something coming with it that wasn't needed, why exactly IDK? Glad to see you told these guys you were a female. Don't think you've divulged that info anywhere since being on the forum and I wasn't going to say anything unless you did. Always nice to see someone getting after it and especially a woman!

Yep! They are in case the ones on the axles need to be replaced. Mine are in great shape no need to replace them.

I referenced myself as a tame Mini Cooper driving soccer mom .. once. I have to keep my superpower under wraps.🤣 Didn't want to change the dynamics of the group. This group is a great bunch that I am absolutely learning a ton about my "nameless" machine.
 
LilRedDonkey

LilRedDonkey

Well-Known Member
Feb 25, 2021
180
613
93
cheesyland
Ownership

  1. 500
I am not super worried about the install, but just am questioning if its truly needed for what I'm going to be doing with it. Nice work on yours!!

p.s. have you seen my debacle with push pins and phillips screws? Guessing torq locker is gonna be quite a bit more difficult than a seatbelt bypass 🤣
can relate, but i didnt buy one. between the trails on my property and public that i use and the p500 being always locked in the rear, i'll be in 2wd 98% of the time!
 
The Green Goat

The Green Goat

LGBTQ Compliance Officer -Lotta gays in this place
Lifetime Member
Supporting Member
Sep 7, 2020
2,270
16,820
113
Ohio
Ownership

  1. 520
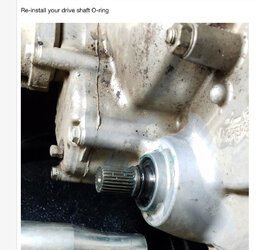
OK, I'm stumped. I got mine all apart. Locker is installed in the casing, but I've got an O-ring that I can't figure out where it goes.

I think it might be what the schematic is referring to as a 'boot band' ( https://www.partzilla.com/product/honda/91302-HM7-A00?ref=d03e618a83913bf3a2c07538ca6afd7244b53ac2 ). I found it lying on the floor near the end of the driveshaft that attaches to the motor.

Per my measurements, it's about 1-11/32" (34.131mm) O.D. and 1/8" (3.175mm) thick. Which looks slightly bigger than the picture in the schematic.

Thoughts on where this might go? Does the rubber boot (part #11) have a two O-rings holding it in place? Mine only has one o-ring on the smaller side, but not one on the larger side. Perhaps that is it?

Drive shaft

20210523 181715
 
  • Like
Reactions: J80
KyGal83

KyGal83

KGB, SNS, Duchess Sheldon, Ms. Daisy, Natasha
Lifetime Member
Feb 3, 2021
9,217
90,528
113
Kentucky
Ownership

  1. 500
OK, I'm stumped. I got mine all apart. Locker is installed in the casing, but I've got an O-ring that I can't figure out where it goes.

I think it might be what the schematic is referring to as a 'boot band' ( https://www.partzilla.com/product/honda/91302-HM7-A00?ref=d03e618a83913bf3a2c07538ca6afd7244b53ac2 ). I found it lying on the floor near the end of the driveshaft that attaches to the motor.

Per my measurements, it's about 1-11/32" (34.131mm) O.D. and 1/8" (3.175mm) thick. Which looks slightly bigger than the picture in the schematic.

Thoughts on where this might go? Does the rubber boot (part #11) have a two O-rings holding it in place? Mine only has one o-ring on the smaller side, but not one on the larger side. Perhaps that is it?

View attachment 273474
It looks the ring that goes inside the oil fill bolt on the side of the differential. I believe that is what it is called.. the red bolt circled in the this picture.
30F610F6 9F58 4F5E 9606 C817B8A69D4E
 
  • Like
Reactions: J80 and trigger
KyGal83

KyGal83

KGB, SNS, Duchess Sheldon, Ms. Daisy, Natasha
Lifetime Member
Feb 3, 2021
9,217
90,528
113
Kentucky
Ownership

  1. 500
My locker is installed not quite completely.. just 3 more steps and I can declare victory! I will NOT say it is easy, but I was able to do it with some assistance on the heavy lifting and pushing, so it is definitely worth DIYing.

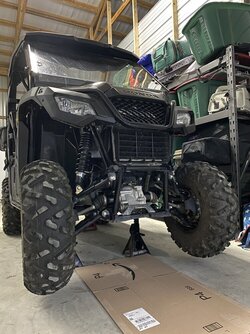
I did not want to completely disassemble the front end.. (futzin is not a fan of my method.) So the method I used was to jack up my 500 to put it on jack stands... remove the wheels, then shocks, unbolt lower A- arms, pull the axels out and ratchet the whole assembly up. Then remove differential and install the locker. Reinstalling was the difficult part. I had SEVERAL fun missteps along the way... and if any of you like a good comedy.. I will gladly write it up for you to read and laugh about.
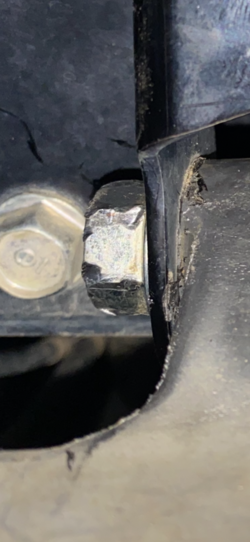
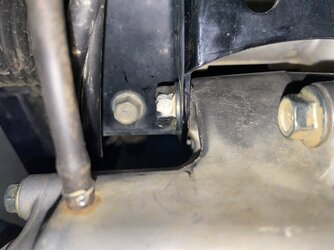
What I have left to declare victory is .. re-installing the bumper and skid plate, which I must do AFTER my NEW main mount bolt arrives on Wednesday. Yep.. I stripped that bolt head because I got my “righty- tighty, lefty-loosely” mixed up. @rustyneversleeps .. you would be very proud of my work on destroying that bolt.

F3E8BF41 909F 4D31 801A CB8BD725F332 0B46DBAD DFA7 4B2C 9A2F A9F51AE05CD5 86BE1B5C CFBB 443E AB07 D1A0785C20B6
 
advertisement
The Green Goat

The Green Goat

LGBTQ Compliance Officer -Lotta gays in this place
Lifetime Member
Supporting Member
Sep 7, 2020
2,270
16,820
113
Ohio
Ownership

  1. 520
I went ahead and threw it all back together, making the assumption that the o-ring was the boot band in the schematic. Everything holds oil. no leaks. on jack stands, it checks out per their specified test. On the ground, it seems ok, I guess. I drove it around my yard in forward and reverse, 2wd and 4wd.

A few thoughts. 1. Man these things are a little unsettling when they pop and ratchet. click, click, click, POP! 2. Thank God for power steering. Even with it, I noticed it would seem to bind when turning in reverse in 2wd. So much so, that I had to quit reversing, move forward a foot or two, or the steering would lock itself in whatever direction I was turning, power steering be damned. I'm not sure if that is a normal thing, or something I need to sort out on mine. I'm gonna give it some break-in time to see if things smooth out. 3. The install really wasn't that bad. About 4hr total with taking my time. I started off trying the 'one wheel' method, but I didn't like how little room I had to manipulate things, so, I pulled the passenger side stuff apart as well, which really doesn't take any time at all. Well worth it, IMO, to be able to pull the diff straight out.

I put conventional 80w-90 Valvoline gear oil back in it for now. I'll swap over to Synthetic 75w-140 when i get back from PTO.

Now I just need to get the thing out and put some miles on it.
 
J80

J80

Well-Known Member
Lifetime Member
Dec 29, 2018
36,867
362,201
113
WNC
When I’m turning on asphalt my does the same thing in 2wd the steering will sometimes lock up just remember to not have the 4wd engaged on pavement or concrete but when I’m in grass or on gravel or dirt it does just fine
 
KyGal83

KyGal83

KGB, SNS, Duchess Sheldon, Ms. Daisy, Natasha
Lifetime Member
Feb 3, 2021
9,217
90,528
113
Kentucky
Ownership

  1. 500
"and ratchet the whole assembly up"

Nothing wrong with your method, but I must have missed this part! :)

Great job, be proud!
:rolleyes:.. holy crap on a cracker! This guy.
I went ahead and threw it all back together, making the assumption that the o-ring was the boot band in the schematic. Everything holds oil. no leaks. on jack stands, it checks out per their specified test. On the ground, it seems ok, I guess. I drove it around my yard in forward and reverse, 2wd and 4wd.

A few thoughts. 1. Man these things are a little unsettling when they pop and ratchet. click, click, click, POP! 2. Thank God for power steering. Even with it, I noticed it would seem to bind when turning in reverse in 2wd. So much so, that I had to quit reversing, move forward a foot or two, or the steering would lock itself in whatever direction I was turning, power steering be damned. I'm not sure if that is a normal thing, or something I need to sort out on mine. I'm gonna give it some break-in time to see if things smooth out. 3. The install really wasn't that bad. About 4hr total with taking my time. I started off trying the 'one wheel' method, but I didn't like how little room I had to manipulate things, so, I pulled the passenger side stuff apart as well, which really doesn't take any time at all. Well worth it, IMO, to be able to pull the diff straight out.

I put conventional 80w-90 Valvoline gear oil back in it for now. I'll swap over to Synthetic 75w-140 when i get back from PTO.

Now I just need to get the thing out and put some miles on it.
Mine makes a clicking noise but no popping sound. Here is a short video of the sound during the wheel test.
Torq Locker Wheel Test - Ratcheting Sound
 
Last edited:
The Green Goat

The Green Goat

LGBTQ Compliance Officer -Lotta gays in this place
Lifetime Member
Supporting Member
Sep 7, 2020
2,270
16,820
113
Ohio
Ownership

  1. 520
:rolleyes:.. holy crap on a cracker! This guy.

Mine makes a clicking noise but no popping sound. Here a short video of the sound during the wheel test.
Torq Locker Wheel Test - Ratcheting Sound
I'll be curious what you think once you drive it.😉
 
Mudder

Mudder

NTC/TAP Transition Member
Lifetime Member
Oct 1, 2016
11,728
88,928
113
Georgia
Ownership

  1. Other Brand

  2. 500
OK, I'm stumped. I got mine all apart. Locker is installed in the casing, but I've got an O-ring that I can't figure out where it goes.

I think it might be what the schematic is referring to as a 'boot band' ( https://www.partzilla.com/product/honda/91302-HM7-A00?ref=d03e618a83913bf3a2c07538ca6afd7244b53ac2 ). I found it lying on the floor near the end of the driveshaft that attaches to the motor.

Per my measurements, it's about 1-11/32" (34.131mm) O.D. and 1/8" (3.175mm) thick. Which looks slightly bigger than the picture in the schematic.

Thoughts on where this might go? Does the rubber boot (part #11) have a two O-rings holding it in place? Mine only has one o-ring on the smaller side, but not one on the larger side. Perhaps that is it?

View attachment 273474
View attachment 273475
A little late but maybe #14 from my list. Rear shaft o ring.

Caution: when reinstalling the rear of the front drive shaft at engine output housing, check O ring. Also the rubber boot has tabs to pull it over the housing. Do this last when you can spin the axle during rotation test, pull boot over in sections as you rotate the shaft.
 
  • Like
Reactions: Mudwing and KyGal83
The Green Goat

The Green Goat

LGBTQ Compliance Officer -Lotta gays in this place
Lifetime Member
Supporting Member
Sep 7, 2020
2,270
16,820
113
Ohio
Ownership

  1. 520
A little late but maybe #14 from my list. Rear shaft o ring.

Caution: when reinstalling the rear of the front drive shaft at engine output housing, check O ring. Also the rubber boot has tabs to pull it over the housing. Do this last when you can spin the axle during rotation test, pull boot over in sections as you rotate the shaft.
Where does the oring go? Are there 2 Orings holding the boot on?
 
  • Like
Reactions: Mudwing
Mudder

Mudder

NTC/TAP Transition Member
Lifetime Member
Oct 1, 2016
11,728
88,928
113
Georgia
Ownership

  1. Other Brand

  2. 500
Where does the oring go? Are there 2 Orings holding the boot on?
@906UP has a good thread with photo.

B99CF835 4F38 448E B55D 689B25DF556A
 
The Green Goat

The Green Goat

LGBTQ Compliance Officer -Lotta gays in this place
Lifetime Member
Supporting Member
Sep 7, 2020
2,270
16,820
113
Ohio
Ownership

  1. 520
@906UP has a good thread with photo.

View attachment 273717
Thank you for that thread; it answered my question.

The two rings in Green were already in place, but I didn't have the one in the red circle; so that must be where my missing oring came from.

Line up shaft
 
KyGal83

KyGal83

KGB, SNS, Duchess Sheldon, Ms. Daisy, Natasha
Lifetime Member
Feb 3, 2021
9,217
90,528
113
Kentucky
Ownership

  1. 500
I'll be curious what you think once you drive it.😉
Bolt changed, everything completely back together. Took it out this evening for a short test ride. Everything working great. No binding or popping.. works great! Excited to have completed this project!

Quite an accomplishment and very Proud moment for me.
 
Fatsquatch

Fatsquatch

Approved Member
Lifetime Member
Supporting Member
Jan 30, 2018
118,226
989,190
113
Hidden
Bolt changed, everything completely back together. Took it out this evening for a short test ride. Everything working great. No binding or popping.. works great! Excited to have completed this project!

Quite an accomplishment and very Proud moment for me.
Congratulations on a successful install. What’s next on your agenda now?
 
  • Like
Reactions: Mudder and KyGal83
advertisement

About us

  • Our community has been around for many years and pride ourselves on offering unbiased, critical discussion among people of all different backgrounds. We are working every day to make sure our community is one of the best.

User Menu

Buy us a beer!

  • Lots of time and money has gone into making sure the community is running the best software, best designs, and all the other bells and whistles. Care to buy us a beer? We'd really appreciate it!

    Beer Fund!

    Club Membership!