P1000m5 Traveller II

Ac240df1c2fe35d8a8a5be85c6e90f10
 
ToddACimer

ToddACimer

Pioneer 1005-2
Lifetime Member
Oct 7, 2016
3,554
14,550
113
Oshkosh, Wi
Ownership

  1. 1000-5
I have noticed similar paint cracks on all my a-arm weld joints but nothing on the frame itself. I'm not sure how well the paint adhesion is on Honda's parts but I'm also curious if the heim joints on your a-arms carry the load into the frame and if the Honda bushings on the stock arms may absorb some of that load.
 
joeymt33

joeymt33

i4WD=imitated 4WD
Moderator
Lifetime Member
Supporting Member
Club Contributor
Mar 17, 2015
11,092
39,079
113
Guntersville, AL
Ownership

  1. 1000-3

  2. 1000-5
I have noticed similar paint cracks on all my a-arm weld joints but nothing on the frame itself. I'm not sure how well the paint adhesion is on Honda's parts but I'm also curious if the heim joints on your a-arms carry the load into the frame and if the Honda bushings on the stock arms may absorb some of that load.

The heims May have more impact but the Oem hinges don’t move freely so they are constantly pulling up and down. I’m not sure which is worse because after 3000+ miles of using these joints I can’t say I’m unsatisfied with the way the machine has held up with the abuse I have given it. Especially with my front 5” wider than stock.

Actually the Heim joints are only on the bottom and the upper is stock set up. But I have seen some paint cracking on the bottom in the past and had to re-weld those areas. But I never used any gussets. I know there have been several members of the forum tear the a-arms from the frame but I can’t remember if any of them were using stock a-arms and bushings. I know that none of them were using Heim joints.

It may be hard to tell in the close-up picture that I provided above but the Weld is pulling from the tube and there is a crack. But I’ve been wanting to strengthen up the front for a while anyway.
 
J

JTW

Guest
The heims May have more impact but the Oem hinges don’t move freely so they are constantly pulling up and down. I’m not sure which is worse because after 3000+ miles of using these joints I can’t say I’m unsatisfied with the way the machine has held up with the abuse I have given it. Especially with my front 5” wider than stock.

Actually the Heim joints are only on the bottom and the upper is stock set up. But I have seen some paint cracking on the bottom in the past and had to re-weld those areas. But I never used any gussets. I know there have been several members of the forum tear the a-arms from the frame but I can’t remember if any of them were using stock a-arms and bushings. I know that none of them were using Heim joints.

It may be hard to tell in the close-up picture that I provided above but the Weld is pulling from the tube and there is a crack. But I’ve been wanting to strengthen up the front for a while anyway.
Delton was stock... and I’m pretty sure the others have been also.
 
  • Like
Reactions: BWAF and joeymt33
joeymt33

joeymt33

i4WD=imitated 4WD
Moderator
Lifetime Member
Supporting Member
Club Contributor
Mar 17, 2015
11,092
39,079
113
Guntersville, AL
Ownership

  1. 1000-3

  2. 1000-5
Finally got done with the fixes referenced above.

For the crack that I noticed, I first stripped the paint then welded the crack and added a gusset. Thanks @snuffnwhisky for the gusset. The TIG welder had a switch acting up so flux core wire had to do.

5871488176cf20d8dac45b74c0b3d607

23d3a0486495bc1dd4a59ba52415ab59

Bc0b095463eb8d00ff675a3bd538fd52

Db9dc894b793218fef99a7f6fdc74956
 
joeymt33

joeymt33

i4WD=imitated 4WD
Moderator
Lifetime Member
Supporting Member
Club Contributor
Mar 17, 2015
11,092
39,079
113
Guntersville, AL
Ownership

  1. 1000-3

  2. 1000-5
I then moved to the other side of the upper a-arm and beefed it up some. I made a bracket that adds strength to the a-arm mount and bumper mount at the same time. The bumper mount is welded on three sides of the tube but not the long side next to the arm mount.

It’s hard to tell but the circled part shows the bumper mount not welded on the side shown. The bracket shown is one part of the new piece
F57f5dd5145d8b8be15245f5efed5331

I added these two pieces and then tacked them together then removed them to be welded front and back.
A504fddb36000d5193b07361956bf30c

Here’s the assembled piece
B34eed64c6e446f1f29f418a1c0b340a

Now installed and painted
Dad9aa06c4222174d744669b872f60dd

Btw, it was welded in place also
Ff9a521479feaf60c8f97c1f1652c8dd
 
joeymt33

joeymt33

i4WD=imitated 4WD
Moderator
Lifetime Member
Supporting Member
Club Contributor
Mar 17, 2015
11,092
39,079
113
Guntersville, AL
Ownership

  1. 1000-3

  2. 1000-5
The lower a-arm is strong in the back but the front of it can be a weak point too. I’ve had to weld stress cracks in the past on both sides. Snuff showed me the modification he did and I copied it.

0ba6a5e695b73b44decda92aa5888aaf

Defab543ff40dd38b7889867b90d842f

Fd6e2101ca972f7629176f75965c11f9

40bd4715c7c99296c4db0fb515604979
 
joeymt33

joeymt33

i4WD=imitated 4WD
Moderator
Lifetime Member
Supporting Member
Club Contributor
Mar 17, 2015
11,092
39,079
113
Guntersville, AL
Ownership

  1. 1000-3

  2. 1000-5
Lastly, I changed the shock location in front to allow more compression stoke and less total droop. This will allow me to run the shocks softer (compression knob) with the increase in up travel and less bottoming the shocks out. I can also increase the spring rates for more stability with out raising it higher. And the last benefit is I can now remove the limit straps.
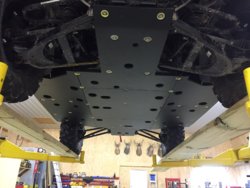
CATVOS stock
0114d5fbb3e58e1e168b1f0bc9f72475

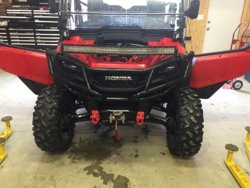
New tabs below the original
4196f33edafdc2f1a55c1de42755b0a7

The TIG decided to work this time
A7c34141cb10f706fb0cb8ae0aac54cd

Why run to Lowe’s for black paint when I’ve got some wrinkle finish? Now one side is semi gloss and one side is wrinkle
352611206a43d59a1131b933ae34bbaa


Oh yeah, I almost forgot that the upper a-arm bolts are now upgraded to 12.9 grade thanks to @ohanacreek sending these to me. I remember when @Hondasxs broke one of these.
B5aca6e3009a15416b78a9ff2636bac6
 
Neohio

Neohio

Beast of the East
Lifetime Member
Supporting Member
Club Contributor
Dec 22, 2016
13,330
64,719
113
Painesville Ohio
Ownership

  1. 1000-5
@joeymt33 Did you use the same washer @ohanacreek used to repair his elongated holes?
 
  • Like
Reactions: sharp and BWAF

Similar threads

Hometeam
Replies
18
Views
1K
Hometeam

About us

  • Our community has been around for many years and pride ourselves on offering unbiased, critical discussion among people of all different backgrounds. We are working every day to make sure our community is one of the best.

User Menu

Buy us a beer!

  • Lots of time and money has gone into making sure the community is running the best software, best designs, and all the other bells and whistles. Care to buy us a beer? We'd really appreciate it!

    Beer Fund!

    Club Membership!