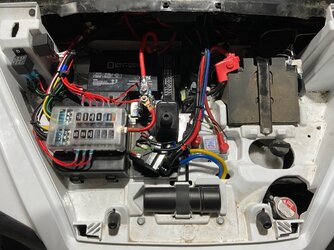
P1000 True Dual battery system

RobSparre

RobSparre

Well-Known Member
Lifetime Member
Supporting Member
Oct 6, 2020
139
453
63
West Chester, PA
Ownership

  1. 1000-5
I actually ordered (and received) one of the larger blocks (12 fuse like @RobSparre got with the LED indicator for blown fuse) as well as a 6 fuse version of a very similar one. It should be small enough to install where Rob said (in his video) might be a good place for a smaller fuse box. If it works out, I'll just order a second one to mount on the other side and not worry about mounting the larger fuse box on the air filter top.
Scoop - Totally agree with this - I love the 12 position block I got, even though I thought it was overkill and a mistake in the video at the time. Since then I am up to about 8 or 9 circuits already. I may end up adding a 2nd smaller block like you guys are talking about for always on power, but so far have not needed it. But need and want are two different things and we just kain't stop fiddling with this stuff now can we?
 
  • Like
Reactions: Lady01 and ChadD
Scoop

Scoop

Well-Known Member
Lifetime Member
Supporting Member
Sep 7, 2021
5,239
20,716
113
Michigan
Ownership

  1. Other Brand

  2. 1000-5

  3. Talon R LV
Scoop - Totally agree with this - I love the 12 position block I got, even though I thought it was overkill and a mistake in the video at the time. Since then I am up to about 8 or 9 circuits already. I may end up adding a 2nd smaller block like you guys are talking about for always on power, but so far have not needed it. But need and want are two different things and we just kain't stop fiddling with this stuff now can we?
For sure. The smaller 6 position block I (also) bought fits perfectly over on the left side (red arrow, green circle). I just don't have a need for it yet.

I've since added a few more things (e.g., stereo, USB 3.0 dual charger, etc.) that aren't in this pic.

For always on power, I've added one item directly to my positive bus bar (that USB 3.0 dual charger), but it has it's own on-off switch on it's face and an inline fuse that I just left.

Oh, and I was able to get that 12v key-on adapter from the Club store installed inline with the 12v socket by reaching up through the wheel well. I guess my arms were just a little longer than yours. :)

1637202626328
 
RobSparre

RobSparre

Well-Known Member
Lifetime Member
Supporting Member
Oct 6, 2020
139
453
63
West Chester, PA
Ownership

  1. 1000-5
For sure. The smaller 6 position block I (also) bought fits perfectly over on the left side (red arrow, green circle). I just don't have a need for it yet.

I've since added a few more things (e.g., stereo, USB 3.0 dual charger, etc.) that aren't in this pic.

For always on power, I've added one item directly to my positive bus bar (that USB 3.0 dual charger), but it has it's own on-off switch on it's face and an inline fuse that I just left.

Oh, and I was able to get that 12v key-on adapter from the Club store installed inline with the 12v socket by reaching up through the wheel well. I guess my arms were just a little longer than yours. :)

View attachment 305046
I ended up putting my winch contactor in that spot where you are planning to put the 6 position block. I see you put your fuse box on top of the aux battery. I am thinking that might have been an easier solution than I did. I am also having some bus bar envy - yours is way better than my cheap-ass bars.
 
  • Like
Reactions: Lady01
Scoop

Scoop

Well-Known Member
Lifetime Member
Supporting Member
Sep 7, 2021
5,239
20,716
113
Michigan
Ownership

  1. Other Brand

  2. 1000-5

  3. Talon R LV
I ended up putting my winch contactor in that spot where you are planning to put the 6 position block. I see you put your fuse box on top of the aux battery. I am thinking that might have been an easier solution than I did. I am also having some bus bar envy - yours is way better than my cheap-ass bars.
My winch contactor is over on the right side in front of the negative bus bar.

I actually started out doing what you did with the fuse block and air box, but abandoned it when that battery and a nice fat slice of Velcro looked too enticing to pass up.

I also used the Velcro to mount my TrueAM isolator where it is in that picture -- I wanted to leave that larger spot open for something else (plus, I'm OCD and try to organize as much as I can), and I think I know what I'm putting there: A NOCO Genisu2D direct mount 2A battery charger and then installing the companion NOCO outlet receptacle somewhere on the body. That way, I don't have to remove the hood to charge. I can just pop the plug cover, plug a regular extension cord right into the receptacle and leave it charging 24x7x265.

One note on that - I know I commented elsewhere (your YouTube video?) about my isolator being marked "MAIN" and "AUX". You said in your video it didn't matter which side you hooked the batteries to and that your isolator was NOT marked like mine. Well, I'll tell you what I noticed: I plugged my trickle charger up and connected it to the AUX battery yesterday. When I went out there this evening, I noticed that the AUX battery was up to around 12.8V (from 12.2V the night before), but the MAIN battery was still down at 12.3v -- the same as it was last night. The blue light was NOT lit up. So the isolator did NOT kick over to charge the MAIN battery (aka connect the batteries in parallel mode). Not sure if that's because the AUX was only at 12.8v (and I think the isolator is looking for 13.3v or something), but I'm wondering if it's because I had the charger on the AUX battery and not the MAIN battery. I changed it around, so we'll see tomorrow what happens.

Did you see that right angle drill accessory I used to drill the hole in the frame for the regulator? I also reused that quick connector (holding the body to the frame) on the other end. That relay is as solid as a rock and not going anywhere.

If you get those Recoil bus bars, just be careful tightening up the screws when adding accessories. They strip out more easily than I expected. So they are kinda cheap-ass, too, but they are red cheap-ass and black-cheap ass ... :D
 
  • Like
Reactions: Lady01
Scoop

Scoop

Well-Known Member
Lifetime Member
Supporting Member
Sep 7, 2021
5,239
20,716
113
Michigan
Ownership

  1. Other Brand

  2. 1000-5

  3. Talon R LV
Hey, @RobSparre - These bus bars are still the Recoil brand, but they have more of the M5 studs (4 vs 2) and fewer of the Phillips screens that stripped out (3 instead of 5). You might want those instead (sturdier M5 studs).

They also have some nice ones here that indicate they are made in the US, but a few dollars more. Might be worthy? They appear to be a little longer.
 
bumperm

bumperm

Well-Known Member
May 7, 2021
1,912
6,799
113
Gardnerville, NV
Ownership

  1. 1000-5
A NOCO Genisu2D direct mount 2A battery charger and then installing the companion NOCO outlet receptacle somewhere on the body. That way, I don't have to remove the hood to charge. I can just pop the plug cover, plug a regular extension cord right into the receptacle and leave it charging 24x7x265.
Instead of permanently installing a trickle charger, I used a different approach, installing a Powerlet socket (with weather cover) on the front to the right of the grill. I can connect my battery charger to that jack by adding a Powerlet plug to the charger cord. This then allows the Powerlet socket to be doubly useful, both for charging batteries and to provide power outside for 12 volt accessories such as an air pump etc. Even a small inverter for AC power (short term of course). One could also use a folding PV panel to charge the batteries if desired.

I've standardized on Powlet plugs as they provide reliable connections and low loss. They are also called BMW plugs, Bosch Plugs, and John Deere tractors used to use them too (don't know if they still do). First ran into them on German gliders.
 
Scoop

Scoop

Well-Known Member
Lifetime Member
Supporting Member
Sep 7, 2021
5,239
20,716
113
Michigan
Ownership

  1. Other Brand

  2. 1000-5

  3. Talon R LV
Instead of permanently installing a trickle charger, I used a different approach, installing a Powerlet socket (with weather cover) on the front to the right of the grill. I can connect my battery charger to that jack by adding a Powerlet plug to the charger cord. This then allows the Powerlet socket to be doubly useful, both for charging batteries and to provide power outside for 12 volt accessories such as an air pump etc. Even a small inverter for AC power (short term of course). One could also use a folding PV panel to charge the batteries if desired.

I've standardized on Powlet plugs as they provide reliable connections and low loss. They are also called BMW plugs, Bosch Plugs, and John Deere tractors used to use them too (don't know if they still do). First ran into them on German gliders.
Yea, we used those for many years back when I was doing a lot of road miles on 2 wheels. Also used the BatteryTender dongles in a similar fashion. I was looking to going this way because I like the idea of needing nothing more than a standard 110v extension cord versus something with a transformer. Who knows, maybe I'll change my mind. Thanks for the suggestion.
 
  • Like
Reactions: Lady01
advertisement
RobSparre

RobSparre

Well-Known Member
Lifetime Member
Supporting Member
Oct 6, 2020
139
453
63
West Chester, PA
Ownership

  1. 1000-5
Did you see that right angle drill accessory I used to drill the hole in the frame for the regulator? I also reused that quick connector (holding the body to the frame) on the other end. That relay is as solid as a rock and not going anywhere.

If you get those Recoil bus bars, just be careful tightening up the screws when adding accessories. They strip out more easily than I expected. So they are kinda cheap-ass, too, but they are red cheap-ass and black-cheap ass ... :D
I did see that drill - I replied to that post, but you being a chatty-kathy and all I can't keep up with where that was. You are everywhere. I definitely gotta get one of those drills. If you were really a friend you would have showed me that before I started the project.

I will have to wait until the next vehicle to get the better bus bars No way I am getting in there with my fat fingers to redo all that!
 
  • Like
Reactions: Lady01
RobSparre

RobSparre

Well-Known Member
Lifetime Member
Supporting Member
Oct 6, 2020
139
453
63
West Chester, PA
Ownership

  1. 1000-5
Oh, and I was able to get that 12v key-on adapter from the Club store installed inline with the 12v socket by reaching up through the wheel well. I guess my arms were just a little longer than yours. :)
It's actually even easier than that. Mr. HondaSxS hisself point out what an idjut I am by reminding me that, once the hole for the switch plate is drilled out, it's super easy to reach through that hole and voila, it's right there. Sigh....
 
  • Like
Reactions: Lady01
StewB

StewB

Well-Known Member
Jan 2, 2021
745
3,461
93
Utah
Ownership

  1. 1000-5
For sure. The smaller 6 position block I (also) bought fits perfectly over on the left side (red arrow, green circle). I just don't have a need for it yet.

I've since added a few more things (e.g., stereo, USB 3.0 dual charger, etc.) that aren't in this pic.

For always on power, I've added one item directly to my positive bus bar (that USB 3.0 dual charger), but it has it's own on-off switch on it's face and an inline fuse that I just left.

Oh, and I was able to get that 12v key-on adapter from the Club store installed inline with the 12v socket by reaching up through the wheel well. I guess my arms were just a little longer than yours. :)

View attachment 305046

My set up is fairly similar (my circuit breaker, relays and 6 tap bus are on the passenger side like yours), but I'm missing where you have the fuse/breaker on the main winch positive from the battery to the contactor. Are you doing it on the negative through the 3 - Cole Hersee 65A?

IMG 2211

I have my Superwinch Terra 45 contactor on the driver's side, right where you do.
The winch fuse/breaker (that came with the winch for the positive to the battery) is inside the black cover box that I wrapped in two straps of red tape (right under the blue winch wire). I just let the cover box float free because the heavy-gauge wire and the nylon wire clip screwed into the plastic immediately right of the box basically suspend it as an inline fuse.
So my dual battery (a Mighty Maxx like yours) powers through the inline fuse/breaker to the contactor for the heaviest of loads-winching.
I absolutely don't know, but do you want/need a fuse/breaker between the battery and the winch contactor?

Best,
StewB

PS: I thought about it for a while, but decided to mount my True Isolator in the open spot - the spot you kept open for your next necessity.
 
  • Like
Reactions: Lady01
W

Wyo307

Active Member
Oct 2, 2021
25
101
28
Wyoming
Ownership

  1. Looking to buy

  2. 1000-3
Here is mine to use as reference. I am also running the mighty max battery which has been great so far. I have filled the remaining spots in my secondary fuse block over the past week since this picture was taken but a lot of those are kind of redundant and not needed, I also have a lot of accessories lol.

6
 
  • Like
Reactions: Lady01
Scoop

Scoop

Well-Known Member
Lifetime Member
Supporting Member
Sep 7, 2021
5,239
20,716
113
Michigan
Ownership

  1. Other Brand

  2. 1000-5

  3. Talon R LV
It's actually even easier than that. Mr. HondaSxS hisself point out what an idjut I am by reminding me that, once the hole for the switch plate is drilled out, it's super easy to reach through that hole and voila, it's right there. Sigh....
Yea, I saw that before I did mine, but I wanted to do it the hard way, just to find out HOW difficult it was. LOL.
 
Scoop

Scoop

Well-Known Member
Lifetime Member
Supporting Member
Sep 7, 2021
5,239
20,716
113
Michigan
Ownership

  1. Other Brand

  2. 1000-5

  3. Talon R LV
My set up is fairly similar (my circuit breaker, relays and 6 tap bus are on the passenger side like yours), but I'm missing where you have the fuse/breaker on the main winch positive from the battery to the contactor. Are you doing it on the negative through the 3 - Cole Hersee 65A?

The only things connected to the main OEM battery are the vehicle positive and negative terminals (as delivered by Honda) and a newly added single cable connecting the positive post to the "MAIN" side of the TrueAM isolator. That battery is dedicated to starting and running the vehicle only -- no added accessories.

The AUX battery powers every accessory. It has three wires directly connected to the positive post:
  • The cable going to the "AUX" side of the isolator
  • The main power cable going to the winch contactor
  • The main power cable that feeds the Cole Hersee relay
I also tapped off of the live side of the Cole Hersee relay to feed the always-on (unswitched 12v) positive bus bar (red bus bar on the passenger side). That was easier than trying to add a fourth thick cable to the positive post on the AUX battery. The other side of the relay feeds the 12 position fuse box.

The negative post on the AUX battery has two connections:
  • The spare OEM frame negative cable (that was originally wrapped up and laying over by the MAIN battery)
  • The cable going to the negative bus bar (black) on the driver's side.
Other than the above, everything (that needed 12v positive or negative ground) is connected directly to the positive bus bar (unswitched 12v), negative bus bar or to the key-on (switched 12v) fuse box. After all, that's one of the primary reasons for adding both bus bars and a fuse block - to avoid a Christmas tree of wires and bunch of inline fuses attaching directly to the battery posts/terminals.

In my pictures, it almost looks like the main winch positive cable (with that big black inline fuse box) is connected to the positive post on the MAIN battery ... but it's not. It runs just past that positive terminal to underneath the dash and is connected to the positive post on the AUX battery.

I absolutely don't know, but do you want/need a fuse/breaker between the battery and the winch contactor?

The thick positive winch cable that came with my winch has a fusible link built into it - that's the cable runs from the AUX positive post to the winch contactor. The key-on lead on the contactor is connected to the 12v switched fuse block, so it only commands the contactor to allow power to flow from the battery to the winch if the key is on. That said, if your cable from the positive battery (or bus bar) to the positive lead on the winch contactor does NOT have a fuse or fusible link, you should add one.

PS: I thought about it for a while, but decided to mount my True Isolator in the open spot - the spot you kept open for your next necessity.
Almost did that (like everybody else). Then I decided that I didn't want to be like everybody else. Well, that and my mild CDO - CDO is like OCD, but the letters are all in the right #$%^ order! :)
 
StewB

StewB

Well-Known Member
Jan 2, 2021
745
3,461
93
Utah
Ownership

  1. 1000-5
Almost did that (like everybody else). Then I decided that I didn't want to be like everybody else. Well, that and my mild CDO - CDO is like OCD, but the letters are all in the right #$%^ order! :)
Understand now your fuse positive. Your order seems to be in the right sh_t. :cool:
 
  • Like
Reactions: Lady01
bumperm

bumperm

Well-Known Member
May 7, 2021
1,912
6,799
113
Gardnerville, NV
Ownership

  1. 1000-5
I absolutely don't know, but do you want/need a fuse/breaker between the battery and the winch contactor?

Best,
StewB

It's common to install the winch contactor direct to battery, no fuse. My new 1000-5 SE came from the factory wired that way.

There are almost 1.5 billion vehicles in the world. Most all have their starter motor wired directly to the battery.
 

About us

  • Our community has been around for many years and pride ourselves on offering unbiased, critical discussion among people of all different backgrounds. We are working every day to make sure our community is one of the best.

User Menu

Buy us a beer!

  • Lots of time and money has gone into making sure the community is running the best software, best designs, and all the other bells and whistles. Care to buy us a beer? We'd really appreciate it!

    Beer Fund!

    Club Membership!