P500 Buckets in a P5

trigger

trigger

Old Ironsides
Vendor
Lifetime Member
Supporting Member
Feb 13, 2016
23,946
178,901
113
Bay City, Michigan
www.quickshieldutv.com
Ownership

  1. 500
Hey @trigger, the Popo seats have a fairly flexible frame.
The frame adds to the comfort of the seat as the seat back is not stiff when your body slams in to it.
Something to consider when mounting, allow some space for the back to move or add a cushion for it to stop against.

You might consider bolting a seat down to something solid and testing how much movment you need.
Food for thought.

Personally I was considering what parts of the seat frame / ROPS might need to be re-located to allow the seat to fit where I want it.
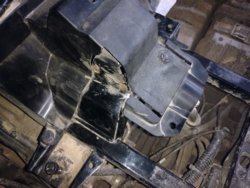
The cross bracing behind the bench seat back needs to tip out of the way to the rear - sacrificing cargo space.
I like the idea of the Talon seats but I can see the supply of RZR seats is pretty good. (Seat cover is a great idea to remove the embroiderd name)
But I need to pick a seat first before I get serious about cutting metal.

Lol, you're right, picking the seat is the hardest part!
I didn't find moving it back any further as an issue. Again I'm trying to keep all factory set seat angles the same and I was able to get the front of the seat bottom flush to the plastics, maybe even back a little. The seat back ended up about a 1/2" from hitting the empty head rest area, but I drew that out of it when fastening it back. Figured it would rattle and drive me nuts. Could put a rubber spacer there and I think I will, good idea @lee !
Moving it down would be the only thing worth cutting anymore than I have and that would be involved, especially keeping the seats easily removable. It can be done but would also remove a layer of protection that I'm not willing to sacrifice. I have my second battery under the driver's seat and the gas tank's on the other side, for the little it's moved me up I just can't justify it.
 
trigger

trigger

Old Ironsides
Vendor
Lifetime Member
Supporting Member
Feb 13, 2016
23,946
178,901
113
Bay City, Michigan
www.quickshieldutv.com
Ownership

  1. 500
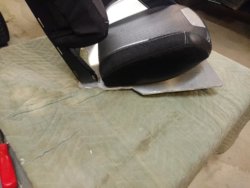
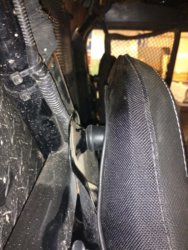
Passenger side is set now too and had to notch plastics for it as well. I adjusted the backs down, which shouldn't make any difference in how high you sit but for some reason feels lower and better. It's not bad at all and i like it. I am going to put rubber bumpers behind the headrest area and need to fine tune the anchoring points. All edges are rounded off and everything will be painted up before it's done but here's some initial pics.

Seat Front
Seat Notched
Seat Headrest Gap
 
C

Chooglin

Guest
Passenger side is set now too and had to notch plastics for it as well. I adjusted the backs down, which shouldn't make any difference in how high you sit but for some reason feels lower and better. It's not bad at all and i like it. I am going to put rubber bumpers behind the headrest area and need to fine tune the anchoring points. All edges are rounded off and everything will be painted up before it's done but here's some initial pics.

View attachment 138868 View attachment 138869 View attachment 138870
Looks great
 
  • Like
Reactions: trigger
Backwoods

Backwoods

Ambassador of Crocs / Speaker of truth & facts /
Lifetime Member
Mar 2, 2018
35,248
357,933
113
Douglasville ga
Ownership

  1. 700-2
Those seats are nice . It will be a lot more comfortable on those long rides. I like them.
 
trigger

trigger

Old Ironsides
Vendor
Lifetime Member
Supporting Member
Feb 13, 2016
23,946
178,901
113
Bay City, Michigan
www.quickshieldutv.com
Ownership

  1. 500
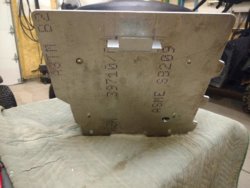
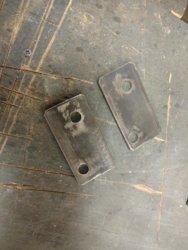
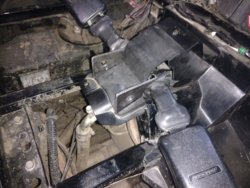
Well they're done as far as fit and function anyway. Now I have to strip it all down and prep and paint everything. Used a lot of aluminum, great on weight but sucks to paint properly. I'm pretty happy with how it turned out, they feel good and aren't going anywhere. Used 1/4" aluminum for the bottom, made patterns from paper then transferred and cut. They fit tight so they can't move. Used steel angles to hook it under the front rail in factory location.
Seat Underside Seat Side

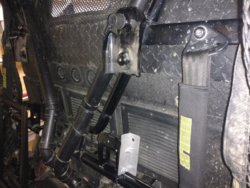
Put rubber bumpers on old headrest brackets, even used the factory bolts.
Seat In

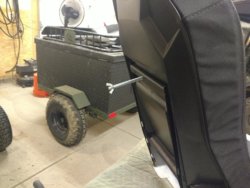
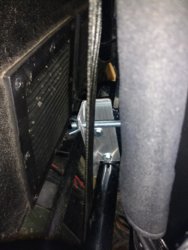
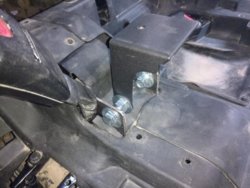
When it came to mounting the back, I tried Jay Man's turnbuckle attachment idea and it sucked for me. The eyebolt doesn't sit right in the seat frame and the angles were wrong to function easy. Also cinching it up wasn't very comfortable so I took a different route. Made brackets and fastened them at the correct angle to the seat, then drilled and put a 3/8" bolt through the seat frame, went straight through the bracket and cinch them up with wing nuts. Just pull the wingnut and the seat will lift out.
Seat Bracket and Stop Seat Back Bolt Seat In 1
Just need to fine tune my shield, order seat covers and buy one of Chooglin's consoles now. :)

Seats Done 1


PS. Don't know if you can tell in the pics but there are no square edges here, everything was rounded over and ground smooth. Sharp metal and upholstery just doesn't go together. ;)
 
Last edited:
Smitty335

Smitty335

Well-Known Member
Lifetime Member
Supporting Member
Oct 3, 2016
35,445
208,726
113
NWA Arkansas
Ownership

  1. 1000-3

  2. 1000-5
Well they're done as far as fit and function anyway. Now I have to strip it all down and prep and paint everything. Used a lot of aluminum, great on weight but sucks to paint properly. I'm pretty happy with how it turned out, they feel good and aren't going anywhere. Used 1/4" aluminum for the bottom, made patterns from paper then transferred and cut. They fit tight so they can't move. Used steel angles to hook it under the front rail in factory location.
View attachment 139136 View attachment 139144

Put rubber bumpers on old headrest brackets, even used the factory bolts.
View attachment 139140

When it came to mounting the back, I tried Jay Man's turnbuckle attachment idea and it sucked for me. The eyebolt doesn't sit right in the seat frame and the angles were wrong to function easy. Also cinching it up wasn't very comfortable so I took a different route. Made brackets and fastened them at the correct angle to the seat, then drilled and put a 3/8" bolt through the seat frame, went straight through the bracket and cinch them up with wing nuts. Just pull the wingnut and the seat will lift out.
View attachment 139141 View attachment 139143 View attachment 139142
Just need to fine tune my shield, order seat covers and buy one of Chooglin's consoles now. :)

View attachment 139145

PS. Don't know if you can tell in the pics but there are no square edges here, everything was rounded over and ground smooth. Sharp metal and upholstery just doesn't go together. ;)
Looks trick!
 
advertisement
trigger

trigger

Old Ironsides
Vendor
Lifetime Member
Supporting Member
Feb 13, 2016
23,946
178,901
113
Bay City, Michigan
www.quickshieldutv.com
Ownership

  1. 500
No triggershield. Unbelievable! Lol


Sent from my iPad using Tapatalk

It's coming, need to put in a couple more cuts. Ordered the console from Choog last night, also ordered some star handled wingnut type things, they look nicer and will function easier. Just ordered the seat covers too, cha ching! :eek:
 
bowhunterbill

bowhunterbill

Well-Known Member
May 31, 2019
420
1,300
93
Bozeman, MT
Here’s a suggestion for painting the aluminum. I’ve used a clear, automotive primer intended for plastic bumpers on shotguns, a duck hunting mountain bike and other hunting projects. Krylon camo adheres to it and does not scratch off.

I don’t have the can now for a brand, but stores that specialize in automotive paints (in can for a spray gun) should carry it.

Nice work.


Sent from my iPhone using Tapatalk
 
  • Like
Reactions: trigger
trigger

trigger

Old Ironsides
Vendor
Lifetime Member
Supporting Member
Feb 13, 2016
23,946
178,901
113
Bay City, Michigan
www.quickshieldutv.com
Ownership

  1. 500
Here’s a suggestion for painting the aluminum. I’ve used a clear, automotive primer intended for plastic bumpers on shotguns, a duck hunting mountain bike and other hunting projects. Krylon camo adheres to it and does not scratch off.

I don’t have the can now for a brand, but stores that specialize in automotive paints (in can for a spray gun) should carry it.

Nice work.


Sent from my iPhone using Tapatalk

Thanks Bill. I've actually done it several times on other aluminum projects. The whole piece has to be sanded with 3M Scotch Brite pads, the red ones. Can't touch it with your fingers either. Wipe it down with rubbing alcohol and you then have 15 minutes to get a primer on it. I use Self Etching Primer, once you've done this you can top coat it with anything you want. It's involved but have never had anything peel afterward.
 
trigger

trigger

Old Ironsides
Vendor
Lifetime Member
Supporting Member
Feb 13, 2016
23,946
178,901
113
Bay City, Michigan
www.quickshieldutv.com
Ownership

  1. 500
My Chooglin console showed up yesterday. I knew it wasn't going to be a bolt it right in thing for me so had to figure out a way to make it work. First off, this thing's BA! I saw Choog's at the Takeover but his is yellow and this one's mine sooo...:D
The side bolsters on the buckets stick out farther than the stock seat so I had to push it towards the front more than Choog's design. Also, the height is set to ride above the stock seat but the bolsters on the seat bottoms of the buckets sit higher so I had to move it up a little more than designed. This is what I came up with and it works great for my situation...

Made two brackets out of 1/8" x 2" flat stock, cut them 4" long and drilled 1/2" holes for the seat belt latches.
Console Brackets
Had to notch two 1/8" slots in the plastic so they sit flat against the frame underneath.
Console Cuts
Installed those, put the seats in and positioned the console right where I wanted it and marked where Choog's bracket holes were.
Console with Latches
Noticed about 3 yrs ago that the passenger side seating area is slightly smaller in width, have always dealt with that and installing these buckets was no exception. After lining everything up as much as possible, you're still left slightly off center between the two. Now, not only did I need to move the console forward and up but side to side as well. Took measurements and used back nuts to place it where I needed it to be.
Console Bracket
Installed the Choog bracket and adjusted accordingly. Reinstalled the seats, put the box on the bracket and tightened her down. This thing is nice and glad I took this route as opposed to making my own. It holds more than it appears in pics, is lockable, has a rubber seal, powder coated black and sits right where I want it, perfect!
Console Installed

Can't stand raw metal so everything has been stripped down and is under paint. Posted this trying to be patient and let things dry properly...not my strong suit. :rolleyes:
 
Last edited:
C

Chooglin

Guest
My Chooglin console showed up yesterday. I knew it wasn't going to be a bolt it right in thing for me so had to figure out a way to make it work. First off, this thing's BA! I saw Choog's at the Takeover but his is yellow and this one's mine sooo...:D
The side bolsters on the buckets stick out farther than the stock seat so I had to push it towards the front more than Choog's design. Also, the height is set to ride above the stock seat but the bolters on the seat bottoms of the buckets sit higher so I had to move it up a little more than designed. This is what I came up with and it works great for my situation...

Made two brackets out of 1/8" x 2" flat stock, cut them 4" long and drilled 1/2" holes for the seat belt latches.
View attachment 139692
Had to notch two 1/8" slots in the plastic so they sit flat against the frame underneath.
View attachment 139693
Installed those, put the seats in and positioned the console right where I wanted it and marked where Choog's bracket holes were.
View attachment 139694
Noticed about 3 yrs ago that the passenger side seating area is slightly smaller in width, have always dealt with that and installing these buckets was no exception. After lining everything up as much as possible, you're still left slightly off center between the two. Now, not only did I need to move the console forward and up but side to side as well. Took measurements and used back nuts to place it where I needed it to be.
View attachment 139695
Installed the Choog bracket and adjusted accordingly. Reinstalled the seats, put the box on the bracket and tightened her down. This thing is nice and glad I took this route as opposed to making my own. It holds more than it appears in pics, is lockable, has a rubber seal, powder coated black and sits right where I want it, perfect!
View attachment 139697
Can't stand raw metal so everything has been stripped down and is under paint. Posted this trying to be patient and let things dry properly...not my strong suit. :rolleyes:
@trigger that is genius, excellent job on making the brackets to work with the bucket seats............I knew you would come up with something!!!
 
advertisement

About us

  • Our community has been around for many years and pride ourselves on offering unbiased, critical discussion among people of all different backgrounds. We are working every day to make sure our community is one of the best.

User Menu

Buy us a beer!

  • Lots of time and money has gone into making sure the community is running the best software, best designs, and all the other bells and whistles. Care to buy us a beer? We'd really appreciate it!

    Beer Fund!

    Club Membership!