Just curious if anyone would be interested in a template for their skid plate. I have drawn it in CAD and am thinking I could make it available as a PDF that you could send to your local office depot or printing store, so long as they have a 36" wide plotter, and have it printed all as one piece as a banner.
It is a three piece design with the seams running front to back. One large piece to cover the belly and two small pieces to cover the rock rails if you want them. It can be made from a single 4' x 8' sheet of UHMW or whatever other material you choose. I ordered a piece of 1/2" UHMW that I am picking up on Monday in order to test the template and make sure my measurements were all good.
To mount the large belly piece you can reuse the factory hardware (I will need longer bolts), plus an additional 4 bolts and washers and one 1" spacer (nylon or brass I suppose will work fine). For the side pieces you will have to order some more cup washers and either rivnuts or self tappers.
Let me know if anyone is interested and I'll take the next step. Otherwise I'll make mine and be done LOL...
UPDATE - skid plate template is ready for release!
The template file in PDF is attached at the bottom of this post. Message me on HondaSXS.com or email at [email protected] and I can send other file formats if you need them (*.DXF *.DWG etc).
All you need is a 4'x8' sheet of material, jig saw, 1" spade bit, drill, maybe a circular saw, scissors, and a sharpie. You will need fourteen longer M6x1.0 bolts (I used 30mm) and two significantly longer bolts for the locations which require the spacers (I used 60mm). You will also need four M10x1.25 bolts with about a 30mm length and four fender washers to go with them. I purchased all this hardware at Lowes, in stainless. If you opt to install the two optional bolts near the front of the frame you will need two additional cup washers from Honda (50403-HL3-A00) as well as two long M6x1.0 bolts with nuts and regular washers. These two bolts are not in factory locations and require you to drill a small 1/4" clearance hole in the sheet metal gusset in the frame. Sorry for the long write-up, but here it is:
I finally got around to finishing up the template and am ready to email it out to anyone who wants it. To recap, it is a single PDF file that can be printed at your local office depot or anywhere that has a 36" wide format printer. My local office depot printed mine and it was $18. The PDF is 36" by 144" (or 12'). It can be printed in black and white to save money (the line weights are different and will make the print decipherable even in b&w). When setting up the print you need to ensure that any option which reads "print to 'original size', 'original scale' or '1:1'" should be used; anything that reads something to the affect of "scaled to fit" should not be used.
It is crucial that the template is printed to the exact scale I have provided, otherwise it will be completely worthless. Just for this reason I have included a small portion of a ruler which will print out on each end of the template. This way, no matter which end of the template comes out first, the person printing the template can check with a ruler if the printed measurements align with their ruler. If they do not, they can go ahead and cancel the print and try again. After it is all printed out, you should check with a tape measure to ensure that the total length of the main belly skid is exactly 93" long and 30" wide. Again, if the measurements are not accurate then throw the template away; if you use it, you will be wasting your sheet of skid plate material. If the template measures correctly then proceed
Step 1 - Get some saw horses so you don't break your back... too bad.

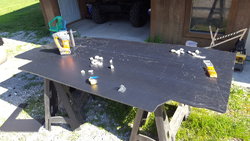
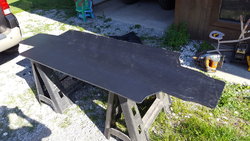
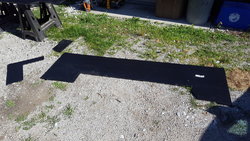
Step 2 - Unroll your template and check the measurements to see if the high school kid at office depot followed your instructions correctly. In the pictures it appears that my measurements do not line up. I assure you they did, the angle is bad in the pictures. These need to be spot on, otherwise the person printing used the wrong setting and the template is trash LOL.


Step 3 - Cut out the paper template and tape it to your material. I chose 1/2" thick UHMW in a 4' x 8' sheet. This is enough material to cover the entire bottom of the machine. My other choice was a 4'x10' sheet of 3/8" thick. The price was only a couple dollars more for the smaller sheet of 1/2", so I went this route.
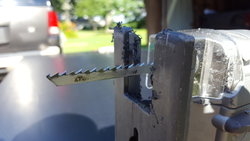
Step 4 - I traced the outline of the template to the material with a silver sharpie, then cut it out with a jig saw and a fast cut blade meant for wood. With a little orbital action this setup cut like butter. I have included center marks for all the radii and their measurements, in case you would like to drill them out and then connect all the holes with straight cuts. I found the jig saw cut the curves very easily and was very fast. Keep in mind, no part of the outline has to be exactly perfect. There is a huge fudge factor available here. The only critical part of this whole thing is the distance between all the mounting holes. Which brings us to the next step.

Step 5 - Tape the template back down to your cut out skid plate. Then use a 1" or 1-1/8" spade bit to start each of the mounting holes by drilling through the paper template and into the skid plate material. Just mark the holes at this point. You can remove the paper template to finish drilling them, this way you won't accidentally snag the paper template and tear it or move it out of alignment. You need to get all of these holes started/marked without moving the template at all. Like stated before, this is the only critical part of the whole process so make sure the template doesn't move while starting/marking these holes.

The factory skid plate holes are a little over 1-1/8". You can use this size if you like or you can use a 1" diameter spade bit like I did. By using the 1" I did not have as much wiggle room to move the fasteners around in the holes and consequently had to chew a little material out on two of the holes to get the cup washers to lay completely flat in the hole like they are meant to. Barely any material had to be removed, I just let a drill bit rub the inside of the hole for a second and that's all it needed. I did make adjustments on the final version of the skid plate template however, so I don't believe you will have this issue.
Step 6 - I then used a jig saw to cut out the drain plug slots and holes. I debated back and forth on the exhaust cut outs and ultimately chose to cut them out per the factory design. It is extremely hot where I ride in the summer and we do a lot of slow technical in the woods with no air flow. I have included all the factory drain and vent locations/designs on the skid plate; you chose which ones and how you want to cut them out.

There are two options on the skid plate for the front corners near the front tires. One option is like the picture above and is meant to have the corners bent upwards at a 45 degree angle. The other option is to remove more of the skid plate material and have the plate simply lay flat and follow the contour of the frame. I originally had it cut for the "bending" option, but after realizing it was going to be a pain to bend this 1/2" UHMW, I went ahead and cut it off to the second option.
At this point you are basically done. There are a couple other things you may want to do though. I have included on the template the location of a relief cut to help the front of the skid plate bend upwards. This cut should be approximately 1/2 the thickness of the material and 2 saw blades wide, and made on the top side of the skid plate so the bottom side remains smooth. Please don't make the mistake of cutting this slot on the bottom side...

In the below picture you can see at this point I had made the decision to cut out the exhaust vent holes. On the template I have modified them from the OEM design to include a little additional material around the one mounting bolt location. At this point I had also decided that bending the material was going to be really hard to do and had cut the front of the template with the second option to just lay flat and follow the frame.

Also, just to make it a little cleaner, I used a 1/4" round over bit in the trim router to really make it fancy LOL. You DO NOT want to round over the mounting bolt holes, leave these squared off.


And Lastly, there are two mounting holes that I have indicated on the template which need spacers between them and the frame. One will require approximately 1/2" spacer, and the other a 1" spacer. I just used scrap UHMW to make spacers, and doubled them up for the one bolt. If you are using 3/8" UHMW I'm sure that will be close enough. Hole saw plugs work great for the spacers. If you are having trouble aligning these spacers, I found out that if you have long arms you can actually reach both spots from the top side by only removing the seat.

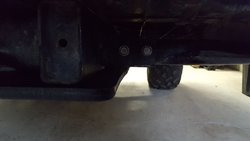
Here is the final product all mounted. You can see in the picture I have not installed the two optional bolts near the front, however the holes have been drilled (I am still waiting on the cup washers from the Honda dealer). I also included a picture to show how far past the main frame rails the skid plate will extend and overlap the rocker skids, with the template width of 30". You could easily add or subtract a little to your liking.


Rocker Skids
In your 12' long print out, there will be a template for both side pieces to cover the rockers. I have not mounted these yet on my pioneer, but after cutting them out I believe the template is accurate. I Have not included any mounting hole locations on the two side templates since there are no factory holes. I plan on using about five 1/4" or 6mm self tapping screws and five cup washers from Honda, per side. I think you can decide for yourself where you would like to screw them in at. If the self tappers fail or don't seem good, then I'll replace with 6mm bolts and rivnuts. I may include the locations I use on later versions of the template.
All in all this is a very easy project. If you have a source for the material then I say it is an easy way to save some money. I hope it helps a couple of you out!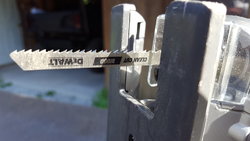
It is a three piece design with the seams running front to back. One large piece to cover the belly and two small pieces to cover the rock rails if you want them. It can be made from a single 4' x 8' sheet of UHMW or whatever other material you choose. I ordered a piece of 1/2" UHMW that I am picking up on Monday in order to test the template and make sure my measurements were all good.
To mount the large belly piece you can reuse the factory hardware (I will need longer bolts), plus an additional 4 bolts and washers and one 1" spacer (nylon or brass I suppose will work fine). For the side pieces you will have to order some more cup washers and either rivnuts or self tappers.
Let me know if anyone is interested and I'll take the next step. Otherwise I'll make mine and be done LOL...
UPDATE - skid plate template is ready for release!
The template file in PDF is attached at the bottom of this post. Message me on HondaSXS.com or email at [email protected] and I can send other file formats if you need them (*.DXF *.DWG etc).
All you need is a 4'x8' sheet of material, jig saw, 1" spade bit, drill, maybe a circular saw, scissors, and a sharpie. You will need fourteen longer M6x1.0 bolts (I used 30mm) and two significantly longer bolts for the locations which require the spacers (I used 60mm). You will also need four M10x1.25 bolts with about a 30mm length and four fender washers to go with them. I purchased all this hardware at Lowes, in stainless. If you opt to install the two optional bolts near the front of the frame you will need two additional cup washers from Honda (50403-HL3-A00) as well as two long M6x1.0 bolts with nuts and regular washers. These two bolts are not in factory locations and require you to drill a small 1/4" clearance hole in the sheet metal gusset in the frame. Sorry for the long write-up, but here it is:
I finally got around to finishing up the template and am ready to email it out to anyone who wants it. To recap, it is a single PDF file that can be printed at your local office depot or anywhere that has a 36" wide format printer. My local office depot printed mine and it was $18. The PDF is 36" by 144" (or 12'). It can be printed in black and white to save money (the line weights are different and will make the print decipherable even in b&w). When setting up the print you need to ensure that any option which reads "print to 'original size', 'original scale' or '1:1'" should be used; anything that reads something to the affect of "scaled to fit" should not be used.
It is crucial that the template is printed to the exact scale I have provided, otherwise it will be completely worthless. Just for this reason I have included a small portion of a ruler which will print out on each end of the template. This way, no matter which end of the template comes out first, the person printing the template can check with a ruler if the printed measurements align with their ruler. If they do not, they can go ahead and cancel the print and try again. After it is all printed out, you should check with a tape measure to ensure that the total length of the main belly skid is exactly 93" long and 30" wide. Again, if the measurements are not accurate then throw the template away; if you use it, you will be wasting your sheet of skid plate material. If the template measures correctly then proceed
Step 1 - Get some saw horses so you don't break your back... too bad.
Step 2 - Unroll your template and check the measurements to see if the high school kid at office depot followed your instructions correctly. In the pictures it appears that my measurements do not line up. I assure you they did, the angle is bad in the pictures. These need to be spot on, otherwise the person printing used the wrong setting and the template is trash LOL.
Step 3 - Cut out the paper template and tape it to your material. I chose 1/2" thick UHMW in a 4' x 8' sheet. This is enough material to cover the entire bottom of the machine. My other choice was a 4'x10' sheet of 3/8" thick. The price was only a couple dollars more for the smaller sheet of 1/2", so I went this route.
Step 4 - I traced the outline of the template to the material with a silver sharpie, then cut it out with a jig saw and a fast cut blade meant for wood. With a little orbital action this setup cut like butter. I have included center marks for all the radii and their measurements, in case you would like to drill them out and then connect all the holes with straight cuts. I found the jig saw cut the curves very easily and was very fast. Keep in mind, no part of the outline has to be exactly perfect. There is a huge fudge factor available here. The only critical part of this whole thing is the distance between all the mounting holes. Which brings us to the next step.
Step 5 - Tape the template back down to your cut out skid plate. Then use a 1" or 1-1/8" spade bit to start each of the mounting holes by drilling through the paper template and into the skid plate material. Just mark the holes at this point. You can remove the paper template to finish drilling them, this way you won't accidentally snag the paper template and tear it or move it out of alignment. You need to get all of these holes started/marked without moving the template at all. Like stated before, this is the only critical part of the whole process so make sure the template doesn't move while starting/marking these holes.
The factory skid plate holes are a little over 1-1/8". You can use this size if you like or you can use a 1" diameter spade bit like I did. By using the 1" I did not have as much wiggle room to move the fasteners around in the holes and consequently had to chew a little material out on two of the holes to get the cup washers to lay completely flat in the hole like they are meant to. Barely any material had to be removed, I just let a drill bit rub the inside of the hole for a second and that's all it needed. I did make adjustments on the final version of the skid plate template however, so I don't believe you will have this issue.
Step 6 - I then used a jig saw to cut out the drain plug slots and holes. I debated back and forth on the exhaust cut outs and ultimately chose to cut them out per the factory design. It is extremely hot where I ride in the summer and we do a lot of slow technical in the woods with no air flow. I have included all the factory drain and vent locations/designs on the skid plate; you chose which ones and how you want to cut them out.
There are two options on the skid plate for the front corners near the front tires. One option is like the picture above and is meant to have the corners bent upwards at a 45 degree angle. The other option is to remove more of the skid plate material and have the plate simply lay flat and follow the contour of the frame. I originally had it cut for the "bending" option, but after realizing it was going to be a pain to bend this 1/2" UHMW, I went ahead and cut it off to the second option.
At this point you are basically done. There are a couple other things you may want to do though. I have included on the template the location of a relief cut to help the front of the skid plate bend upwards. This cut should be approximately 1/2 the thickness of the material and 2 saw blades wide, and made on the top side of the skid plate so the bottom side remains smooth. Please don't make the mistake of cutting this slot on the bottom side...
In the below picture you can see at this point I had made the decision to cut out the exhaust vent holes. On the template I have modified them from the OEM design to include a little additional material around the one mounting bolt location. At this point I had also decided that bending the material was going to be really hard to do and had cut the front of the template with the second option to just lay flat and follow the frame.
Also, just to make it a little cleaner, I used a 1/4" round over bit in the trim router to really make it fancy LOL. You DO NOT want to round over the mounting bolt holes, leave these squared off.
And Lastly, there are two mounting holes that I have indicated on the template which need spacers between them and the frame. One will require approximately 1/2" spacer, and the other a 1" spacer. I just used scrap UHMW to make spacers, and doubled them up for the one bolt. If you are using 3/8" UHMW I'm sure that will be close enough. Hole saw plugs work great for the spacers. If you are having trouble aligning these spacers, I found out that if you have long arms you can actually reach both spots from the top side by only removing the seat.
Here is the final product all mounted. You can see in the picture I have not installed the two optional bolts near the front, however the holes have been drilled (I am still waiting on the cup washers from the Honda dealer). I also included a picture to show how far past the main frame rails the skid plate will extend and overlap the rocker skids, with the template width of 30". You could easily add or subtract a little to your liking.
Rocker Skids
In your 12' long print out, there will be a template for both side pieces to cover the rockers. I have not mounted these yet on my pioneer, but after cutting them out I believe the template is accurate. I Have not included any mounting hole locations on the two side templates since there are no factory holes. I plan on using about five 1/4" or 6mm self tapping screws and five cup washers from Honda, per side. I think you can decide for yourself where you would like to screw them in at. If the self tappers fail or don't seem good, then I'll replace with 6mm bolts and rivnuts. I may include the locations I use on later versions of the template.
All in all this is a very easy project. If you have a source for the material then I say it is an easy way to save some money. I hope it helps a couple of you out!


Attachments
Last edited:

