P500 Torq Locker Install Issue

B

BC40

Member
Jan 1, 2019
14
48
13
BC
Ownership

  1. 500
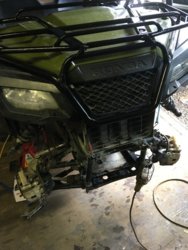
Using some quality self isolation time to do some work on the P500. I bought a torq locker off amazon last summer when work was busy, and then when the sxs went into winter storage the locker just wasn't priority. Now with the snow melting figured I'd getter done.

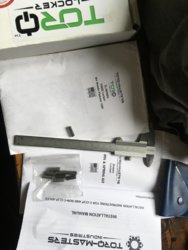
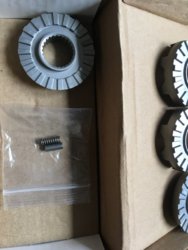
So got the front end torn apart and pulled the locker pieces out to start install into the diff carrier. Pretty sure I'm missing a spring. There is one spring and one steel pin. The steel pin is same dimensions as a partly compressed spring, but it doesnt seem like the locker would ratchet with that in place instead of a spring. Sent word to the torq masters info line but thought I'd ask if anyone here has seen the same thing? Not sure what the steel pin is for. Vaguely remember there being pins when I installed an aussie locker in my toyota, so maybe I was just 'lucky' enough to get the wrong hardware?
IMG 2062
 
  • Like
Reactions: Vikes79
B

BC40

Member
Jan 1, 2019
14
48
13
BC
Ownership

  1. 500
Wasn't expecting such a fast reply from Cora. Yup, I need two springs and yes, the steel pin is for an aussie locker install. They are sending me more springs.
 
  • Like
Reactions: Mudder
NitroxDiver

NitroxDiver

Well-Known Member
Dec 22, 2016
488
918
93
Concord NC
Ownership

  1. 500
Was going to say my locker has two Springs but you have it figured out. I have my locker laying in the workbench. Wish I could get it installed during this quarantine but my machine is in every and I’m stuck in NC. Good luck on the installation and let us know how it goes.
 
Last edited:
Mudder

Mudder

NTC Ambassador of Walls
Lifetime Member
Oct 1, 2016
11,327
84,202
113
Georgia
Ownership

  1. Other Brand

  2. 500
Cora has been helpful from the very beginning. Knocking out the little OEM pin was “interesting”, other than that, the instructions provided were great, thinking @JWB was the author????
 
futzin

futzin

Well-Known Member
Lifetime Member
Sep 10, 2019
3,204
23,027
113
Kentucky
Ownership

  1. 500

  2. 520
So what are the GOTCHA'S in this project? Things that may have reared their head after the instruction writing . . . something about a pin: how to remove, how to 'dimple'? how? why? something about shims? I know there's also a thread about not taking off near as many front end components as originally instructed. Sorry, just feeling overwhelmed as I'm about to start this myself later this week hopefully.
 
  • Like
Reactions: Mudwing
B

BC40

Member
Jan 1, 2019
14
48
13
BC
Ownership

  1. 500
Yup followed the detailed instructions. Was kind of dreading digging into it but the work is straight forward.

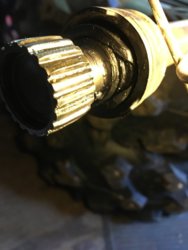
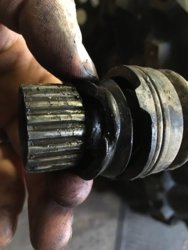
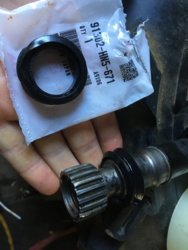
That said had some more bad luck. Assembly line worker screwed up the front diff install with one galled/stripped captive nut in the front crossmember (for the front diff bracket), and the engine side inner seal on the driveshaft got pinched and is now NFG. Diff itself is smooth and no weird wear showing, so I'm happy about that. Agree about that pin putting up a fight. Going to need to get myself a better pin punch since the one I have on hand is too thin and is bending trying to drive that sucker out. Guess I have a bit of time to sort out the details before the spring kit arrives.

IMG 2063 IMG 2065 IMG 2066
 
  • Like
Reactions: futzin
B

BC40

Member
Jan 1, 2019
14
48
13
BC
Ownership

  1. 500
So what are the GOTCHA'S in this project? Things that may have reared their head after the instruction writing . . . something about a pin: how to remove, how to 'dimple'? how? why? something about shims? I know there's also a thread about not taking off near as many front end components as originally instructed. Sorry, just feeling overwhelmed as I'm about to start this myself later this week hopefully.

If you have the locker in hand the written instructions are quite good. There is always more than one way to skin a cat so yes, the AMR video on youtube shows further disassembly. The instructions have it apart about as shown above. Someone posted on here a while back about just pulling the left side apart giving enough room to more the diff to the side to disengage the right side axle. Its 3 extra bolts to do the like the instructions say, so not a big deal. Could do with the wheels left on if you wanted. I'm putting some spacers on anyways so I removed them.
 
  • Like
Reactions: futzin and 906UP
Mudder

Mudder

NTC Ambassador of Walls
Lifetime Member
Oct 1, 2016
11,327
84,202
113
Georgia
Ownership

  1. Other Brand

  2. 500
Some notes after my installation.

P500 Torq-Master Locker Install Tips.
  1. Link to JWB Video. https://hondasxs.com/attachments/tl-honda-final-6-28-18-pdf.79804/
  2. Link to AMR (Jay_man81) video P500 - Torq-Masters torq locker feedback
  3. Read supplied instructions front to back before starting, will clarify videos (shims vs cone washer reuse, etc). A link to a .pdf of instructions would be helpful.
  4. Bumper and winch may come off as a unit, depending on type.
  5. Take measurement of exposed threads on 4wd cable to help in reinstall.
  6. Caution: Pull 4wd sensor plug off, instead of removing bolt and twisting wire as in AMR video.
  7. Free up brake line, just 2 bolts each side. Calipers remained in place.
  8. Do not have to remove steering joint, just A arm bolts, ample clearance to pull axle out.
  9. Recommend Zip tie or other method to support loose axles to A arm to prevent stress after removal from differential.
  10. Before starting, get proper sized pin punch (I used a drill bit) to remove pin and a point punch to re-dimple pin in place on reassembly.
  11. Pre lube locker surfaces during installation.
  12. Be careful of not damaging the oil seals, both while pulling the axle shafts and then reinstalling them. The stub end could easily damage the oil seal lips in the differential.
  13. Circlip update from Torq-Master. Axle Re-installation - Use the new circlips provided with the locker.
  14. Caution: when reinstalling the rear of the front drive shaft at engine output housing, check the O ring. Also the rubber boot has tabs to pull it over the housing. Do this last when you can spin the axle during rotation test, pull boot over in sections as you rotate the shaft.
  15. Refill with 75-140w gear oil (optional heavier weight).
  16. Clean dripped oils, then reinspect after riding to ensure no leaks at differential.
 
Last edited:
Mudder

Mudder

NTC Ambassador of Walls
Lifetime Member
Oct 1, 2016
11,327
84,202
113
Georgia
Ownership

  1. Other Brand

  2. 500
A link to a video of the P500 locker at work.
 
  • Like
Reactions: Mudwing
advertisement
B

BC40

Member
Jan 1, 2019
14
48
13
BC
Ownership

  1. 500
Some notes after my installation.

P500 Torq-Master Locker Install Tips.
  1. Link to JWB Video. https://hondasxs.com/attachments/tl-honda-final-6-28-18-pdf.79804/
  2. Link to AMR (Jay_man81) video P500 - Torq-Masters torq locker feedback
  3. Read supplied instructions front to back before starting, will clarify videos (shims vs cone washer reuse, etc). A link to a .pdf of instructions would be helpful.
  4. Bumper and winch may come off as a unit, depending on type.
  5. Take measurement of exposed threads on 4wd cable to help in reinstall.
  6. Caution: Pull 4wd sensor plug off, instead of removing bolt and twisting wire as in AMR video.
  7. Free up brake line, just 2 bolts each side. Calipers remained in place.
  8. Do not have to remove steering joint, just A arm bolts, ample clearance to pull axle out.
  9. Recommend Zip tie or other method to support loose axles to A arm to prevent stress after removal from differential.
  10. Before starting, get proper sized pin punch (I used a drill bit) to remove pin and a point punch to re-dimple pin in place on reassembly.
  11. Pre lube locker surfaces during installation.
  12. Circlip update from Torq-Master. Axle Re-installation - Remove the circlip from the differential side of the axle shaft assembly. Then tighten the circlip using pliers, reducing the diameter of the circlip. Reinstall circlip onto the axle shaft ensuring that the circlip is tight in the circlip recess in the axle shaft.
  13. Caution: when reinstalling the rear of the front drive shaft at engine output housing, check the O ring. Also the rubber boot has tabs to pull it over the housing. Do this last when you can spin the axle during rotation test, pull boot over in sections as you rotate the shaft.
  14. Refill with 75-140w gear oil (optional heavier weight).
  15. Clean dripped oils, then reinspect after riding to ensure no leaks at differential.

Great summary.

One other thing not mentioned is to be careful of not damaging the oil seals, both while pulling the axle shafts and then reinstalling them. The stub end could easily damage the oil seal lips in the differential.
 
  • Like
Reactions: Mudder
Mudder

Mudder

NTC Ambassador of Walls
Lifetime Member
Oct 1, 2016
11,327
84,202
113
Georgia
Ownership

  1. Other Brand

  2. 500
Great summary.

One other thing not mentioned is to be careful of not damaging the oil seals, both while pulling the axle shafts and then reinstalling them. The stub end could easily damage the oil seal lips in the differential.
Thanks, good point, added as #12.
 
B

BC40

Member
Jan 1, 2019
14
48
13
BC
Ownership

  1. 500
Ok. just received the spring kit yesterday afternoon. Cora sent out the kit immediately but it got stuck in the postal system. Joys of cross border deliveries.

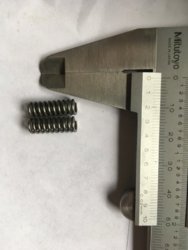
Anyways, it is the spring kit for an aussie locker, which uses 4 springs and pins. They are the same as the torq locker springs (TL on left, AL on right).
IMG 2106IMG 2107

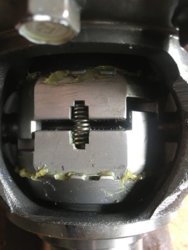
Slathered some grease onto the contact surfaces and put the diff together. wiped away the excess after the pic taken.
IMG 2108

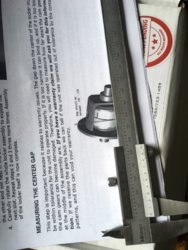
No idea if the center gap measurement matters for the torq locker, but the aussie locker instructions that came with the kit specify to check its in range. Mine would be at 0.150".
IMG 2110
 
  • Like
Reactions: Mudwing and Mudder
B

BC40

Member
Jan 1, 2019
14
48
13
BC
Ownership

  1. 500
So while waiting I replaced the prop shaft seal that was NFG from the factory. Not expensive so I'm just glad I found it.
IMG 2065IMG 2078
 
  • Like
Reactions: Mudwing and Mudder
B

BC40

Member
Jan 1, 2019
14
48
13
BC
Ownership

  1. 500
Reassembly went ok. Ended up dropping the engine skid plate after all to make it easier to get the boot onto the engine side of the front drive shaft.

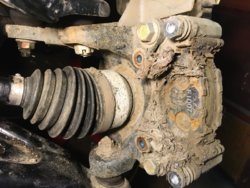
Took the front brakes apart to clean up and lubricate as needed. There was more mud trapped in there than I thought. No wonder the brake pads are wearing faster than they otherwise should.

Added oil, did the wheel spin tests. Seems to be doing what its supposed to.

Now just need to get the front bumper/winch back on and finish up the snorkel to get out and test the locker. Onward

IMG 2117
 
B

BC40

Member
Jan 1, 2019
14
48
13
BC
Ownership

  1. 500
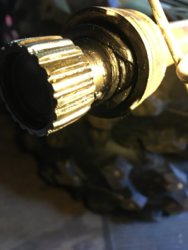
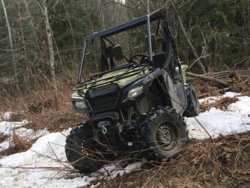
got it out into the light of day for the first time in several months. Finished my batch of winter projects on this thing, the rack, snorkel and locker. Have ideas for the rear storage/rack but that will wait for next winter.

So its too early to say for sure but first impressions are good. I only have about 20 min of seat time after the locker install. Not enough snow left to really test it. Breaks traction and pushes the front straight ahead turning under throttle where its slick. Climbed some good snow piles and then high centered. So far I don't mind having no power steering even with the 27x10s up front on stock rims. Time will tell if that changes.

IMG 2127
 

About us

  • Our community has been around for many years and pride ourselves on offering unbiased, critical discussion among people of all different backgrounds. We are working every day to make sure our community is one of the best.

User Menu

Buy us a beer!

  • Lots of time and money has gone into making sure the community is running the best software, best designs, and all the other bells and whistles. Care to buy us a beer? We'd really appreciate it!

    Beer Fund!

    Club Membership!