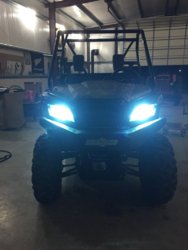
P500 HID lights install/how to

J

JTW

Guest
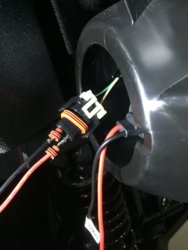
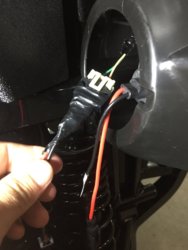
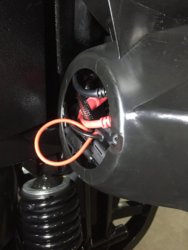
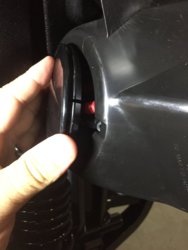
Ok.. so with all the questions on the HID light installs thanks @CumminsPusher making this awesome suggestion.. I took some pics for reference and how to..

Tools needed...
black tape

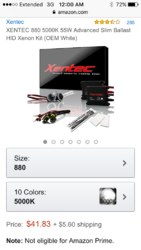
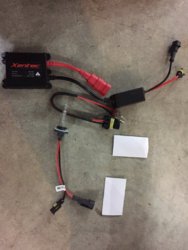
And a HID slim ballast kit.. this is exactly what I ordered. 880 and 5000k

https://www.amazon.com/gp/aw/d/B00NFAA5N4/?tag=sxsweb24-20


That's it!

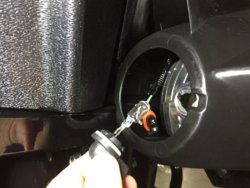
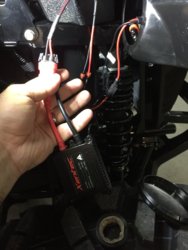
It's as simple as taking the cover off the back of the light housing. Rotating and pulling out the bulb, disconnecting the plug to it.. and then inserting the HID bulb into the socket. Plug pigtails and ballast into the bulb and insert positive and negative ends into the OME plug. (Black-green & red- brown) Use a little electrical tape to secure the ends, then neatly and carefully stuff ballast and wires into the light housing. Situate as desired and then recover with cap.

*You may need to adjust your head lights down.. simply insert a Phillips head into the hole below the light housing on the front side and adjust as needed

*Also, I took the foam that protected the HID lights for shipping and put it on the stock light bulbs. I put them in my toolbox, but in the light housing under the wires would be a great place for it as a backup!
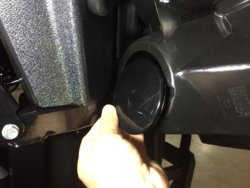
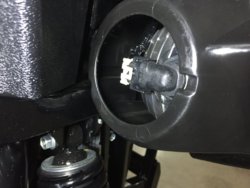
IMG 0534 IMG 0535 IMG 0536 IMG 0533 IMG 0537 IMG 0538 IMG 0540 IMG 0541 IMG 0542 IMG 0552 IMG 0583

After riding this weekend with my buddies and their stock lights.. These are impressive and well worth the $40-$45... I think this could be the best cheap improvement we can make on the little P500.. There is also a 35watt version if you want less light for some reason?
 
Last edited by a moderator:
FuzzyGrub

FuzzyGrub

Well-Known Member
Sep 19, 2014
373
532
93
Rural NY
www.joefishin.com
Ownership

  1. 500
I think mine are the same as yours, and I also found the install easy. They did make some improvement in visibility, but a large difference in being noticed by others. ie I ride some on dirt roads (Slow Moving Vehicle) where it is important that car/truck drivers see me in the daylight.

I have added LEDs for night vision, but that is too much for oncoming vehicles. ;)
 
  • Like
Reactions: JTW
ehart814

ehart814

Well-Known Member
Lifetime Member
Club Contributor
Mar 28, 2016
1,654
3,643
113
NWPA
Ownership

  1. 500

  2. 1000-5
Ok.. so with all the questions on the HID light installs thanks @CumminsPusher making this awesome suggestion.. I took some pics for reference and how to..

Tools needed...
black tape

And a HID slim ballast kit.. this is exactly what I ordered. 880 and 5000k

https://www.amazon.com/gp/aw/d/B00NFAA5N4/?tag=sxsweb24-20


That's it!

It's as simple as taking the cover off the back of the light housing. Rotating and pulling out the bulb, disconnecting the plug to it.. and then inserting the HID bulb into the socket. Plug pigtails and ballast into the bulb and insert positive and negative ends into the OME plug. (Black-green & red- brown) Use a little electrical tape to secure the ends, then neatly and carefully stuff ballast and wires into the light housing. Situate as desired and then recover with cap.

*You may need to adjust your head lights down.. simply insert a Phillips head into the hole below the light housing on the front side and adjust as needed

*Also, I took the foam that protected the HID lights for shipping and put it on the stock light bulbs. I put them in my toolbox, but in the light housing under the wires would be a great place for it as a backup!
View attachment 24042 View attachment 24043 View attachment 24044 View attachment 24045 View attachment 24046 View attachment 24047 View attachment 24048 View attachment 24049 View attachment 24050 View attachment 24051 View attachment 24052

After riding this weekend with my buddies and their stock lights.. These are impressive and well worth the $40-$45... I think this could be the best cheap improvement we can make on the little P500.. There is also a 35watt version if you want less light for some reason?

Good pics. Makes it easy to see when the machine is clean and new. The kits should come with a connector for the plug to the vehicle harness (mine did) so normally you wouldn't have to tape.
 
  • Like
Reactions: JTW
drfubar

drfubar

TheDonFather
Lifetime Member
Club Contributor
Jun 7, 2016
5,889
19,233
113
Mary's Ridge (Dayton Mtn), TN
Ownership

  1. 1000-3
Ok.. so with all the questions on the HID light installs thanks @CumminsPusher making this awesome suggestion.. I took some pics for reference and how to..

Tools needed...
black tape

And a HID slim ballast kit.. this is exactly what I ordered. 880 and 5000k

https://www.amazon.com/gp/aw/d/B00NFAA5N4/?tag=sxsweb24-20


That's it!

It's as simple as taking the cover off the back of the light housing. Rotating and pulling out the bulb, disconnecting the plug to it.. and then inserting the HID bulb into the socket. Plug pigtails and ballast into the bulb and insert positive and negative ends into the OME plug. (Black-green & red- brown) Use a little electrical tape to secure the ends, then neatly and carefully stuff ballast and wires into the light housing. Situate as desired and then recover with cap.

*You may need to adjust your head lights down.. simply insert a Phillips head into the hole below the light housing on the front side and adjust as needed

*Also, I took the foam that protected the HID lights for shipping and put it on the stock light bulbs. I put them in my toolbox, but in the light housing under the wires would be a great place for it as a backup!
View attachment 24042 View attachment 24043 View attachment 24044 View attachment 24045 View attachment 24046 View attachment 24047 View attachment 24048 View attachment 24049 View attachment 24050 View attachment 24051 View attachment 24052

After riding this weekend with my buddies and their stock lights.. These are impressive and well worth the $40-$45... I think this could be the best cheap improvement we can make on the little P500.. There is also a 35watt version if you want less light for some reason?
Good job, thank you, for the visual reference. I have these in my garage and will install sometime this week
 
Longbrake500

Longbrake500

Active Member
Aug 13, 2016
96
168
33
Anna Ohio
Ownership

  1. 500
Looks good... Might just have to order a set of those today...lol
 
  • Like
Reactions: JTW
J

JTW

Guest
Good pics. Makes it easy to see when the machine is clean and new. The kits should come with a connector for the plug to the vehicle harness (mine did) so normally you wouldn't have to tape.
There is a connector that almost works but it didn't fit the stock plug without bending the contacts and I didn't like that.
 
rocmar

rocmar

Where Eagles & Angels....Dare to Fly...
Lifetime Member
Dec 21, 2014
4,741
5,773
113
4 CORNERS
Ownership

  1. 500
There is a connector that almost works but it didn't fit the stock plug without bending the contacts and I didn't like that.
The tape is to keep his
Burnt nose...firmly in
place...
haha
good thread....great pics
that new machine needs
some....."DIRT"
 
  • Like
Reactions: JTW
Tramguage1

Tramguage1

Texan
Moderator
Lifetime Member
Supporting Member
Club Contributor
Jul 2, 2015
7,139
27,144
113
Somereset, Texas
Ownership

  1. 1000-5

  2. Talon X
I just plugged the oem plug into the new plug from the ballast

Sent from my SAMSUNG-SM-N930A using Tapatalk
 
J

JTW

Guest
I just plugged the oem plug into the new plug from the ballast

Sent from my SAMSUNG-SM-N930A using Tapatalk
I wonder if this is a difference in the 17 and 15/16 wiring harness?? I'm going to go double check to see if I can get mine to plug direct. I'm pretty sure mine was significantly wider and would have caused the male connections to bend in order to fit.
 
  • Like
Reactions: CumminsPusher
advertisement
Tramguage1

Tramguage1

Texan
Moderator
Lifetime Member
Supporting Member
Club Contributor
Jul 2, 2015
7,139
27,144
113
Somereset, Texas
Ownership

  1. 1000-5

  2. Talon X
I wonder if this is a difference in the 17 and 15/16 wiring harness?? I'm going to go double check to see if I can get mine to plug direct. I'm pretty sure mine was significantly wider and would have caused the male connections to bend in order to fit.
I will also take some pictures of the new ones when they arrive.

Sent from my SAMSUNG-SM-N930A using Tapatalk
 
  • Like
Reactions: JTW
Shadesmn

Shadesmn

Well-Known Member
Lifetime Member
Aug 19, 2015
505
959
93
Ramsey, MN
Ownership

  1. 500
Tramguage1

Tramguage1

Texan
Moderator
Lifetime Member
Supporting Member
Club Contributor
Jul 2, 2015
7,139
27,144
113
Somereset, Texas
Ownership

  1. 1000-5

  2. Talon X
Ok my replacements arrived today. About 10min install this time.
20161015 134517
20161015 134524
20161015 134601
20161015 134612
20161015 134936
20161015 134704
20161015 134747
20161015 134810
20161015 134849
20161015 134936
20161015 135021
20161015 135610


Sent from my SAMSUNG-SM-G935A using Tapatalk
 
Last edited:
Tramguage1

Tramguage1

Texan
Moderator
Lifetime Member
Supporting Member
Club Contributor
Jul 2, 2015
7,139
27,144
113
Somereset, Texas
Ownership

  1. 1000-5

  2. Talon X
This is a 700-4

Sent from my SAMSUNG-SM-G935A using Tapatalk
 
  • Like
Reactions: drfubar
Longbrake500

Longbrake500

Active Member
Aug 13, 2016
96
168
33
Anna Ohio
Ownership

  1. 500
I just got the same kit JTW posted up.. $40 and then I ordered some $8 harness adapters so that I could just plug them directly into the honda harness one I solder on the adapters. I got the HID kit yesterday just waiting on the harness adapters and will hopefully get it done this weekend and take some pics.
 
  • Like
Reactions: Tramguage1
Martin

Martin

Active Member
Sep 29, 2015
55
105
33
Mont-Laurier, Qc, Canada
Ownership

  1. 500
Ok.. so with all the questions on the HID light installs thanks @CumminsPusher making this awesome suggestion.. I took some pics for reference and how to..

Tools needed...
black tape

And a HID slim ballast kit.. this is exactly what I ordered. 880 and 5000k

https://www.amazon.com/gp/aw/d/B00NFAA5N4/?tag=sxsweb24-20


That's it!

It's as simple as taking the cover off the back of the light housing. Rotating and pulling out the bulb, disconnecting the plug to it.. and then inserting the HID bulb into the socket. Plug pigtails and ballast into the bulb and insert positive and negative ends into the OME plug. (Black-green & red- brown) Use a little electrical tape to secure the ends, then neatly and carefully stuff ballast and wires into the light housing. Situate as desired and then recover with cap.

*You may need to adjust your head lights down.. simply insert a Phillips head into the hole below the light housing on the front side and adjust as needed

*Also, I took the foam that protected the HID lights for shipping and put it on the stock light bulbs. I put them in my toolbox, but in the light housing under the wires would be a great place for it as a backup!
View attachment 24042 View attachment 24043 View attachment 24044 View attachment 24045 View attachment 24046 View attachment 24047 View attachment 24048 View attachment 24049 View attachment 24050 View attachment 24051 View attachment 24052

After riding this weekend with my buddies and their stock lights.. These are impressive and well worth the $40-$45... I think this could be the best cheap improvement we can make on the little P500.. There is also a 35watt version if you want less light for some reason?


What is the light patern like? I tried different lights and could not get a good light projection.... I either had a major black spot dead center about 20 feet in front of the P5 or the lights would not project more than about 30 feet.... Do you have picture of the light patern at night?

Tx,
 
  • Like
Reactions: joeymt33
advertisement

About us

  • Our community has been around for many years and pride ourselves on offering unbiased, critical discussion among people of all different backgrounds. We are working every day to make sure our community is one of the best.

User Menu

Buy us a beer!

  • Lots of time and money has gone into making sure the community is running the best software, best designs, and all the other bells and whistles. Care to buy us a beer? We'd really appreciate it!

    Beer Fund!

    Club Membership!