P1000 OnTheJob's P1K-3 Build: "The Pie-O-Near"

OnTheJob

OnTheJob

Well-Known Member
Dec 29, 2017
426
925
93
Bristol, NY
Ownership

  1. 1000-3
That's how my 7-year-old pronounces Pioneer.

Well it's been just over a month now since I picked up "The Pioneer" It's what my family calls it or the other woman that I spend all my time with in the garage or online late at night. She's a leftover 2016 EPS 3-seater I purchased for $13,000. Yes the addiction is fully engaged. I don't have a catchy name for her yet, which may evolve later. I got her for my upcoming new home build on 22 acres adjacent to my wife's parent's 175 acres. Well, That's how I sold it. I need a machine like this to plow a 400' driveway, inspect work on the build, tree work, ride back and forth to the farmhouse, our little temporary cottage we are living at for the next 1.5 years during the house build that is across the street from build site. Oh and to ride around with the boys on their ATVs.

Through my research, I saw the two main glaring issues were the clutch and water intrusion. The dealer was unaware of the clutch update. I don't think he sells a lot of them. I had him do the update which took a week to get the parts and complete the install before I took her home. Next I did the second battery install and then extended all the vent lines which I'll go into on my next post. Everyone is sweating me and it's time for church anyway.
IMG 5015
 
Last edited:
OnTheJob

OnTheJob

Well-Known Member
Dec 29, 2017
426
925
93
Bristol, NY
Ownership

  1. 1000-3
When I got her home, I took off the netting. I immediately started pouring through the second battery set ups. I went with the cheaper Mighty Maxx battery because up here in Upstate, NY the cold kills the batteries in 3-5 years unless you store them indoors. I can already tell I'm going to have to replace the main battery because it struggles on really colder days when it's in the single digits either side of zero degrees. Some of it was trial an error but here is my shopping list, all purchased on Amazon or eBay:
Mighty Maxx Battery https://www.amazon.com/gp/product/B00MHNM75Y/?tag=sxsweb24-20
Tru dual battery kit https://www.amazon.com/gp/product/B00WRG2U58/?tag=sxsweb24-20
Bussman Circuit breaker 100 amp https://www.amazon.com/gp/product/B00139FQSS/?tag=sxsweb24-20
Blue Sea fuse panel https://www.amazon.com/gp/product/B000THQ0CQ/?tag=sxsweb24-20
Stinger relay switch https://www.amazon.com/gp/product/B001HC6UJ0/?tag=sxsweb24-20
6 gauge copper wire https://www.amazon.com/gp/product/B01MD1ZGKO/?tag=sxsweb24-20
Blue Sea Bussbar https://www.amazon.com/gp/product/B000OTJ8A0/?tag=sxsweb24-20
Copper lugs 1/4" and #10 https://www.amazon.com/gp/product/B073Y7H1DL/?tag=sxsweb24-20

More to follow. Time to cook burger on The Big Green Egg
 
E

elkguide

Well-Known Member
Lifetime Member
Supporting Member
Mar 14, 2017
3,377
7,963
113
Vermont
Ownership

  1. 1000-3
Sounds like you're enjoying joining us with "THE ADDICTION!!!!"
 
  • Like
Reactions: Hammer21 and BWAF
OnTheJob

OnTheJob

Well-Known Member
Dec 29, 2017
426
925
93
Bristol, NY
Ownership

  1. 1000-3
All of the heavy duty wiring is 6 gauge and the wiring I used for the switches is 16 gauge.
IMG 5063


The battery is sealed so it fit nicely on it's side in the box to the rear. I opted to have the terminals face towards the read so I could get to them more easily. The battery isolator location is pretty much the same spot most have put theirs. Next I wired in a ground terminal bussbar by routing a single 6 gauge black wire to the engine grounding point that the main battery uses.

IMG 5021

I did this so I didn't have to overload the negative battery terminal with connections and it comes out much neater and easier to ground anything that has something to do with the Aux Batt side. All the connections heat shrink wraps on them and all the wire is copper strand, same stuff I would use on a boat or marine grade. Then the positive side goes to the 100 amp breaker which can also be used to manually shut off the Aux side. From there it goes to the Stinger relay switch which turns the Aux side on from a dash switch. Finally the fuse box which gets grounded back to the grounding point and the main battery. This was the EASY part of the Aux Batt install.

The switch is an ON-OFF-ON: Rocker switch 589B2 12V MAIN AUX on off on blue ATV UTV RTV DPDT | eBay
Positaps: https://www.amazon.com/gp/product/B01EINQXEG/?tag=sxsweb24-20
Wiring: https://www.amazon.com/gp/product/B000NV0G0U/?tag=sxsweb24-20
2 voltmeters: https://www.amazon.com/gp/product/B078M2RCDT/?tag=sxsweb24-20
Switch plate: Car Boat 3 Way Aluminum Rocker Switch Panel Housing Holder FOR ARB Carling Narva | eBay


IMG 5056


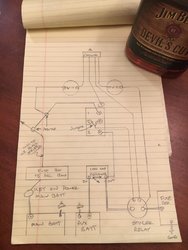
So the way I wired this switch:
Center position the Aux side is off whether the key is on or not.
Switch up the Aux side is powered on when key is on, still only uses power from the Aux Batt
Switch down the Aux side is powered on whether the key is on or not.


The key on power came from the white wire with a black stripe from the fuse box, 15 amp, ACC, 5th one down. P1000 - Key On Power, Illumination, and backup source! - Honda Pioneer 1000
There are two of them and I don't think it makes a different which one. I used Positap which is a really great way to tap into a line, highly recommended. That went to one end of the switch. The Aux side power came directly from the 100 amp breaker. The center pin of the switch then goes to the Stinger small screws, doesn't matter which side, and then to the grounding bar. I Positap-ed each of the voltmeters into the key on source and Aux source. One of the voltmeters I got was defective and had to send it back.

Someone asked for a diagram for the wiring of the switch and voltmeters so here is a quick sketch. Not shown is the isolator.
See top right for disclaimer.
27752007 10211230166569307 4443679674723864878 n
 
Last edited:
OnTheJob

OnTheJob

Well-Known Member
Dec 29, 2017
426
925
93
Bristol, NY
Ownership

  1. 1000-3
Yesterday I extended all of my vent lines which is well documented here and where you can purchase a kit all put together cheaper than if I would've tried to:

Complete Vent Extension kits. Protect you vital components from water!

I had to use a heat gun to get the tubing more pliable to fit them on the barbs. All of the zip ties snapped because it was so cold. I had to use some of my heavier duty ones.

I also had to replace the air intake to complete my two main missions of solving the water ingestion issues and dual battery issues.

P1000 - Honda Water Ingestion Fix

Today I completed the reverse lights. That turned into a longer trial and error project than expected. I started with purchasing a sub harness to power the lights when the machine was key on and in reverse. Plug and play, no cut or tapped wires.

https://www.amazon.com/gp/product/B00NO0TFWW/?tag=sxsweb24-20

These are the lights I saw others using and that are plenty bright, waterproof and cheap:

https://www.amazon.com/gp/product/B01HT642WY/?tag=sxsweb24-20

This post shows the location that this sub harness plugs into. I failed to take before photos and now it's all taped up and under heat shrink.

P1000 - Simple reverse light?

This was the first location I used that did not work:


IMG 5069


Because when I open the tailgate or dumped the bed they looked like this:

IMG 5074


So I bought a piece of 3/4" (Go a full 1" instead) square aluminum stock and hacked it up so it would fit between the ROPS mounting points that are not used on a 3-seater. I bolted them on with some M10-1.25 35mm flange bolts (go shorter, like 20mm). Then mounted the lights to that after I painted it black.

IMG 5076

Nothing was touching when the tailgate was opened or when the bed was dumped. I heat shrank all the connections and they were plenty bright for me to back into a dark garage at night.

IMG 5087

The mounting was a pain but the electrical connection was really simple. I used 16 gauge marine copper strand wire and crimp connections and then heat shrink all connections. I thought about running them to dash switch to turn them on when the machine is not in reverse or to have the ability turn them off completely even when in reverse but I just kept it this way. I'm going to add some flood lights on the roof for the bed on a dash switch, which should be good enough. The glass windshield, roof and hard back panel just came in and that's my next project!
 
Last edited:
OnTheJob

OnTheJob

Well-Known Member
Dec 29, 2017
426
925
93
Bristol, NY
Ownership

  1. 1000-3
Added a Honda factory glass windshield, roof and hard rear panel. I really came close to going with Alumilite Armor cab but the dealer is giving me 15% off any Honda accessories I buy from him because of my purchase there.

Compare

This eliminates shipping costs for me. I also going with the Honda fabric half doors because that seems like an easier conversion from summer to winter months. Everything went in pretty easy. Be prepared nothing comes with printed instructions so you have to look them up online. I am pleased with this purchase but ouchie $$$$
IMG 5089


IMG 5088
 
OnTheJob

OnTheJob

Well-Known Member
Dec 29, 2017
426
925
93
Bristol, NY
Ownership

  1. 1000-3
Next I had to add some work lights in the back now that I have a cab. I liked the reverse lights so much, I went with another set of those. Parts list:

Lights: https://www.amazon.com/gp/product/B01HT642WY/?tag=sxsweb24-20
Switch: https://www.amazon.com/gp/product/B0719HSZ9D/?tag=sxsweb24-20
Waterproof connectors: https://www.amazon.com/gp/product/B01A6LTK44/?tag=sxsweb24-20
Bought a mirror too: https://www.amazon.com/gp/product/B01A6LTK44/?tag=sxsweb24-20

IMG 5110

I went with this location. Covers the bed just fine. The plastic in the roof has more than enough support for the mounts. I drilled two holes, one for the mounts screw and one for the wire through the other side of mounting bracket.

IMG 5109


I put the waterproof connection in just in case I want to remove the roof I can disconnect everything without cutting wires or heat shrink. I ran the wires down the ROPS through here.
IMG 5114


Then to my accessory panel and then the switch on the dash.

IMG 5099

Daytime photos. I'm in reverse which is why the reverse lights are on. Between both sets, it throws out plenty of light. Each light is an 18 watt LED, so 4X


At night.
IMG 5119
 
Last edited:
OnTheJob

OnTheJob

Well-Known Member
Dec 29, 2017
426
925
93
Bristol, NY
Ownership

  1. 1000-3
So I bought this mirror too:
https://www.amazon.com/gp/product/B01A6LTK44/?tag=sxsweb24-20

It do NOT fit the ROPS without longer screws. The Honda ROPS is a hair larger than 1.75". Buy some M4-.70x12mm to replace the shorter ones and you can mount this. You need a long 3mm allen wrench to make it easier. I'm still on the fence on this one, It mounts pretty high and I moved it more in front of the driver. I didn't want to do side view mirrors because the garage and trails are tight and I feel they are gonna get knocked off.

IMG 5105

IMG 5106


IMG 5107
 
E

elkguide

Well-Known Member
Lifetime Member
Supporting Member
Mar 14, 2017
3,377
7,963
113
Vermont
Ownership

  1. 1000-3
What have I gotten myself into..........


You've now officially begun that downhill slide as there is NO going back!


You'll love it here!!!!!
 
OnTheJob

OnTheJob

Well-Known Member
Dec 29, 2017
426
925
93
Bristol, NY
Ownership

  1. 1000-3
This was came today, a Koplin Rhino Gun Mount:

https://www.amazon.com/gp/product/B006OZF6PY/?tag=sxsweb24-20

IMG 5141


I originally wanted to mount it behind me but there was no room for the clamps between the ROPS and the back panel. I'm going to try this location out for now. It does not block any of my vision and my head isn't anywhere near it. It sits much higher than I thought it would.

IMG 5138

IMG 5142

It's a very secure mount. I didn't use the rubber cushions because I couldn't get them in there but does not slip at all when I try to move them. No creaking from them underway either.

IMG 5122


The gun doesn't budge at all. Just press two large rubber buttons and the top arms release. Squeeze them together and they ratchet tight on to the gun.
 
OnTheJob

OnTheJob

Well-Known Member
Dec 29, 2017
426
925
93
Bristol, NY
Ownership

  1. 1000-3
Next up was a battery tender:
IMG 51441


NOCO Genius G1100

IMG 51451


With a port plug for a standard 110v extension cord. Had to drill a 2 inch hole through the fender. Nothing under there to bump into.

IMG 51471


I picked the passenger side because it's closest to the outlet and I have to walk by it anyway to get to the driver's seat. Very simple install. The battery tender plugs in the port plug. Had to buy a separate pigtail that plugs into the battery charger in lieu of the large alligator clips it comes with. There are two sizes and I got the small 1/4" ring terminals.

IMG 51511


It charges the main battery first and then when it reaches 12.8v it open the True Isolator and begins charging the AUX battery. There isn't any hesitation when I start her up cold now.
Parts list:
Charger: https://www.amazon.com/gp/product/B004LX3AXQ/?tag=sxsweb24-20
Port plug: https://www.amazon.com/gp/product/B009ANV81S/?tag=sxsweb24-20
Terminal connector: https://www.amazon.com/gp/product/B004LWQ35Y/?tag=sxsweb24-20

I'm considering getting one of these for each of the batteries to keep the them from freezing when it gets in the single digits. They plug into a 110v line and I was thing of pig-tailing that int the plug port:

https://www.amazon.com/dp/B000I8XDBM/?tag=sxsweb24-20

Anyone have any experience or feedback on the idea?

I've got a winch coming on Thursday so that will be the weekend project......
 
Last edited:
OnTheJob

OnTheJob

Well-Known Member
Dec 29, 2017
426
925
93
Bristol, NY
Ownership

  1. 1000-3
Today I finished up installing a Viper Elite 5000# wide spool winch. Everything I wanted was included; 65' red synthetic line, wireless remote, dash switch and a mount for the P1K that mounts the unit upside down for a straighter pull than other mounts. Thanks Kenny Mihalko for the deal and fast shipping! I had considered a front bumper, maybe a TC or Slasher. Instead I kept it clean with the stock location. I'm happy with it. It's gonna have a plow at some point so I had to keep that in mind.
IMG 5167


The instructions were really good with photos and diagrams. I put the front end on ramps for easier access. The front bumper came off pretty easy. Next the winch and the mount get u-bolted to the frame in 4 places. All very easy to get attached. Appears very well connected to the machine.

IMG 5158

IMG 5159


Don't forget to spool the rubber stopper through the synthetic line and run it through the fair lead before reattaching the bumper. Attaching the line before the bumper goes on is way easier than trying to after the bumper is attached because there just is't enough room under there to attach the line. As you can see the Viper mount puts it upside down. Fairly straight pull depending on where from.

IMG 5160


The wiring wasn't bad at all. I had to shorten a bunch of wires but I decided on just the main wires and not the switch wires.

IMG 5165


As you can see I had to move my battery tender. Running out of under hood mounting options. The wireless remote is kinda funny but now I get why they do it. Each time you want to use it, you have to hold both buttons down for 3+ seconds for it to turn on and connect. No accidental activations this way. It feels sturdy but there is a delay when using it. NO mater how quick you press the button you get more than 1.5" in either direction.

IMG 5169


Access isn't too bad. I may trim out the hard plastic to get to the freespool.

IMG 5168


Dash space is getting tight. Gonna put in the 10 gang plate I ordered last month. That's the remote hanging. Waterproof but I bet it'll sink.

IMG 5171


Lastly, these came as well. Super cool that looks factory. Thanks Kent Hill!

IMG 5173


A good weekend.......
 
Last edited:
Smitty335

Smitty335

Well-Known Member
Lifetime Member
Supporting Member
Oct 3, 2016
35,368
208,011
113
NWA Arkansas
Ownership

  1. 1000-3

  2. 1000-5
Today I finished up installing a Viper Elite 5000# wide spool winch. Everything I wanted was included; 65' red synthetic line, wireless remote, dash switch and a mount for the P1K that mounts the unit upside down for a straighter pull than other mounts. Thanks Kenny Mihalko for the deal and fast shipping! I had considered a front bumper, maybe a TC or Slasher. Instead I kept it clean with the stock location. I'm happy with it. It's gonna have a plow at some point so I had to keep that in mind.
View attachment 66333

The instructions were really good with photos and diagrams. I put the front end on ramps for easier access. The front bumper came off pretty easy. Next the winch and the mount get u-bolted to the frame in 4 places. All very easy to get attached. Appears very well connected to the machine.

View attachment 66338
View attachment 66339

Don't forget to spool the rubber stopper through the synthetic line and run it through the fair lead before reattaching the bumper. Attaching the line before the bumper goes on is way easier than trying to after the bumper is attached because there just is't enough room under there to attach the line. As you can see the Viper mount puts it upside down. Fairly straight pull depending on where from.

View attachment 66340

The wiring wasn't bad at all. I had to shorten a bunch of wires but I decided on just the main wires and not the switch wires.

View attachment 66341

As you can see I had to move my battery tender. Running out of under hood mounting options. The wireless remote is kinda funny but now I get why they do it. Each time you want to use it, you have to hold both buttons down for 3+ seconds for it to turn on and connect. No accidental activations this way. It feels sturdy but there is a delay when using it. NO mater how quick you press the button you get more than 1.5" in either direction.

View attachment 66344

Access isn't too bad. I may trim out the hard plastic to get to the freespool.

View attachment 66348

Dash space is getting tight. Gonna put in the 10 gang plate I ordered last month. That's the remote hanging. Waterproof but I bet it'll sink.

View attachment 66347

Lastly, these came as well. Super cool that looks factory. Thanks Kent Hill!

View attachment 66349

A good weekend.......
Really like your build, good job!
 
Smitty335

Smitty335

Well-Known Member
Lifetime Member
Supporting Member
Oct 3, 2016
35,368
208,011
113
NWA Arkansas
Ownership

  1. 1000-3

  2. 1000-5
Today I finished up installing a Viper Elite 5000# wide spool winch. Everything I wanted was included; 65' red synthetic line, wireless remote, dash switch and a mount for the P1K that mounts the unit upside down for a straighter pull than other mounts. Thanks Kenny Mihalko for the deal and fast shipping! I had considered a front bumper, maybe a TC or Slasher. Instead I kept it clean with the stock location. I'm happy with it. It's gonna have a plow at some point so I had to keep that in mind.
View attachment 66333

The instructions were really good with photos and diagrams. I put the front end on ramps for easier access. The front bumper came off pretty easy. Next the winch and the mount get u-bolted to the frame in 4 places. All very easy to get attached. Appears very well connected to the machine.

View attachment 66338
View attachment 66339

Don't forget to spool the rubber stopper through the synthetic line and run it through the fair lead before reattaching the bumper. Attaching the line before the bumper goes on is way easier than trying to after the bumper is attached because there just is't enough room under there to attach the line. As you can see the Viper mount puts it upside down. Fairly straight pull depending on where from.

View attachment 66340

The wiring wasn't bad at all. I had to shorten a bunch of wires but I decided on just the main wires and not the switch wires.

View attachment 66341

As you can see I had to move my battery tender. Running out of under hood mounting options. The wireless remote is kinda funny but now I get why they do it. Each time you want to use it, you have to hold both buttons down for 3+ seconds for it to turn on and connect. No accidental activations this way. It feels sturdy but there is a delay when using it. NO mater how quick you press the button you get more than 1.5" in either direction.

View attachment 66344

Access isn't too bad. I may trim out the hard plastic to get to the freespool.

View attachment 66348

Dash space is getting tight. Gonna put in the 10 gang plate I ordered last month. That's the remote hanging. Waterproof but I bet it'll sink.

View attachment 66347

Lastly, these came as well. Super cool that looks factory. Thanks Kent Hill!

View attachment 66349

A good weekend.......
Now for the expensive stuff, a arms, shocks and wheels and tires, HA!
 

About us

  • Our community has been around for many years and pride ourselves on offering unbiased, critical discussion among people of all different backgrounds. We are working every day to make sure our community is one of the best.

User Menu

Buy us a beer!

  • Lots of time and money has gone into making sure the community is running the best software, best designs, and all the other bells and whistles. Care to buy us a beer? We'd really appreciate it!

    Beer Fund!

    Club Membership!