Getting to know the MIGHTY 500

lee

lee

Village Idiot
Lifetime Member
Club Contributor
Apr 4, 2013
2,323
13,006
113
Springfield Ohio
Ownership

  1. 500
If I were to acquire a brand new (year old) P500 this is what I would do to it before riding it hard.

full


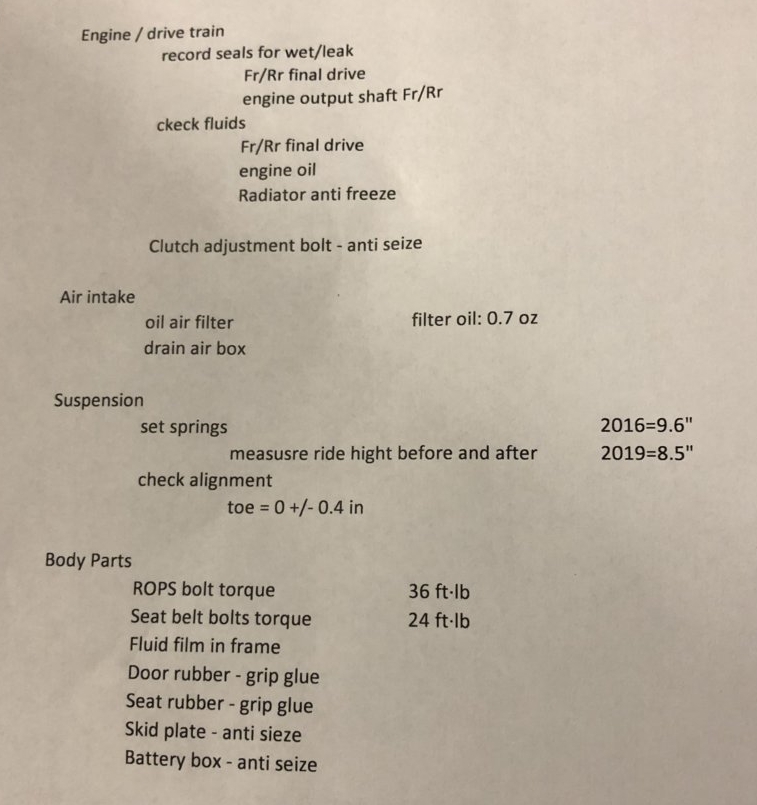
These are things I have heard on line or through experience may be an issue with new SxSs or ATVs.
Also, I’m cheap and got a deal on a unit that has been sitting in a warehouse for the last year of so.
I think the term I heard once was ‘crate rot’, just from sitting around there are some things that need checking (hopefully your dealer has taken care of it).
The Mighty P500 was manufactured a little over a year ago so it has been sitting around somewhere for a while.

Upload 2019 10 12 23 33 9


Also, if you decide to do something similar you will become more familiar with your SxS, and as a bonus you will remain relatively clean (until you start messing with the filter oil) because the SxS is not dirty yet.
Believe me, once you take it out on a trail ride, no matter how many times you pressure wash it (FYI manual says don’t do that so this is just hypothetical) it will never be this clean again. Ever.
 
Last edited:
lee

lee

Village Idiot
Lifetime Member
Club Contributor
Apr 4, 2013
2,323
13,006
113
Springfield Ohio
Ownership

  1. 500
So I’ll give a little commentary on the list, starting from the top.

Record of seals

I’ve seen guys ask if there diff or engine was leaking or whatever.
Then they have a picture of a wet area around the drive shaft that looks all too normal.
So my thinking is to take a picture new and a follow up later to have a base line for comparison.
These pictures are just a record for later if I get paranoid.

I’ll just attach one picture as an example, rear of the engine and rear drive shaft.
The yellow foam you see is a little Fluid Film I sprayed on exposed metal surfaces to slow the rust down.
Obviously, I have pictures of the other parts.

full


Fluids

I keep hearing about occasional low fluid level in a new SxS.
It seems like a simple thing to check just to make sure.

The front and rear finals are easy to check.
17mm combination wrench, when putting the plug back in I lined up the yellow paint mark to set the torque.
Except on the front the marks didn’t line up before I removed it.
No idea what is up with that.

Picture shows the rear, you can clearly see the level of the oil (and teeth on the ring gear).

full


The engine oil is easy to access from under the seat.
Owners manual says to run the engine for several minutes then shut it off and let it sit for a few.
Reaching for the dipstick I could feel the heat radiating from the muffler, be careful that thing is hot and just out of view right above the dipstick.
Engine oil was good.

BD8A97E1 DB5A 4B99 B95D 85087F21676B


Next is the antifreeze in the radiator. (Actualy this is out of order, do the radiator before warming the engine up)
Radiator and the overflow tank had fluid, there are lines on the back side of the overflow tank to show you the max and min.
While doing this I turned the little wire hose clip thing to point to the side so it wouldn't dig in to my hand next time I remove the cap.

20191013 081602


It's interesting to note the lable on the radiator cap reads sideways.
Was the engineer asleep when they speced that out?
Maybe he was dyslexic and can read upside down and side ways just as well as right side up.
Or is this how the parts came out of the parts bin and not fixing it saved half a yen.
I guess you will never know.

Anti-seize on the clutch adjust bolt


This is a personal pet peeve.
I have an old Rancher 350 where I never adjusted the clutch until one day I couldn’t.
When I went to adjust the clutch the screw was stuck.
I reefed on it till I thought I was going to mess up the screw driver slot.
The Rancher is still not adjusted, so I figure I better anti seize the Mighty P500 before it’s too late.
I started by marking the screwdriver slot orientation with a sharpie.
Drop the jamb nut off, apply anti-seize and screw it in and out to spread the anti-seize around.

Upload 2019 10 12 22 12 22


There is a great instructional video for resetting the clutch adjustment.

P500 - Pioneer 500 Clutch Adjustment (Video)
 
Last edited:
lee

lee

Village Idiot
Lifetime Member
Club Contributor
Apr 4, 2013
2,323
13,006
113
Springfield Ohio
Ownership

  1. 500
Air Filter

This thing has been sitting for a while so I wanted to make sure the air filter was good to go.
I have been using the Pro-Honda bio based filter oil.
After cleaning the filter with solvent (gas) and letting it dry I re-oiled it.
The manual says to use 0.7 oz, that’s like ½ a shot glass worth, it also says to pour the oil inside the filter, who knew?

full


I ended up pouring about a full shot glass worth to the inside of the filter and using a plastic bag to squish it around.

159683 031cebaf41741b04f2c06c0b87f01939

Reassemble the core to the filter, drop it back in the air box and tighten the hose clamp.
Don’t forget to wiggle the wedge back in on top of the filter.
I’m guessing the engineer that thought that up had no problems inserting that thing on his computer CAD program.

159682 ff938934f7c13ac20cd09a6efee32c00

When putting the lid back on it only goes on one way.
Look at the clips, two are horizontal and two are at an angle.

159681 d0f2d71b98e9025fd3a4263af1fe165a


One last thing before moving on from the air filter stuff.
When I first got my old Rancher the air box drain was full of oil from the air filter, I guess it had been sitting around a while.
But the oil was clear, I pulled the drain thing (it's like a short tube with the end seals off) off and it went everywhere.
On the P500 there is a drain tube on the outside of the frame, I checked mine and there was no oil in it this time.

Upload 2019 10 12 23 6 50
 
Last edited:
lee

lee

Village Idiot
Lifetime Member
Club Contributor
Apr 4, 2013
2,323
13,006
113
Springfield Ohio
Ownership

  1. 500
Spring Pre-load

When the P500 was first released in 2016 the ground clearance was reported as 9.6”.
Then there was some sort of mysterious letter sent out with a sticker to be applied to the roll cage.

P500 - Non-compliance sticker

And the 2017 P500 ground clearance was reduced to 8.5”.
Also, the shocks received spring pre-load adjusters front and rear.
My intention of this series is to discuss what should be done to a stock P500, not throw out some crazy modification ideas.
If you want to go crazy might I suggest:
P500 - long travel kit is under construction
P500 - Portal hubs on P5?! Is it possible?!


My 2018 has 8 5/16” ground clearance.
This seams low, and realistically no matter what I do the ground clearance of the P500 will always be a little low.
Adjusting the springs will get back some of the original ground clearance that the P500 was intended to have.


full


Both front and rear were delivered on the one from the lowest setting.

Upload 2019 10 13 16 34 15


To adjust the spring pre-load I jacked up each end in turn and rotated the spring perch using a spanner wrench from Harbor Freight.

159715 f93e379e516c80045263821fe73a1df7

I cranked them up to the highest setting.

full


And the ride height went up to 8 ¾ “.

full


Not a lot but 7/16” of free ground clearance.

Alignment

I did a quick toe check with a measuring tape.
The tires have a serious mold parting line that defines the center of the tread.
I measured the front and rear center to center dimension.
Front: 41 7/16”
Rear: 41 3/16”
So ¼” of toe out, well within the spec.
 
Last edited:
lee

lee

Village Idiot
Lifetime Member
Club Contributor
Apr 4, 2013
2,323
13,006
113
Springfield Ohio
Ownership

  1. 500
Roll cage bolt torque

I have heard that the roll cage is assembled at the dealer or at a warehouse but not at the factory.
And, some people have posted stories of the bolts being lose.
So I checked the torque on the roll cage and the seat belts.

159684 d4cb97508b51e31623f5f80b94cfe2d9

I used a 6 point 14mm deep socket to reach the front bolts under the fender.
They are hard to see from above but there is plenty of access from underneath or with the hood off.

Upload 2019 10 13 17 45 9


Most of the bolts where ½ to ¾ turn lose from the manual specified torque (36 ft*lb).
Also the bolts felt a little funny, like that stretch just before the snap.
I think it was the roll cage tubes squishing to conform to the final shape.
Also I noticed the bolts in the middle behind the seat back where torqued and had paint marks, all of the not so tight bolts (not really loose) did not have the paint marking.
So I’m guessing the paint marked ones were done at the factory.
The seat belt bolts where good.

Glueing Door Rubbers

I have heard that the door rubber bumpers can fall out.
So preemptively, I am glueing them in with grip glue.
I popped them out by pulling on the bumper and shoving one corner of the back side in to the hole with a trim tool.
Apply the glue to both at the same time.

full


Tilt the bumper and tuck one side of the back through the hole.
Then I used the trim tool to pry the back until it was seated.

full


Once it was back in place I rotated the bumper to spread the glue evenly and repeat for the other bumbler.
Then I closed the door to hold the bumper till the glue was dry.

full
 
Last edited:
lee

lee

Village Idiot
Lifetime Member
Club Contributor
Apr 4, 2013
2,323
13,006
113
Springfield Ohio
Ownership

  1. 500
Seat Rubbers

I decided to glue the seat rubber cushions as well.
There is some possibility that this is not a good idea but I don't want to lose one on the Wednesday ride of the Takeover and have four more days of riding.
The seat rubbers fit over pins on the seat frame.
They provide some cushioning but more importantly they hold the seat from moving or flying off when they are not being held down with a great weight.

The method of glueing them is similar to the door rubbers but you do not have access to the back.
So I tucked one side of the lip on the back in to the seat back and then stuffed the other side in with a trim tool.
You could substitute a flat blade screw driver just as well.

17DD517A 0176 44E2 8586 577FE989F0FD


Once the lip on the back is fully tucked in I rotated the rubber to spread the glue evenly.
When both rubbers where glued I replaced the seat to make sure the spacing of the rubbers was correct.

A79A25B7 8AE1 480A 85FA FA6042780BFA


Anti-seize and Fluid Film

The last few sort of run together. (And are out of order according to my list)
I wanted to anti-seize the bolts holding the skid plates on so that they would be removable later.
The bolts are threaded in to the frame rails with out a welded on nut on the back side, and the inside of the frame is not painted.
So, the inside of the frame will rust and lock the bolts in place if somthing is not done.

My plan was to remove each bolt, spray Fluid Film in to the frame rails and coat the bolt with anti-seize before replacing the bolt.
Fluid Film is an oil used to slow rust.
It's popular with farmers, made from sheep lanolin.(it smells like a wet sheep)
It's avalible in bulk to be sprayed on with a garden sprayer or in aerosol cans.

Spraying Fluid Film in to the frame rail:
159707 3000b7e8362a278c5ab5bb4d9925f253


Replacing the bolt with anti-seize applied:

full


I marked the bolt heads with a Sharpe as I went along, so I wouldn't get distracted and skip one.
After doing this it dawned on me if I had marked the washers it would have been easier to see what was done.
 
Last edited:
lee

lee

Village Idiot
Lifetime Member
Club Contributor
Apr 4, 2013
2,323
13,006
113
Springfield Ohio
Ownership

  1. 500
One of the reasons for doing all this stuff was to gain a good understanding of the Mighty 500.
Doing the skid plate bolts was enlightening.
There where 3 bolts missing.

One missing at the rear of the main skid plate:

20191013 204923


Two missing on the front bumper:

20191013 205203


I happen to have a stock of metric fasteners so I replaced them.
All three of the missing bolt holes where misaligned.
The trick to dealing with this is to loosen all the fasteners so the part is lose, install the missing bolt then tighten them.
The bolt at the back of the main skid plate also passes through the rear skid plate.
Before I figured out what was going on I ended up removing the main skid so I could see the threaded hole and align the rear skid plate.
On the main skid plate there are two holes that are a key hole shape.
Leave those bolts lose, place the large end of the key hole over the bolt head and slide the skid forward.
Now you can let go and it will stay in place while you start the other bolts.

658B39BE E466 4D10 9A60 8D61E73B535C
 
Last edited:
lee

lee

Village Idiot
Lifetime Member
Club Contributor
Apr 4, 2013
2,323
13,006
113
Springfield Ohio
Ownership

  1. 500
Fluid Film in the frame

I also sprayed Fluid Film in to any of the frame rails I could get the cans nozzle in to.

159705 f611426303d934cca4bbd0984942326e

And a view inside the main frame rail after spraying Fluid Film:

CAFB671B CACF 4012 85BD 347217A17967


Anti-seize the Battery Box Bolts

There are numerous complaints about the battery box bolts .
And a like number of comments about the engineer responsable for this design. (I'm sure it was an honest mistake where he was misled about how well that structure worked (Or didn't work))
The nuts mounted in the box will spin and can be a royal pain.

I figured if I dropped the bolts out before to much time elapsed they would be easyer to get out.
I applied anti-seize when replacing the bolts.

73FD4B38 F76E 4D93 8141 7F756DDBD5DD


While I had the lid off I poked around in the battery box a little.
At the top of the box you can see the offending captured nut.
I pulled the fuse box lid, you can see the label for the fuses and what they do.
There are also a number of spare fuses (and a big one (40A) on the back side of the battery box lid).
You can also see the rubber sponge thing that has become detached from the top of the box.
Not sure what that is about, maybe drip rail to keep water from adhearing to the top and dripping down the back of the box on the components there.
Seams like some sort of desperate last minute bandaid to make some manager sleep better at night.
My battery box lid fits pretty good so I'm not going to wory about it.
 
Last edited:
lee

lee

Village Idiot
Lifetime Member
Club Contributor
Apr 4, 2013
2,323
13,006
113
Springfield Ohio
Ownership

  1. 500
And finally (yes this thing is going to end) I added my state issued plate so I am legal to ride in Ohio.
To balance things out I added a plate I got at the 2016 Takeover.

8303955D C8A1 4B0B A6AE CA500774C942

C8029E0B 7077 4CD9 ADA7 AB5D896A5D8D


You would think with as many states that require a plate for off road or allow on road registration honda would provide a place to mount the plate.
Oh well, they fit on the fender pretty good.
 
Last edited:
JACKAL

JACKAL

Ancient Honda fanboi
Moderator
Lifetime Member
Supporting Member
Club Contributor
Jun 11, 2015
39,152
265,140
113
Pioneer, TN
Ownership

  1. Other Brand

  2. 1000-5
Good variety of information with helpful commentary.
 
  • Like
Reactions: Zaleski
DG Rider

DG Rider

Member: Triple Clutch Club
Lifetime Member
Aug 14, 2013
9,192
41,583
113
Casa Grande, AZ
Ownership

  1. 700-2
Some of the pics aren't showing up for me.
 
Zaleski

Zaleski

Active Member
Aug 28, 2019
67
176
33
Ohio
Man, you’d be a good person to buy a used machine from, good write-up, thanks for the info! I’ve heard good things about fluid film, but never tried it, might have to give it a shot
 

About us

  • Our community has been around for many years and pride ourselves on offering unbiased, critical discussion among people of all different backgrounds. We are working every day to make sure our community is one of the best.

User Menu

Buy us a beer!

  • Lots of time and money has gone into making sure the community is running the best software, best designs, and all the other bells and whistles. Care to buy us a beer? We'd really appreciate it!

    Beer Fund!

    Club Membership!