$217 is crazy cheap...especially since they come with decals.....looking forward to seeing the finished product
You are using an out of date browser. It may not display this or other websites correctly.
You should upgrade or use an alternative browser.
You should upgrade or use an alternative browser.
-
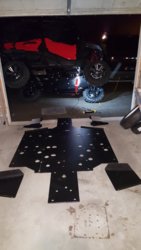 20151222_213210.jpg1.9 MB · Views: 868
 -
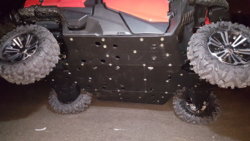 20151223_003447.jpg6.3 MB · Views: 691
 -
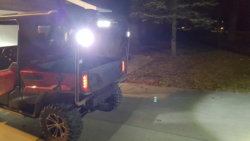 20160106_213906.jpg5.7 MB · Views: 531
 -
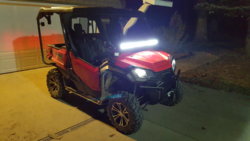 20160106_214218.jpg6.2 MB · Views: 552
 -
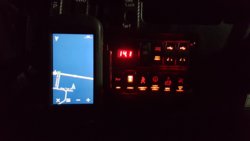 20160108_221047.jpg4.4 MB · Views: 820
 -
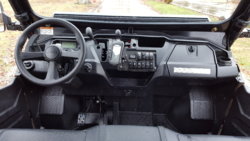 20160109_142007.jpg6.1 MB · Views: 646
 -
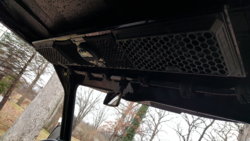 20160109_142035.jpg5.6 MB · Views: 560
 -
 20160122_094311.jpg4.7 MB · Views: 817
 -
 20160122_094325.jpg4.4 MB · Views: 821
 -
 20160122_094335.jpg5 MB · Views: 867
 -
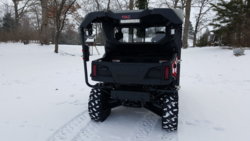 20160122_094354.jpg4.2 MB · Views: 846
 -
 20160122_094414.jpg4 MB · Views: 1,151
 -
 20160122_094438.jpg3.3 MB · Views: 1,161
I cheated. I just gave Ben at Procaliber your ticket reference number and ordered off your ticket. Thanks.
Thanks for the Pioneer Takeover sponsors, 35 North Honda aka. Kent motorsports for all the help and door prizes they donated for our [HASHTAG]#pioneertakover[/HASHTAG]
North Honda Kent Motorsports in New Braunfels, Texas | Honda ATVs, Motorcycles, UTVs For Sale
I ended up winning this gear rail system from Kolpin donated by them, I wasn't sure how I would use it at first but after unboxing it I am pretty sure it will support a spare tire & wheel as well as (2) 3 gal. Rotopax. I will mount it across the rear roll bars just above the tailgate. The clamping brackets can be bought separate for $28 each, the main rail system as shown below sells for about $147. The rail is oversize and you cut the length to fit once clamps are mounted and measured. By its oval design it will not bend or twist and is made of heavy aluminum extrusion. I've ordered 2 extra clamps to slide on and will either put a 4 gal Rotopax on the inboard side opposite the spare tire or two 3 gal Rotopax outboard beside the tire room permitting. Once I get the other clamps in I will cut to fit and take proper pictures. Thanks again Kent motorsports for this and the many other items your business donated.
View attachment 15096
Hey Jackal, did you ever mount up this gear rail system and have you tried it out with a spare tire/fuel cans? I keep trying to get a shipping quote from Jamie about the custom carrier he made but I'm not making progress :-(. This looks like a less expensive alternative if it works good.
Thanks,
Waylan
CumminsPusher
Just a Honda doing Honda things.
Lifetime Member
Supporting Member
Club Contributor
That's a great idea waylan! He definitely found the best price on that stuff! Just the darn decal I replaced was a 100. I'll bet parts distributors are going to know the name @JACKAL now.I cheated. I just gave Ben at Procaliber your ticket reference number and ordered off your ticket. Thanks.
JACKAL
Ancient Honda fanboi
Moderator
Lifetime Member
Supporting Member
Club Contributor
No, I haven't had time everything I own is packed in a trailer or sitting in a basement 450 miles from me. In the process of cleaning and painting my house in IL to sell it an move to TN. Currently living in my toyhauler and will be for next 5 months or so. I will get around to it in about 60 days. I did get all the mounts though, all set to mount a spare tire/ wheel, chainsaw, & two 3 gal. ROTOPAX on the rail.. I think it will work pretty slick.Hey Jackal, did you ever mount up this gear rail system and have you tried it out with a spare tire/fuel cans? I keep trying to get a shipping quote from Jamie about the custom carrier he made but I'm not making progress :-(. This looks like a less expensive alternative if it works good.
Thanks,
Waylan
Jackal, the TOA R in the picture... Mine looks bent. Can you take a pic of yours? My TOA L looks straight. I'm not sure if that's the way it is or if mine R is bent.This is where I ended up mounting the horn, much easier than OEM, $300 cheaper than OEM, and 6X louder than OEM. Minor project a success.
View attachment 8569
JACKAL
Ancient Honda fanboi
Moderator
Lifetime Member
Supporting Member
Club Contributor
moparornocar
RIP....Rocmar...
Lifetime Member
Interested to see how that gear rail turns out. I'm wanting something like a High mounted spare and fuel can.
J
So where you purchase this pdm having hard time finding the pdm. If you have model please inform.I am planning on having a total of twelve rockers divided into two gangs of six per row of which two will be a double port 3.2 amp USB power port with red backlighting giving me (4) total powered USB ports for charging phones, GoPro, GPS, etc. the remaining 10 switches will perform the various electrical functions all through a Cooper Bussman power distribution module, this module has an 6 gauge main Positive power line & 8 gauge Negative grounding line both to the secondary Oddessey 925 Battery, then there is (5) output wires with 15 amp fuses without relays for running the minor stuff like pod lights, horn, etc. There is (5) 35 amp relay lines with 30 amp fuses for each line / relay with a 14 gauge wire to go to the switched power to close the relay and (5) 10 gauge wires coming out of the fused relay to power bigger accessories, Light bars, Stereo, etc.
Here is the power distribution module as received, all prewired and includes all necessary items like heat shrink and butt connectors, etc. View attachment 8435
Here is a detail of the top with cover off and underneath detail:
View attachment 8436 View attachment 8437
Looking under the hood for a place to mount this PDM there was not a location I liked with the metal standoff attached to the Bussman PDM so I removed the standoff then you have the prewired bundle coming from underneath so that negates a flush mount. Then the light went off that the large black cover that covers the air pre-cleaner and intake tube could house this PDM in a recessed cutout in a very tidy fashion.
OEM under the hood untouched, then black air intake cover removed:
View attachment 8438 View attachment 8441
Dropping in the 2nd battery, note the added L connectors on terminals:
View attachment 8439 View attachment 8440
Intended location for PDM once cover is on & PDM setting in place of hole to be cut out:
View attachment 8442 View attachment 8443
Roughed cutout in black cover for PDM insertion from underneath & 3/4" hole on side for all wiring to exit.
View attachment 8444 View attachment 8445
PDM screwed in place with wires pulled through & lid secured in place. All neat and tidy without using up any additional space under the hood.
View attachment 8446 View attachment 8447
I will seal around the PDM mounting holes with black RTV silicone and as shown you do not lose any space where you can mount anything else needed. The only other spot big enough (that suited me) with the PDM standoff attached is where I want to mount the Battery Isolator which I will not have until 12/30/15. As viewing the bottom right picture with the cap on the PDM it does interfere with the hood slightly and needs to come down 3/8 of an inch on the left side where the hood lies with the body. Thankfully there is 1" of clearance underneath the PDM cover so a little work with the heat gun will reshape this so it doesn't touch the hood when secured down.
Well time to start making a couple dozen Jumper wires for all my lighted switches, no rest for the wicked.
JACKAL
Ancient Honda fanboi
Moderator
Lifetime Member
Supporting Member
Club Contributor
So where you purchase this pdm having hard time finding the pdm. If you have model please inform.
They are on ebay, I put a link below if it doesn't work search for Cooper Bushman relay.
Universal Waterproof Fuse Relay Box Panel Cooper Bussmann ATV UTV RV Boat 4X4
advertisement
Don't know how comfortable I would be with the banjo music out in the hills like that?Thanks, I am very happy with the MTX MUDSYS46, in wooded trails it easily will drown out all other noises by the machine. It plays loud and clear without distortion, so loud you can't stand it over 2/3 volume sitting in the machine with a high quality MP3 playing. Here is a little longer clip, it is simply the GoPro mounted to the roll cage picking up the in cab audio just like you would hear it, this isn't dubbed into the video.
F
Thanks, I am very happy with the MTX MUDSYS46, in wooded trails it easily will drown out all other noises by the machine. It plays loud and clear without distortion, so loud you can't stand it over 2/3 volume sitting in the machine with a high quality MP3 playing. Here is a little longer clip, it is simply the GoPro mounted to the roll cage picking up the in cab audio just like you would hear it, this isn't dubbed into the video.
Great video, thanks for taking us along.
JACKAL
Ancient Honda fanboi
Moderator
Lifetime Member
Supporting Member
Club Contributor
Thanks for the Pioneer Takeover sponsors, 35 North Honda aka. Kent motorsports for all the help and door prizes they donated for our [HASHTAG]#pioneertakover[/HASHTAG]
North Honda Kent Motorsports in New Braunfels, Texas | Honda ATVs, Motorcycles, UTVs For Sale
I ended up winning this gear rail system from Kolpin donated by them, I wasn't sure how I would use it at first but after unboxing it I am pretty sure it will support a spare tire & wheel as well as (2) 3 gal. Rotopax. I will mount it across the rear roll bars just above the tailgate. The clamping brackets can be bought separate for $28 each, the main rail system as shown below sells for about $147. The rail is oversize and you cut the length to fit once clamps are mounted and measured. By its oval design it will not bend or twist and is made of heavy aluminum extrusion. I've ordered 2 extra clamps to slide on and will either put a 4 gal Rotopax on the inboard side opposite the spare tire or two 3 gal Rotopax outboard beside the tire room permitting. Once I get the other clamps in I will cut to fit and take proper pictures. Thanks again Kent motorsports for this and the many other items your business donated.
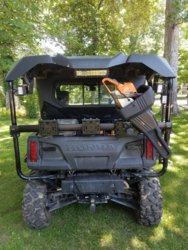
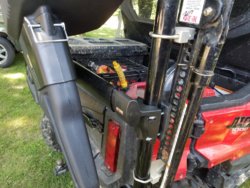
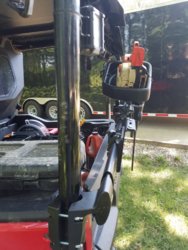
I got around to mounting the Kolpin Gear Rail system on my P1K, the rails is normally cut to length but the P1K5D is so wide in the back is could be 1.25" longer for a perfect fit on the mounts but as is it is still supported by over 2/3rds of the supporting ends. As is if you were going to put a spare tire on it I would make sure it rests on the tailgate, I base this on how much flex in the individual mount gave me with the chainsaw which is about 1/3rd the weight of the tire n wheel combo.
Only got the chainsaw mounted today, my Rotopax and spare tire are 400 miles from me, but you can get the idea of how it will work. I will put the spare tire on the left bracket, the 3 gal Rotopax on the center and as pictured the chainsaw on the right. As displayed everything will fit with the left bracket set to hold a 30" tire and stay 1" inside the outer left roll bar. As it is mounted below you can open and close the tailgate even with the chainsaw and Rotopax in place the tire would either keep it open or closed.
North Honda Kent Motorsports in New Braunfels, Texas | Honda ATVs, Motorcycles, UTVs For Sale
I ended up winning this gear rail system from Kolpin donated by them, I wasn't sure how I would use it at first but after unboxing it I am pretty sure it will support a spare tire & wheel as well as (2) 3 gal. Rotopax. I will mount it across the rear roll bars just above the tailgate. The clamping brackets can be bought separate for $28 each, the main rail system as shown below sells for about $147. The rail is oversize and you cut the length to fit once clamps are mounted and measured. By its oval design it will not bend or twist and is made of heavy aluminum extrusion. I've ordered 2 extra clamps to slide on and will either put a 4 gal Rotopax on the inboard side opposite the spare tire or two 3 gal Rotopax outboard beside the tire room permitting. Once I get the other clamps in I will cut to fit and take proper pictures. Thanks again Kent motorsports for this and the many other items your business donated.
Interested to see how that gear rail turns out. I'm wanting something like a High mounted spare and fuel can.
I got around to mounting the Kolpin Gear Rail system on my P1K, the rails is normally cut to length but the P1K5D is so wide in the back is could be 1.25" longer for a perfect fit on the mounts but as is it is still supported by over 2/3rds of the supporting ends. As is if you were going to put a spare tire on it I would make sure it rests on the tailgate, I base this on how much flex in the individual mount gave me with the chainsaw which is about 1/3rd the weight of the tire n wheel combo.
Only got the chainsaw mounted today, my Rotopax and spare tire are 400 miles from me, but you can get the idea of how it will work. I will put the spare tire on the left bracket, the 3 gal Rotopax on the center and as pictured the chainsaw on the right. As displayed everything will fit with the left bracket set to hold a 30" tire and stay 1" inside the outer left roll bar. As it is mounted below you can open and close the tailgate even with the chainsaw and Rotopax in place the tire would either keep it open or closed.


J
Here is the finish plate all mounted and wired up, got everything accomplished tonight I was hoping to get done by tomorrow. Now I need to wash this dusty beast and get some good clean photos. Hopefully we get the 2" of snow forecasted for tomorrow afternoon and I will have a decent background.
View attachment 8879
In cab view after getting done:
View attachment 8880
Here is what I mean by dusty, too many gravel road runs this week
View attachment 8878[/QUOTE]
WHERE DID YOU FIND THE CUSTOM SWITCH PLATE ? lOOKS LIKE MAYBE CARBON FIBER PATTERN WHICK I LIKE.
View attachment 8879
In cab view after getting done:
View attachment 8880
Here is what I mean by dusty, too many gravel road runs this week
View attachment 8878[/QUOTE]
WHERE DID YOU FIND THE CUSTOM SWITCH PLATE ? lOOKS LIKE MAYBE CARBON FIBER PATTERN WHICK I LIKE.
JACKAL
Ancient Honda fanboi
Moderator
Lifetime Member
Supporting Member
Club Contributor
Here is the finish plate all mounted and wired up, got everything accomplished tonight I was hoping to get done by tomorrow. Now I need to wash this dusty beast and get some good clean photos. Hopefully we get the 2" of snow forecasted for tomorrow afternoon and I will have a decent background.
View attachment 8879
In cab view after getting done:
View attachment 8880
Here is what I mean by dusty, too many gravel road runs this week
View attachment 8878
WHERE DID YOU FIND THE CUSTOM SWITCH PLATE ? lOOKS LIKE MAYBE CARBON FIBER PATTERN WHICK I LIKE.[/QUOTE]
I made it myself out of the OEM skid plate plastic, the carbon fiber is simply an adhesive wrap made by 3M picked it up at local Autozone store. The wrap has enough material to make 4 switch plates that size.
moparornocar
RIP....Rocmar...
Lifetime Member
N
Jackal, I have another question for you if I may. I see that you have your lightbar mounted through the bottom of the glass windshield frame. I intend to mount mine in the same location. It appears to me that you have attached utilizing a bushing? Would you tell me more about your mount? Thanks for your time.
JACKAL
Ancient Honda fanboi
Moderator
Lifetime Member
Supporting Member
Club Contributor
Jackal, I have another question for you if I may. I see that you have your lightbar mounted through the bottom of the glass windshield frame. I intend to mount mine in the same location. It appears to me that you have attached utilizing a bushing? Would you tell me more about your mount? Thanks for your time.
I wanted to ensure the light was properly supported so I found some thick nylon washers about 3/8" thick and 1.75" in outside diameter. This was to serve 3 purposes; to ensure that the light cleared the windshield frame adequately, to keep the windshield frame from flexing at the bolt hole I drilled, and as a bit of a shock absorber for vibration reduction.
The washers are by SERVALIGHT and I got them at a Farm Supply Store like Rural King or TSC.
J
Another question for you. I recieved my pdm and have my 32" 180w led bar in about to install. I noticed when looking at the supplied wiring harness that came with light bar that it had a 40 amp relay and the pdm largest relay is 35 amp. do you foresee any problems if i wire directly to the PDM like you did leaving out that wire harness.They are on ebay, I put a link below if it doesn't work search for Cooper Bushman relay.
Universal Waterproof Fuse Relay Box Panel Cooper Bussmann ATV UTV RV Boat 4X4
JACKAL
Ancient Honda fanboi
Moderator
Lifetime Member
Supporting Member
Club Contributor
You won't have any issues with the relay in the PDM. I am running a 50" 400 watt led light bar off of that 35 amp PDM relay without any problems.Another question for you. I recieved my pdm and have my 32" 180w led bar in about to install. I noticed when looking at the supplied wiring harness that came with light bar that it had a 40 amp relay and the pdm largest relay is 35 amp. do you foresee any problems if i wire directly to the PDM like you did leaving out that wire harness.
advertisement
Similar threads
- Replies
- 0
- Views
- 477

