Paul, how much time am I looking at to remove these for tack welding? I'm 5 months from seeing my machine again.Well, I was one of those questioning the tack welds but I will give you the info anyway
1.25" tubing Spicer 10-26-37
1.75" tubing Spicer 10-28-97 or Neapco 10-2817
Found some PTO Weld Yokes that may work for the stock tubing (not sure about the wall thickness on stock tubing)...
Neapco NOE-04-6016-A made for 1.5" tube with .065 wall
Neapco NOE-04-2108-A made for 1.5" tube with .083 wall
Also, note: I just discovered the series 1000 joints used for the Talon were only used in a driveline back in the 70's and only on one vehicle for a couple years. Now they are mainly (only?) used for steering columns in large trucks. This may be the reason for the crappy tolerances in the yoke bores. Steering shafts don't spin fast or continuously so there is not really a need for close tolerances as the clips will suffice just fine in a steering column environment.
You are using an out of date browser. It may not display this or other websites correctly.
You should upgrade or use an alternative browser.
You should upgrade or use an alternative browser.
CID
Well-Known Member
Lifetime Member
Supporting Member
Doogle - I copied Paul’s info on the removal and added it to the New Talon Owners thread fairly recently, so probably on the last page (Linked in my sig).Paul, how much time am I looking at to remove these for tack welding? I'm 5 months from seeing my machine again.
Last edited:
H
hondabob
Well-Known Member
Lifetime Member
I caught my drive shaft failure right away so there was no yoke damage. The cups in one yoke would fall out without the C clips. I didn't want to weight a couple of weeks to get it fixed so I took it to my buddies shop to get it welded. I had my other failed drive shaft for parts. Putting in the C clip was a PITA, I gave up after 30 minutes. My buddy got it installed and did the welding. I will get my new drive shaft welded before its installed.
If the driveshaft fails way out on a long ride the skid plate can be removed and the drive shaft can be cut in half to remove the rear section. The front part can be tie wrapped. It won't more without the clutch engaged. It can be driven out in 2WD and without the skid plate reinstalled. A short drive at low speed will be have a lot of banging but so far it has only damaged the driveshaft yoke. There is a carboard sleeve inside the driveshaft to reduce vibration. I will add this hack saw to my tool kit.
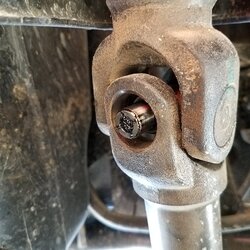
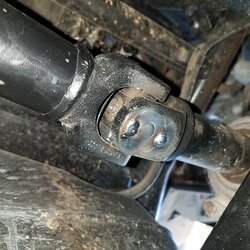
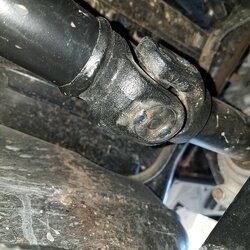
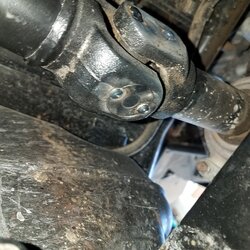
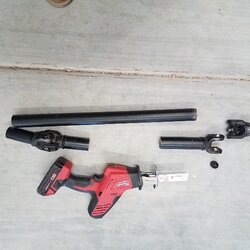
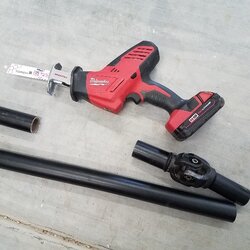
If the driveshaft fails way out on a long ride the skid plate can be removed and the drive shaft can be cut in half to remove the rear section. The front part can be tie wrapped. It won't more without the clutch engaged. It can be driven out in 2WD and without the skid plate reinstalled. A short drive at low speed will be have a lot of banging but so far it has only damaged the driveshaft yoke. There is a carboard sleeve inside the driveshaft to reduce vibration. I will add this hack saw to my tool kit.


PaulF
/\/\/\/\/\/\/\/\/\/\/\/\
Lifetime Member
I have a rack and it takes me 1 hour to remove and replace but I have practice now. If you follow my instructions that @CID mentioned, it should take you less than 2 hours total.Paul, how much time am I looking at to remove these for tack welding? I'm 5 months from seeing my machine again.
If you have aftermarket skids with side guards, it will take a little longer.
D
Have yet to look at mine with the skid plates removed and i understand the critical need to ground on the yoke being welded upon, but i wonder if a young guy without trifocals ( not me) could do this in place?I have a rack and it takes me 1 hour to remove and replace but I have practice now. If you follow my instructions that @CID mentioned, it should take you less than 2 hours total.
If you have aftermarket skids with side guards, it will take a little longer.
D
Never mind. Just took a look at the front one with that in mind.Have yet to look at mine with the skid plates removed and i understand the critical need to ground on the yoke being welded upon, but i wonder if a young guy without trifocals ( not me) could do this in place?
CID
Well-Known Member
Lifetime Member
Supporting Member
Yes, it can be done in place or no it can’t?Never mind. Just took a look at the front one with that in mind.
PaulF
/\/\/\/\/\/\/\/\/\/\/\/\
Lifetime Member
The rear is definitely possible and I think the front would be possible but I had to fix/replace parts on both machines and cannot weld overhead for crap, so I didn't even try.Have yet to look at mine with the skid plates removed and i understand the critical need to ground on the yoke being welded upon, but i wonder if a young guy without trifocals ( not me) could do this in place?
PaulF
/\/\/\/\/\/\/\/\/\/\/\/\
Lifetime Member
Depends on where the movement is. The entire shaft will move a little due to the slight play in the splines (both front and rear) and this is OK. But if any of the cups move in their yokes, this is not acceptable and will spell disaster so you need to "feel" for cup movement.So I looked at mine and was able to reach down and check for movement. Seemed good only slight movement, should there be any movement? What else should I look for on inspection? 6k miles, always I’m i4WD off pavement.
Put your thumb and forefinger on 2 opposite cups and try to make them move in the yoke. Move the car if needed to change the position of the yokes and check the other 2 cups. If any of them move, you need to act fast!
advertisement
H
hondabob
Well-Known Member
Lifetime Member
I caught the last failure right away so the yoke wasn't damage. The yoke is oversized causing the C clip to fail. I put in a bearing Cup by hand and my buddy got the C clip installed. He spot welded the bearing cups so I can ride until I get my 4th drive shaft. I will get it spot welded before my dealer installs it. I'm showing the guys how to cut the drive shaft in half if they are way out on a ride. The hole in the skid plate for the coolant drain bolts is large enough. Pulling the drive shaft forward off the sub trans will allow 2WD to work without turning the drive shaft. The forward part won't turn unless the 4WD clutch is on so it can lay in the skid plate. We have 14 Talons in the Tuesday ride group. There is a cardboard tube inside the driveshaft probably to dampen vibration.
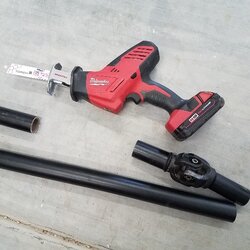
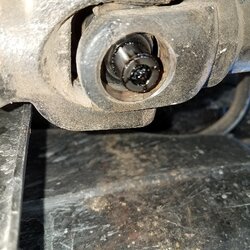
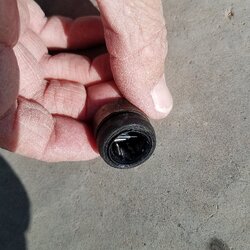
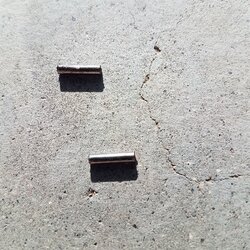
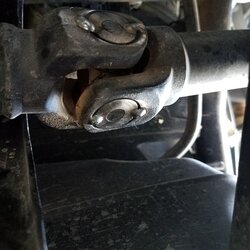
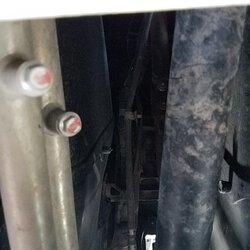
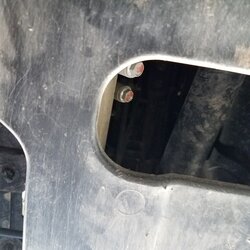
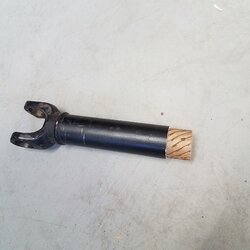


Bob I’m trying to understand how the front section of the shaft won’t turn if it’s still connected to the front diff. The front diff disengages when not in i4x4? I figured front diff would spin as don’t has tires where turning and I turn spin the driveshaft even in 2 wheel drive.I caught my drive shaft failure right away so there was no yoke damage. The cups in one yoke would fall out without the C clips. I didn't want to weight a couple of weeks to get it fixed so I took it to my buddies shop to get it welded. I had my other failed drive shaft for parts. Putting in the C clip was a PITA, I gave up after 30 minutes. My buddy got it installed and did the welding. I will get my new drive shaft welded before its installed.
If the driveshaft fails way out on a long ride the skid plate can be removed and the drive shaft can be cut in half to remove the rear section. The front part can be tie wrapped. It won't more without the clutch engaged. It can be driven out in 2WD and without the skid plate reinstalled. A short drive at low speed will be have a lot of banging but so far it has only damaged the driveshaft yoke. There is a carboard sleeve inside the driveshaft to reduce vibration. I will add this hack saw to my tool kit.
View attachment 272518 View attachment 272519 View attachment 272520 View attachment 272521 View attachment 272522 View attachment 272523
PaulF
/\/\/\/\/\/\/\/\/\/\/\/\
Lifetime Member
The driveshaft always
No, the output shaft of the sub trans (and therefore the driveshaft) always turns, even in 2WD. There is a clutch on the input end of the front diff that engages when you select 4WD.Bob I’m trying to understand how the front section of the shaft won’t turn if it’s still connected to the front diff. The front diff disengages when not in i4x4? I figured front diff would spin as don’t has tires where turning and I turn spin the driveshaft even in 2 wheel drive.
Gotcha thanksThe driveshaft always
No, the output shaft of the sub trans (and therefore the driveshaft) always turns, even in 2WD. There is a clutch on the input end of the front diff that engages when you select 4WD.
PaulF
/\/\/\/\/\/\/\/\/\/\/\/\
Lifetime Member
Can someone share the post on the driveshaft removal can’t seem to find it. Thanks.
New Talon Owners - First Things to Know and Check
My shifter on my 2021 is different than yours in the video? Was that there way to correct it? That's not my video but it's an aftermarket shift gate, there are several different choices available including one from PaulF on this site. I'll add that to my post. 👍
B
I probably can't add much new information, but I thought I would relate my experience. I only have 837 miles on my Talon, but with all these reports of drive shaft failures, I knew I had to address this. I finally had time to work on it today. Fortunately, I do have a lift. Unfortunately, I did not have @PaulF to help me do this job! I spent over 2.5 hours just getting the shaft out. I have Trail Armor skids, so it took a few minutes to get those off. The biggest hangup was the left bolt on the front drive shaft loop. I spent 45 minutes on that, using all of my words, to no avail. It must have been tightened to about 5 million ft-lbs!  I checked the Honda manual for their procedure, which starts with removing the LF floorboard. I turned to the page on removing the floorboard, and the first step is to remove the dash!!! You have got to be kidding, Honda! I finally used a 3/4" hole saw and cut a hole through the floor board above the bolt. I didn't get the hole in perfect alignment, but it was close enough to get the bolt out. It isn't a flat area, so If I can't get a plastic plug to fit, I think a piece of Gorilla tape will suffice. I didn't have the proper retaining ring pliers to remove the drive shaft clip. I do have a nice set of retaining ring pliers, so I improvised using a large set of retaining ring pliers with 90 degree tips, which worked OK. I do think I will buy the proper pliers. I unbolted the front diff, but I did not loosen the engine bolts as PaulF suggests. I got the shaft loose with no problem, but getting it out of the machine was a puzzle. I finally got it out by the RR wheel. I did have to remove the rear drive shaft loop also.
With the shaft out, I did a close inspection. There was no movement evident in any of the cups, so I got it in time. Cleaning the joints with a wire wheel, tack welding, and spray painting took all of about 20 minutes. Hopefully my drive shaft will now last a long time. I am very disappointed in Honda for allowing an issue like this to continue uncorrected. I will put it all back together tomorrow. Hopefully that will go uneventfully.
One of the pictures below shows two tack welds and how I connected the ground at each cup. The other picture shows the finished, painted job.
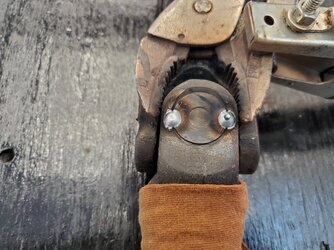
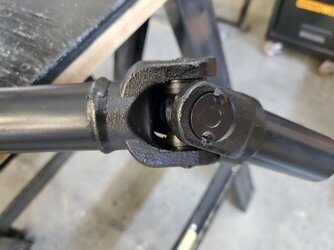


TripleB
Well-Known Member
Lifetime Member
No picturesI probably can't add much new information, but I thought I would relate my experience. I only have 837 miles on my Talon, but with all these reports of drive shaft failures, I knew I had to address this. I finally had time to work on it today. Fortunately, I do have a lift. Unfortunately, I did not have @PaulF to help me do this job! I spent over 2.5 hours just getting the shaft out. I have Trail Armor skids, so it took a few minutes to get those off. The biggest hangup was the left bolt on the front drive shaft loop. I spent 45 minutes on that, using all of my words, to no avail. It must have been tightened to about 5 million ft-lbs!I checked the Honda manual for their procedure, which starts with removing the LF floorboard. I turned to the page on removing the floorboard, and the first step is to remove the dash!!! You have got to be kidding, Honda! I finally used a 3/4" hole saw and cut a hole through the floor board above the bolt. I didn't get the hole in perfect alignment, but it was close enough to get the bolt out. It isn't a flat area, so If I can't get a plastic plug to fit, I think a piece of Gorilla tape will suffice. I didn't have the proper retaining ring pliers to remove the drive shaft clip. I do have a nice set of retaining ring pliers, so I improvised using a large set of retaining ring pliers with 90 degree tips, which worked OK. I do think I will buy the proper pliers. I unbolted the front diff, but I did not loosen the engine bolts as PaulF suggests. I got the shaft loose with no problem, but getting it out of the machine was a puzzle. I finally got it out by the RR wheel. I did have to remove the rear drive shaft loop also.
With the shaft out, I did a close inspection. There was no movement evident in any of the cups, so I got it in time. Cleaning the joints with a wire wheel, tack welding, and spray painting took all of about 20 minutes. Hopefully my drive shaft will now last a long time. I am very disappointed in Honda for allowing an issue like this to continue uncorrected. I will put it all back together tomorrow. Hopefully that will go uneventfully.
One of the pictures below shows two tack welds and how I connected the ground at each cup. The other picture shows the finished, painted job.
CID
Well-Known Member
Lifetime Member
Supporting Member
TripleB
Well-Known Member
Lifetime Member
advertisement
Similar threads
D
- Replies
- 1
- Views
- 312
- Replies
- 1
- Views
- 702

