TerryH
Well-Known Member
Supporting Member
Looking forward to future upgrades! Your Pics and Vids are good.
Thank you sir!
TerryH
Well-Known Member
Supporting Member
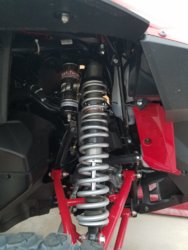
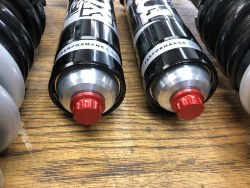
Install video coming soon but wanted to share some pics of the JC Racing billet nitrogen caps. Very cool little upgrade. Super easy to install. Does away with the prone to leak Fox self healing rubber ball seal and replaces it with a covered Schrader valve. Valve cap is also billet with an o ring. All around nice product.
Link to the JC Racing site: UTV / Side by Side
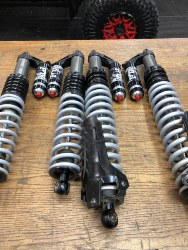
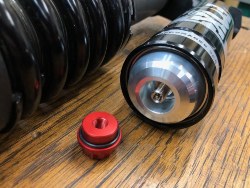
Link to the JC Racing site: UTV / Side by Side


Last edited:
D
TerryH
Well-Known Member
Supporting Member
View attachment 163199 I like the looks of that system. Gives a lot of added protection to the Schrader valve.
I have the schrader valves installed on mine, but they are not recessed like yours
The Schrader valve itself is a big upgrade from what Fox has. I also really liked that the valve was completely covered in the JC Racing ones. I'm also a sucker for anything shiny or color coordinated. lol...
TerryH
Well-Known Member
Supporting Member
Install video on the JC Racing billet nitrogen caps. Very impressed with the machining, fit and function of these caps.
Ragnar406
The Great Bald One
Lifetime Member
Supporting Member
Great video @TerryH Where Locally did you get your shocks filled ?Install video on the JC Racing billet nitrogen caps. Very impressed with the machining, fit and function of these caps.
TerryH
Well-Known Member
Supporting Member
Great video @TerryH Where Locally did you get your shocks filled ?
Matt Mangin filled them but Joe Wooster (Ultra Off Road) and Rick Long (Madhatter Performance) can also do it.
TerryH
Well-Known Member
Supporting Member
Newest addition is the HillBilly brake. I know a lot of guys have them on their Pioneers. Great addition to the Talon!
Video of the install and review on my YouTube channel:
Video of the install and review on my YouTube channel:
D
I have the Hillbilly e-brake on my Talon And Like it. When you stop on a steep incline make sure and set the brake first, then put the trans in park. Putting it in park first and releasing the brake before setting the E-brake puts a lot of stress on the park trans pal, and can cause damage trying to get the trans back out of park.
Your unit installed as directed in the installation instructions, Mine did not.
I had to make shims to add between the brake and Talon mounting bracket. My brake pedal would not go down far enough to engage the E-brake.
I made shims out of 16 ga. sheet metal and stacked them up until I was able to engage it.
This required approximately 5/16" of shims and a longer bolt to accommodate it.
This also makes sense to me and should have been designed into the unit.
As your brake pads wear done, the brake pedal will travel down more to force the pads in to contact with the rotor. Without any way to adjust for this , the E- brake will no longer hold.
I can remove shims as needed to compensate for this and make the E-brake work properly...
Some thing to think about...DRK
advertisement
Sheetmetalfab
Liberal kryptonite. truth and logic….
Lifetime Member
I have the Hillbilly e-brake on my Talon And Like it. When you stop on a steep incline make sure and set the brake first, then put the trans in park. Putting it in park first and releasing the brake before setting the E-brake puts a lot of stress on the park trans pal, and can cause damage trying to get the trans back out of park.
Your unit installed as directed in the installation instructions, Mine did not.
I had to make shims to add between the brake and Talon mounting bracket. My brake pedal would not go down far enough to engage the E-brake.
I made shims out of 16 ga. sheet metal and stacked them up until I was able to engage it.
This required approximately 5/16" of shims and a longer bolt to accommodate it.
This also makes sense to me and should have been designed into the unit.
As your brake pads wear done, the brake pedal will travel down more to force the pads in to contact with the rotor. Without any way to adjust for this , the E- brake will no longer hold.
I can remove shims as needed to compensate for this and make the E-brake work properly...
Some thing to think about...DRK
The brake calipers are floating so the pedal travel should remain the same.
(No matter how worn the pads are)
D
I was under the impression all disc brake systems had free floating pads.
But to force the pad against the rotor as the pad wears down'
The puck in the caliper had to be forced out by more brake fluid , which requires more pedal travel to supply the needed fluid to compensate for the wear.
If I am wrong in this I apologize.
But to force the pad against the rotor as the pad wears down'
The puck in the caliper had to be forced out by more brake fluid , which requires more pedal travel to supply the needed fluid to compensate for the wear.
If I am wrong in this I apologize.
Sheetmetalfab
Liberal kryptonite. truth and logic….
Lifetime Member
I was under the impression all disc brake systems had free floating pads.
But to force the pad against the rotor as the pad wears down'
The puck in the caliper had to be forced out by more brake fluid , which requires more pedal travel to supply the needed fluid to compensate for the wear.
If I am wrong in this I apologize.
the fluid regenerates from the reservoir.
as the pads wear the level gets lower but the pedal travel remains consistent.
B
I installed the hillbilly brake as well....i didnt make shims; ratehr adjusted the threaded rod on the back of the pedal. works great now.Thanks Sheetmetalfab, I now understand the working of the newer systems a little better now.
D
That's what I like about these forums,. You learn something every day.
I did not know there was a adjustment on the threaded rod.
And worse yet, when I called Hillbilly about the problem, they didn't seem to know this either or at least did not mention it.
I did not know there was a adjustment on the threaded rod.
And worse yet, when I called Hillbilly about the problem, they didn't seem to know this either or at least did not mention it.
TerryH
Well-Known Member
Supporting Member
On to beginning the electrical install. Using the XTC key on harness to power the ruse box. Hondasxs.com tail light harness to power the chase bar. Switch panel from PBR. SATV Black Ops 5000lb winch on SATV winch mount. Bunch of led goodies. Tusk heated seats. Remembering now how much I dislike doing electrical. lol...
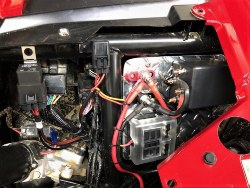
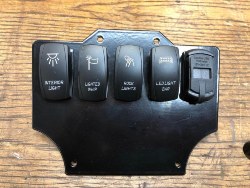
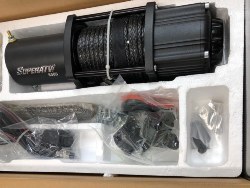
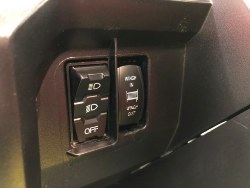


Last edited:
Dragon21
In my defense, I was left unsupervised
Lifetime Member
any plans to add a second battery? Still not sure if these are as bad as the pioneers when it comes to Amp draw affecting performanceon to beginning the electrical install. Using the XTC key on harness to power the ruse box. Hondasxs.com tail light harness to power the chase bar. Switch panel from PBR. SATV Black Ops 5000lb winch on SATV winch mount. Bunch of led goodies. Tusk heated seats. Remembering now how much I dislike doing electrical. lol...
View attachment 165919
View attachment 165920
View attachment 165921
View attachment 165922
TerryH
Well-Known Member
Supporting Member
any plans to add a second battery? Still not sure if these are as bad as the pioneers when it comes to Amp draw affecting performance
Not at this point. Will add if needed. Not doing any stereo so I'm figuring around 20 amps max if the LED's and the heated seats were on at the same time.
From a previous thread by hondasxs.com on the subject: The Talon has a .7 kW charge rating. Calculations show it can handle 58 amps alone.
D
Couple more goodies added tonight. The CA shifter gate was a super easy mod. Toughest thing about the swap was getting the shifter knob off. It's a press fit and took a good amount of effort to get it off. Honda uses rivet style push pins on the top of the console so it's a matter of pushing the center pin thru to release them. Little bit of messing with the gate to get the shifter moving smoothly thru the gears. I used regular push ins to replace the rivet style. Entire process took about 20 minutes.
View attachment 159102
I figured a fire extinguisher would be a good idea just in case any of my RZR buddies needed it. lol... I bought a Airain quick disconnect rool bar mount. Pretty neat little piece. Comes with stainless clamps but I had a couple of insulated black ones so I used that to attach the base to one of the rear down tubes.
View attachment 159103
Just a matter of pulling the red knob and it's out of the mount.
View attachment 159104
View attachment 159105
Link to the mount on Amazon...
https://www.amazon.com/gp/product/B07L7Z866H/?tag=sxsweb24-20
Put one of these on my R, first ride it fell off where brackets attach together (red Knob). Luckily fell down into bed and did not lose it.
advertisement
Similar threads
D
- Replies
- 9
- Views
- 1K
D
T
- Replies
- 55
- Views
- 5K
T
- Replies
- 509
- Views
- 39K
- Replies
- 72
- Views
- 5K


