You are using an out of date browser. It may not display this or other websites correctly.
You should upgrade or use an alternative browser.
You should upgrade or use an alternative browser.
E
elkguide
Well-Known Member
Lifetime Member
Supporting Member
Besides looking great it looks like you've got the water issue covered too. NICE!
Tailgate fix:
I copied this idea from someone on here that I saw a while back. Sorry I don't remember who to give the credit too. I saw someone else use a master chain link as well.
National Hardware 3153BC 1/4 Cold Shut, Zinc at Tractor Supply Co.


This was probably the cheapest and easiest mod I've done. I was sitting on the tailgate a couple nights ago and it just wasn't comfortable with angled up. I happened to be a Tractor Supply the other day and picked up a couple of these. It's so simple.


Now I have a nice level, maybe a degree or two down, tailgate.
I copied this idea from someone on here that I saw a while back. Sorry I don't remember who to give the credit too. I saw someone else use a master chain link as well.
National Hardware 3153BC 1/4 Cold Shut, Zinc at Tractor Supply Co.
This was probably the cheapest and easiest mod I've done. I was sitting on the tailgate a couple nights ago and it just wasn't comfortable with angled up. I happened to be a Tractor Supply the other day and picked up a couple of these. It's so simple.
Now I have a nice level, maybe a degree or two down, tailgate.
Last edited:
4" Cube LED Lights
I came up with this idea after checking out how the Honda OEM mounts their cube lights to the Honda glass windshield. They use the two screws that attach the windshield to the clamp.
I had considered putting a curved light bar under the front of the roof line or at the base of the windshield. Under the roof line there really wasn't any way to securely attach it unless you screw it through the plastic roof. I figured that light beam would bounce all over. The base of the windshield I worried that when I plowed and the blade was up I'd get a nasty glare back at me. I started looking how Jeeps mounted lights to their windshields and found these I really liked:
https://www.amazon.com/gp/product/B00W3IH4HY/?tag=sxsweb24-20
Then I modified them by trimming the bottom part of the bracket. It's very heavy duty. Then I drilled two holes that were 3/4" apart that would match the screws on the windshield that mounted the clamp.


Then I went with $17 Amazon cheapies to see how I'm going to like this set up:
https://www.amazon.com/gp/product/B074YYBSGW/?tag=sxsweb24-20


Each pair puts out 120 watts so 240 watts at 12 volts equals 20 amps so I didn't go with a relay and I had plenty of power left on my fuse panel. I wired everything with 14 AWG to this switch:
Carling ARB Narva Style Rocker Switch SPOT LIGHTS Blue LED Boat Marine 12V 24V | eBay
When it gets dark I'll take some more pictures of the lights on. Total time for this project was about 3 hours. I am pleased how it came out. The lights are at eye level and they won't get ripped off by trees or thick brush.

I came up with this idea after checking out how the Honda OEM mounts their cube lights to the Honda glass windshield. They use the two screws that attach the windshield to the clamp.
I had considered putting a curved light bar under the front of the roof line or at the base of the windshield. Under the roof line there really wasn't any way to securely attach it unless you screw it through the plastic roof. I figured that light beam would bounce all over. The base of the windshield I worried that when I plowed and the blade was up I'd get a nasty glare back at me. I started looking how Jeeps mounted lights to their windshields and found these I really liked:
https://www.amazon.com/gp/product/B00W3IH4HY/?tag=sxsweb24-20
Then I modified them by trimming the bottom part of the bracket. It's very heavy duty. Then I drilled two holes that were 3/4" apart that would match the screws on the windshield that mounted the clamp.
Then I went with $17 Amazon cheapies to see how I'm going to like this set up:
https://www.amazon.com/gp/product/B074YYBSGW/?tag=sxsweb24-20
Each pair puts out 120 watts so 240 watts at 12 volts equals 20 amps so I didn't go with a relay and I had plenty of power left on my fuse panel. I wired everything with 14 AWG to this switch:
Carling ARB Narva Style Rocker Switch SPOT LIGHTS Blue LED Boat Marine 12V 24V | eBay
When it gets dark I'll take some more pictures of the lights on. Total time for this project was about 3 hours. I am pleased how it came out. The lights are at eye level and they won't get ripped off by trees or thick brush.

Last edited:
What I learned was that I learned from this comparison is my headlights are way out of adjustment.
Headlights only

Spotlights:

Video headlights only;
Spotlights on:
I like. I'm going to look into brighter cubes.
Headlights only
Spotlights:
Video headlights only;
Spotlights on:
I like. I'm going to look into brighter cubes.
BWAF
I get paid to pass gas
Lifetime Member
I have a friend that has these I haven't seen them but I guess there bright
Sent from my SM-G930U using Tapatalk
Side Shooter LED Lights, DJI 4X4 2Pcs 4'' 96W Triple Row CREE LED Pods Off Road Spot Flood Combo Beam Dual Side Cubes Work Light Driving Fog Lights for Trucks Jeep ATV SUV Boat, 2 Years Warranty https://www.amazon.com/dp/B079BDLQFW/?tag=sxsweb24-20What I learned was that I learned from this comparison is my headlights are way out of adjustment.
Headlights only
View attachment 89567
Spotlights:
View attachment 89568
Video headlights only;
Spotlights on:
I like. I'm going to look into brighter cubes.
Sent from my SM-G930U using Tapatalk
Smitty335
Well-Known Member
Lifetime Member
Supporting Member
I have a Black Oak 20 inch, thats really bright, had a bar welded to my stock bumper, to get above the air flow into the radiator. I ride in the tight woods, roof mount would have lasted like a fart in a whirl wind, so low I go!I was pleased with my 20" light bar. I didn't know if it would be enough, but more than enough for my use. I also found that I needed to realign my headlights after taking the hood on/off several times.
FredD
advertisement
Smitty335
Well-Known Member
Lifetime Member
Supporting Member
LED Replacment Bulbs:
I got a lot bang for my buck on this modification. Stock light bulbs blow. I liked these so much I’m ordering these for my pickup.
I couldn’t believe the difference.
High beams:
Took 10 minutes. No wiring. Cheap. Blinding.
Reverse Lights Revisited:
So reverse lights were one my first mods. I think it's on page 1 of this post if you want to see the wiring for the reverse harness. Since then, I added a rear bumper which partially blocked the lights. I also probably fried one of them from the exhaust heat, being so close to the exhaust. I saw someone flush mount them into the tailgate and went that direction. I liked how bright these were:
https://www.amazon.com/gp/product/B07847SGY9/?tag=sxsweb24-20

These lights are 2" deep so I got nervous where to put them. I hoped this was going to be a good spot because cutting a huge hole made me hesitate on flush mounts:


The wiring was easy because everything was already there. The second hole was easier to cut because I went a little larger and it popped right in. I may pop them off, take the gasket out and using some black adhesive silicone to seal them up better. I was also ready to pop rivet them on if the #14 sheet metal screws did hold them in place to my satisfaction.

They are angled down. They really light up the ground in reverse light which will make it nice when plowing. They are plenty bright enough.


Took about an 2 hours including uninstalling the old lights and wiring the new ones. They clear the bumper which is what I was looking for. When I drop the tailgate they also clear the bumper. I give this one a thumbs up after I seal up the opening.
So reverse lights were one my first mods. I think it's on page 1 of this post if you want to see the wiring for the reverse harness. Since then, I added a rear bumper which partially blocked the lights. I also probably fried one of them from the exhaust heat, being so close to the exhaust. I saw someone flush mount them into the tailgate and went that direction. I liked how bright these were:
https://www.amazon.com/gp/product/B07847SGY9/?tag=sxsweb24-20
These lights are 2" deep so I got nervous where to put them. I hoped this was going to be a good spot because cutting a huge hole made me hesitate on flush mounts:
The wiring was easy because everything was already there. The second hole was easier to cut because I went a little larger and it popped right in. I may pop them off, take the gasket out and using some black adhesive silicone to seal them up better. I was also ready to pop rivet them on if the #14 sheet metal screws did hold them in place to my satisfaction.
They are angled down. They really light up the ground in reverse light which will make it nice when plowing. They are plenty bright enough.
Took about an 2 hours including uninstalling the old lights and wiring the new ones. They clear the bumper which is what I was looking for. When I drop the tailgate they also clear the bumper. I give this one a thumbs up after I seal up the opening.
Last edited:
CEC Enclosures Upper Fabric Doors:
I completed enclosing my 3-seater today with fabric upper doors by CEC Enclosures. $385 shipped. I have Honda glass, roof and hard rear panel.
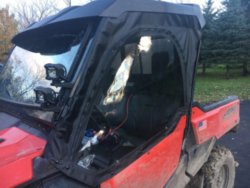
I considered the Honda OEM hard doors but way too much. Then the Honda OEM upper fabric doors but a number of people didn't seem pleased with them, mostly with the installation. They also didn't seem to seal up well. I liked the CEC ones but I gotta be honest, at first I didn't know if I was going to like zipping in and zipping out each time, like getting in and out of a tent. Because of the zipper design the whole things seals up really well, much better than the Honda OEM.
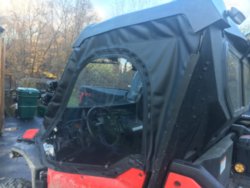
Installation took just over an hour. It is a series of straps that snaps the fabric around the ROPS. I had to loosen the clamps to slip the straps under the windshield and roof. Most of them I had plenty of room to get around the extend vent lines and electrical lines I have zip tied to the ROPS. I had problem with two straps in the same spot on both doors. One strap was way too long and one was way to short up in the top rear corner where I couldn't snap it. I don't know why. Very minor and still very functional.
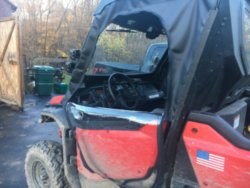
Then you have to install snaps into the the lower door and base of the windshield. Easy to do. I own a boat and deal with canvass and snaps all the time. A really nice fit. You could easily transport this at 90 mph and it's not going anywhere, very air and water tight. To get in and out, you have to zip open the window, reach in and open the door. It is an extra step to get in and out but I think worth it because everything seals up so well. There is a way to roll the window up and strap it to the lower door.
I kinda wish I could just zipper the window right off but I have a feeling if they did that, it would become unzippered each time you opened the door. Then you'd have to thread the zipper each time. Removing the window would also prevent damage if I trail ride. I think taking them off and on will shorten to 20 minutes now that know the process and the snaps are in place. I heard the Honda upper doors are a pain to take off and back on. I'll probably only have them on December through February or March.
Overall I am very pleased with the design and workmanship. CEC was great to deal with. I think this is going to work very well for me.
I completed enclosing my 3-seater today with fabric upper doors by CEC Enclosures. $385 shipped. I have Honda glass, roof and hard rear panel.

I considered the Honda OEM hard doors but way too much. Then the Honda OEM upper fabric doors but a number of people didn't seem pleased with them, mostly with the installation. They also didn't seem to seal up well. I liked the CEC ones but I gotta be honest, at first I didn't know if I was going to like zipping in and zipping out each time, like getting in and out of a tent. Because of the zipper design the whole things seals up really well, much better than the Honda OEM.

Installation took just over an hour. It is a series of straps that snaps the fabric around the ROPS. I had to loosen the clamps to slip the straps under the windshield and roof. Most of them I had plenty of room to get around the extend vent lines and electrical lines I have zip tied to the ROPS. I had problem with two straps in the same spot on both doors. One strap was way too long and one was way to short up in the top rear corner where I couldn't snap it. I don't know why. Very minor and still very functional.

Then you have to install snaps into the the lower door and base of the windshield. Easy to do. I own a boat and deal with canvass and snaps all the time. A really nice fit. You could easily transport this at 90 mph and it's not going anywhere, very air and water tight. To get in and out, you have to zip open the window, reach in and open the door. It is an extra step to get in and out but I think worth it because everything seals up so well. There is a way to roll the window up and strap it to the lower door.
I kinda wish I could just zipper the window right off but I have a feeling if they did that, it would become unzippered each time you opened the door. Then you'd have to thread the zipper each time. Removing the window would also prevent damage if I trail ride. I think taking them off and on will shorten to 20 minutes now that know the process and the snaps are in place. I heard the Honda upper doors are a pain to take off and back on. I'll probably only have them on December through February or March.
Overall I am very pleased with the design and workmanship. CEC was great to deal with. I think this is going to work very well for me.
BWAF
I get paid to pass gas
Lifetime Member
Looks good I like may move mineReverse Lights Revisited:
So reverse lights were one my first mods. I think it's on page 1 of this post if you want to see the wiring for the reverse harness. Since then, I added a rear bumper which partially blocked the lights. I also probably fried one of them from the exhaust heat, being so close to the exhaust. I saw someone flush mount them into the tailgate and went that direction. I liked how bright these were:
https://www.amazon.com/gp/product/B07847SGY9/?tag=sxsweb24-20
View attachment 90650
These lights are 2" deep so I got nervous where to put them. I hoped this was going to be a good spot because cutting a huge hole made me hesitate on flush mounts:
View attachment 90652
View attachment 90655
The wiring was easy because everything was already there. The second hole was easier to cut because I went a little larger and it popped right in. I may pop them off, take the gasket out and using some black adhesive silicone to seal them up better. I was also ready to pop rivet them on if the #14 sheet metal screws did hold them in place to my satisfaction.
View attachment 90659
They are angled down. They really light up the ground in reverse light which will make it nice when plowing. They are plenty bright enough.
View attachment 90661
View attachment 90663
View attachment 90665
Took about an 2 hours including uninstalling the old lights and wiring the new ones. They clear the bumper which is what I was looking for. When I drop the tailgate they also clear the bumper. I give this one a thumbs up after I seal up the opening.
Sent from my SM-G930U using Tapatalk
Denali Plow with Hydro-Turn
I just finished the installation of my 72" Denali standard UTV steel plow with the hydro-turn, plow markers, rubber top flap and pulley fairlead kit from Motoalliance. $1,350 delivered.
Shopping
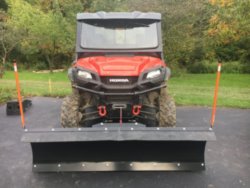
It came in 5 boxes that some were beat up from delivery but none of the product was damaged or scratched inside. Assembly was very straight forward. The mount attaches nicely to the bottom of the frame with 4 bolts and two bolts at the bottom of the bumper. The only negative here is you are losing about an inch or two of clearance from the two push tube mounting points. A direct hit with a large rock would likely do a number to it. For the summer months it would probably take 15 minutes to take it off and put it back on.
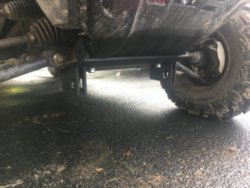
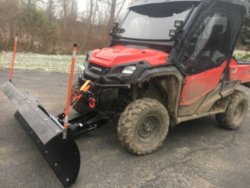
It probably took me 2 hours to get the plow assembled and mounted up. This includes the scraper blade, markers and rubber flap.
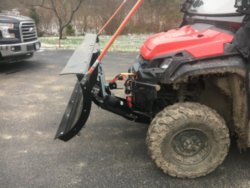
At first I didn't get the pulley fairlead kit but now I could see it makes a difference on the lifting angles and the 2:1 purchase along with not constantly rubbing against the hawse fairlead, so I ordered that and installed it. That comes with a shorter 3 foot synthetic line.
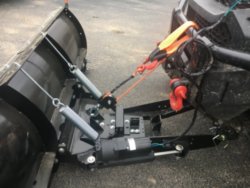
The hydro-turn was on backorder and just came in. Again a very easy straightforward install, I thought everything was very well designed and heavily built. Welds looked great. The bad news is the switch to turn it left/right was defective. It would only turn in one direction. I pulled the switch and confirmed it with a multimeter. I don't blame Motoalliance, they offered to replace it but I just ordered another because the snow was coming.
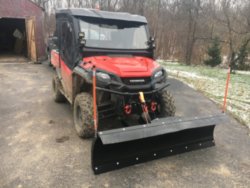
I really love the hydro-turn because I had no desire to get in and out of the cab each time I had to change directions. I seriously considered a Boss V-Blade but the price and weight had me find this solution. We are suppose to get 5-10" of wet snow tonight so I'll report back how the set up works!
I just finished the installation of my 72" Denali standard UTV steel plow with the hydro-turn, plow markers, rubber top flap and pulley fairlead kit from Motoalliance. $1,350 delivered.
Shopping

It came in 5 boxes that some were beat up from delivery but none of the product was damaged or scratched inside. Assembly was very straight forward. The mount attaches nicely to the bottom of the frame with 4 bolts and two bolts at the bottom of the bumper. The only negative here is you are losing about an inch or two of clearance from the two push tube mounting points. A direct hit with a large rock would likely do a number to it. For the summer months it would probably take 15 minutes to take it off and put it back on.


It probably took me 2 hours to get the plow assembled and mounted up. This includes the scraper blade, markers and rubber flap.

At first I didn't get the pulley fairlead kit but now I could see it makes a difference on the lifting angles and the 2:1 purchase along with not constantly rubbing against the hawse fairlead, so I ordered that and installed it. That comes with a shorter 3 foot synthetic line.

The hydro-turn was on backorder and just came in. Again a very easy straightforward install, I thought everything was very well designed and heavily built. Welds looked great. The bad news is the switch to turn it left/right was defective. It would only turn in one direction. I pulled the switch and confirmed it with a multimeter. I don't blame Motoalliance, they offered to replace it but I just ordered another because the snow was coming.

I really love the hydro-turn because I had no desire to get in and out of the cab each time I had to change directions. I seriously considered a Boss V-Blade but the price and weight had me find this solution. We are suppose to get 5-10" of wet snow tonight so I'll report back how the set up works!
BWAF
I get paid to pass gas
Lifetime Member
That's a nice oneDenali Plow with Hydro-Turn
I just finished the installation of my 72" Denali standard UTV steel plow with the hydro-turn, plow markers, rubber top flap and pulley fairlead kit from Motoalliance. $1,350 delivered.
Shopping
View attachment 93979
It came in 5 boxes that some were beat up from delivery but none of the product was damaged or scratched inside. Assembly was very straight forward. The mount attaches nicely to the bottom of the frame with 4 bolts and two bolts at the bottom of the bumper. The only negative here is you are losing about an inch or two of clearance from the two push tube mounting points. A direct hit with a large rock would likely do a number to it. For the summer months it would probably take 15 minutes to take it off and put it back on.
View attachment 93980View attachment 93981
It probably took me 2 hours to get the plow assembled and mounted up. This includes the scraper blade, markers and rubber flap.
View attachment 93982
At first I didn't get the pulley fairlead kit but now I could see it makes a difference on the lifting angles and the 2:1 purchase along with not constantly rubbing against the hawse fairlead, so I ordered that and installed it. That comes with a shorter 3 foot synthetic line.
View attachment 93983
The hydro-turn was on backorder and just came in. Again a very easy straightforward install, I thought everything was very well designed and heavily built. Welds looked great. The bad news is the switch to turn it left/right was defective. It would only turn in one direction. I pulled the switch and confirmed it with a multimeter. I don't blame Motoalliance, they offered to replace it but I just ordered another because the snow was coming.
View attachment 93984
I really love the hydro-turn because I had no desire to get in and out of the cab each time I had to change directions. I seriously considered a Boss V-Blade but the price and weight had me find this solution. We are suppose to get 5-10" of wet snow tonight so I'll report back how the set up works!
Sent from my SM-G930U using Tapatalk
CumminsPusher
Just a Honda doing Honda things.
Lifetime Member
Supporting Member
Club Contributor
Great timing on your behalf. Need some pics of your hard work in action
G
I'm new to the forum. Thanks for this detailed thread. I especially appreciate the large, high-quality pictures and links to the items you utilized.
I'm adding a winch, second battery, isolator, etc. and your tutorial has me just about tuned up and ready to install.
I do have just a few questions though:
1. Does your winch have any type of fuse or breaker on the power wire or does the solenoid offer protection?
2. Would it mater if the Auxiliary ground wire went to the Buss and the then to the Aux battery as opposed to the way you have it wired? (battery first the Buss)
3. Do you happen to know which model of mighty max battery fits in the stock location? Since I'm adding an odyssey as the aux battery, it seems like a good time to also upgrade my 2 year old stock battery.
Thanks and I hope you had a great Thanksgiving.
advertisement

