P1000 Universal heater

O

OleRed

Well-Known Member
Lifetime Member
Sep 6, 2018
142
276
63
Wisconsin
Ownership

  1. 1000-5
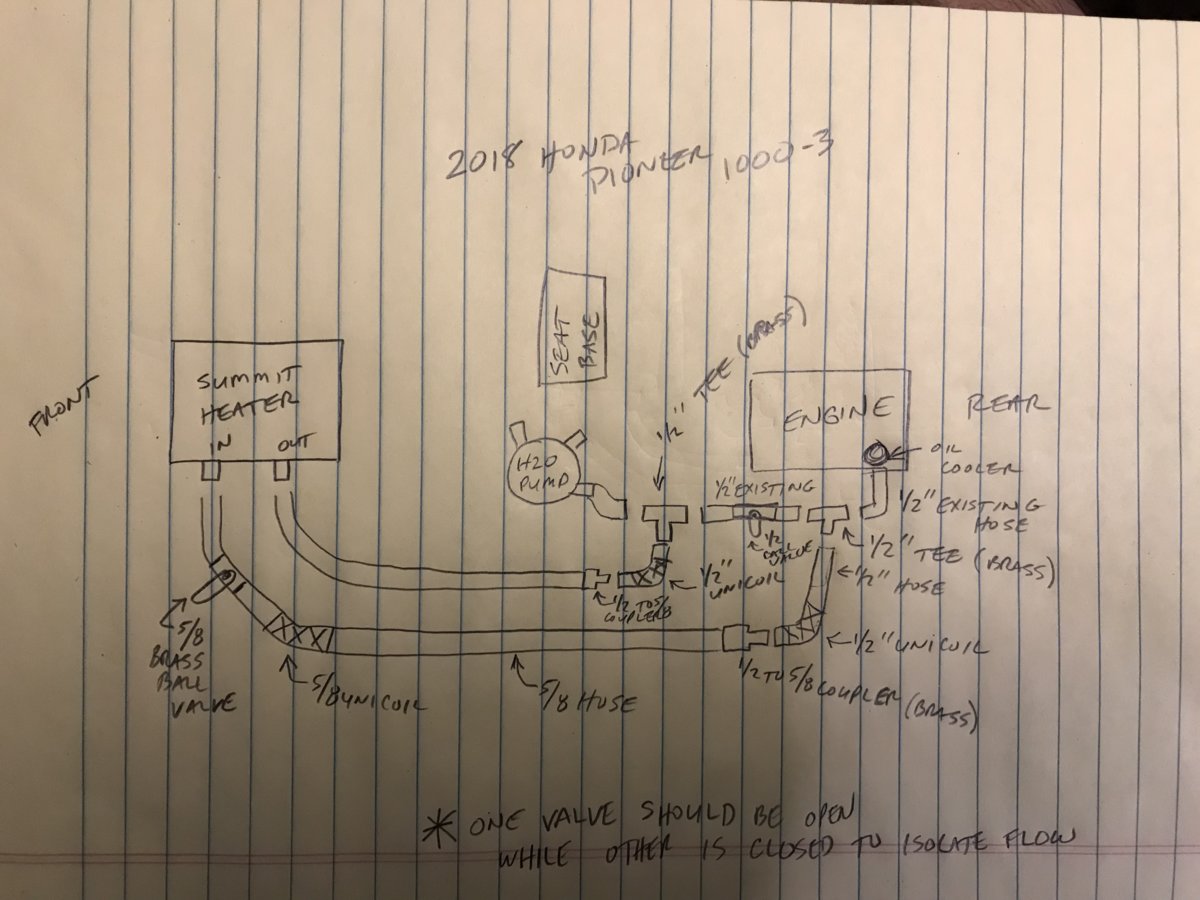
remington--I dropped machine off at dealer to get new shoes put on. I left you hanging in the breeze... You will need two T's and two valves. You are essentially just creating a run from oil cooler, through heater box and to the water pump (where oil cooler originally hooked up to.)

First, extend the oil cooler line to the bottom fitting of your heater box. Next, make a hose to connect the top fitting of your heater box to your water pump. 3rd-- cut those two nice lines you just made and insert your T's.... one in each line. Connect the two open ports on the T's together and put one of your valves there. So make sure your line that connects those two open ports is long enough to get your shutoff valve in there. The other valve can go in either line that connects the heater box.

You are creating two loops-- in winter you open valve to heater box and shut the short cut loop--- in summer, you can open the short cut loop and shut the valve to your heater box.

Not sure how that all reads but I would be happy to draw a picture or actually take a real one (like I promised)
 
O

OleRed

Well-Known Member
Lifetime Member
Sep 6, 2018
142
276
63
Wisconsin
Ownership

  1. 1000-5
Leave the original hose on the front of the water pump--- just loses the hose clamp and rotate it to compliment the direction you need to go.
 
Remington

Remington

POIDH Enforcement Officer
Lifetime Member
Supporting Member
Jul 24, 2016
20,253
115,817
113
Michigan
Ownership

  1. 1000-5

  2. Talon X
I got the heater finnished. Before I post my pics and how too. I had some difficulty with the aluminum flex and might be doing that again tomorrow when my head is clear form a 13 hr day at work then messing with this. My question is, what is this black flex rated at? I know the Honda heater uses it and it goes all over hell’s creatiation. Just don’t want to use it If it ain’t good for heatbinthe engine compartment.
7350ABFD 626A 4E3F 8DC8 4A65E26D762A
 
Remington

Remington

POIDH Enforcement Officer
Lifetime Member
Supporting Member
Jul 24, 2016
20,253
115,817
113
Michigan
Ownership

  1. 1000-5

  2. Talon X
Ok, so I did my best with pics. It’s a very tight area to take pics in but I think you’ll get the idea. Any questions just ask and I’ll try to clarify. Special thanks to @OleRed for his help as well with putting a vision in my head about cutting and routing. He sent some pics my way That were helpful that I will post.

Parts needed-
This is the Summitt heater as listed in some of the previous post. You will need 2-1/2”x5/8” barbs and 2-5/8” tee’s and 4’ to be safe of 5/8 heater hose, and 5/8 90 heater hose to attach to the heater and a lot of clamps. Also 3-1/2”ball valves barbed on both ends. I used brass tees & barbs. I like there durability and I don’t want to have to get in there to ever replace them, you’ll see what I mean.

So first, you want to have 2 needle nose vice grips (I prefer) or something to to pinch off the half inch line so u loose very little coolant (this is the only 1/2” line when u have your seat removed on the drivers side of the engine that runs from the water pump to the back of the engine where the oil cooler is.) the line looks like a U shape but about 12-13” long. Sorry too tight for a full pic but you’ll see it and be able to gather what I’m talking about in other pics. Cut the line as far back as you can towards the cooler. From there you will add the 1/2” to 5/8” barb with some clamps. Then a short pice if 5/8” hose to a 5/8” tee. After the tee put a ball valve, that valve is going perpendicular with the engine between the two lines that go to your heater. This is to be in the OFF position while the heat is on so that the flow is through the heater core then to the oil cooler. I added the 3rd as apposed to 2 cuz I wanted 2 valves at the heater to isolate it for easy service and less coolant loss if served is ever needed.
C38845F4 8E12 4092 B14F 44EF226BD024

4DD81303 B29D 4236 A17D F08E4F29AB0C
37651FE2 C082 44DF ADD3 D16E8B93C0AD
CA3B519E BDC9 429C 9AD4 E927CADF9115
 
Last edited:
Remington

Remington

POIDH Enforcement Officer
Lifetime Member
Supporting Member
Jul 24, 2016
20,253
115,817
113
Michigan
Ownership

  1. 1000-5

  2. Talon X
The next thing you will want to do is get yourself some 1-1/4” rubber grommets you can find on amazon. These will help you after you feed your 5/8 heater hose through the box and Will keep it from rubbing on sharp edges. The side of the first tee near the oil cooler from above, you want to drill your hole in the box under the seat then attach your 5/8” hose to the tee , feed it and leave it long to cut later in the box. I cut the same hole in back corner of the box (On the engine side) for the second line. No it’s good to note that my holes can be different that your hose locations but I found these to be the best for my application.
58703903 841A 453B 82BA 9699E695C17F
CBF8FC02 8914 402F AC83 B6ED2734D782
 
Remington

Remington

POIDH Enforcement Officer
Lifetime Member
Supporting Member
Jul 24, 2016
20,253
115,817
113
Michigan
Ownership

  1. 1000-5

  2. Talon X
No the fun part! Hope you don’t have GQ hands cuz the will be scratches and cut. Again, the right confines of the engine compartment on the drivers side of the box as seen below make it difficult to see the fittings. So that 1/2” hose you cut and was hanging from the first post, you’ll want follow that up to the water pump (olered’s pic first post) and cut it just past the 90 degree bend and discard the 10” (roughly) of 1/2” hose left. Now take your 1/2”x5/8” coupling barb and install it we’re you just cut. Then another short aprox 2” of 5/8” hose, connect it to the other end of the barb, then connect the 5/8” tee to that barb making sure your tee end up to the hole you cut facing the side of the box so you can hook up a 5/8” hose to that, that will go to the other side of your heater later. Weww...exhausting!lol. After you’ve cut your hands all up and cussing then cut u a peace of 5/8” hose to go from the tee at the back to the tee at the front to complete the circuit if you will. You have now replaced the 1/2” line you cut out.
CB59AFD9 DF1A 428F B28F 222AB093E762
 
Remington

Remington

POIDH Enforcement Officer
Lifetime Member
Supporting Member
Jul 24, 2016
20,253
115,817
113
Michigan
Ownership

  1. 1000-5

  2. Talon X
Mounting the box is self explanatory. I had to move mine, I had it facing on a 45 and drilled holes in the corner of the box for space but it proved to be a complete F show running duct. So I re mounted it facing streight towards the engine wall. You’ll want to cut the box using a hole saw or whatever you want to cut the holes for your duct. You’ll put in and remove the heater a few times for fitmit doing this. Take your time, no need to rush this cuz once you cut it, it’s permanent and DONT CUT ANY WIRES EITHER! So when your set with that, you will install the 5/8 90’s to the heater and set the heater in the box, secure it then all that extra hose sticking out of the grommets, you will now (by feel) cut the hose so you will have enough room to install the valves. Make sure you can reach them. These are so you can isolate the heater in the summer or to service it as well. Once ALL your clamps are tight you can remove your vice grips.
6F3F87CE 424D 496E B2A2 3724F72BFD79
 
Remington

Remington

POIDH Enforcement Officer
Lifetime Member
Supporting Member
Jul 24, 2016
20,253
115,817
113
Michigan
Ownership

  1. 1000-5

  2. Talon X
You can see we’re I put my vents on the foot wall. You can put them wherever you like, I just wanted full air flow less bends and easy run. I was able to use 3-3” vent elbows to go from the heater to the vent on the drivers side very ridged and heat proof.for the drives side I used 2-3” elbows and some 3” aluminum flex (dryer vent) to reach that side. Again safe and heat proof. DO NOT use the black vinyl flex duct as it’s easy to work with but will melt and cause a fire in he engine box. Also to note I used some foyal tape you can get at a hardware store to seal the seams, it’s easy to use, heat resistant and makes a good seal. I use it a lot at work. When your all finished with the electrical connections for the heater ( I can post something for that if you like? But it’s straight forward) you can add some atifreeze (BLUE HONDA TYPE) I found some at the local parts store by Prestone. Your all set and ready to heat your cab.
D4BF83DF 73EE 4C05 9251 0DFADADDBFBF
21E4B5CF B618 430E A98D 83F9F57F9248
 
  • Like
Reactions: thumper144
Remington

Remington

POIDH Enforcement Officer
Lifetime Member
Supporting Member
Jul 24, 2016
20,253
115,817
113
Michigan
Ownership

  1. 1000-5

  2. Talon X
I’ll post some pics soon of links to Parts I bought. Sorry if I missed anything and my gramor sucks. My mind goes way too faster than my hands. If I missed something let me know thanks
 
Last edited:
Remington

Remington

POIDH Enforcement Officer
Lifetime Member
Supporting Member
Jul 24, 2016
20,253
115,817
113
Michigan
Ownership

  1. 1000-5

  2. Talon X
Parts list-

Joyway 5/8" ID Hose Barb, Tee T 3 Way Union Fitting Intersection/Split Brass Water/Fuel/Air https://www.amazon.com/dp/B07CQKXBF9/?tag=sxsweb24-20

Pico 6127PT Vinyl Wire Grommets ID 1" x OD 1-3/8" 3 per Package https://www.amazon.com/dp/B001S7P3CO/?tag=sxsweb24-20

Joyway 1/2" to 5/8" Reduce ID Hose Barb Splicer, Hex Union Brass Fitting Reducer Water/Fuel/Air https://www.amazon.com/dp/B07J5FCX4W/?tag=sxsweb24-20

Gates 18701 Molded Heater Hose https://www.amazon.com/dp/B000C2W9TQ?tag=sxsweb24-20

You need 2 of each of these items and a bunch of stainless hose clamps
 
  • Like
Reactions: OleRed
advertisement
Remington

Remington

POIDH Enforcement Officer
Lifetime Member
Supporting Member
Jul 24, 2016
20,253
115,817
113
Michigan
Ownership

  1. 1000-5

  2. Talon X
Well, I got Er bleed tonight., it sure helps haveing pinched the lines as to not loose any coolant during installation . In total filling the heater and lost coolant id say just under a 1/2 gallon. It also blows like a........use your imagination lol. Once the machine warms up she’s good and hot. Did u hear that @Montecresto? You were waiting for this to be done and there u have it. :)
 
T

thumper144

New Member
Dec 12, 2018
16
19
3
Pittsburgh
Ownership

  1. 1000-3
Remington and Olé Red....thank you both for everything you’ve written and taken pictures of. I just bought a 2018 pioneer 1000-3 to replace my Arctic Cat trail(which also had a summit heater). Hope to be done with the plumbing in a day or so...waiting for parts. Then the wiring....oh no!!! BTW....I will never own a UTV without heat again!!
 
O

OleRed

Well-Known Member
Lifetime Member
Sep 6, 2018
142
276
63
Wisconsin
Ownership

  1. 1000-5
You’re welcome— glad it worked ...I’d keep the duct runs as short as possible and you will double heat output.
 
  • Like
Reactions: Remington
Remington

Remington

POIDH Enforcement Officer
Lifetime Member
Supporting Member
Jul 24, 2016
20,253
115,817
113
Michigan
Ownership

  1. 1000-5

  2. Talon X


Does this look ok?? Any problems or ideas that’d make anything better?
Yes that will work. Just make sure the ball valve between the 2 tees is accessible like I placed it in post# 84 second pic. The reason for the other 2 valves under the seat is for easy removal and service of the heater or it’s motor. It’s pure preference but being a service tech I think way too far ahead lol.
Also, in the placent of the tees, you’ll see the ease of probably not needing your unicoils, the hose won’t need that much bending accept for directly at the heater at witch you will need a 90. There’s links to the gates 90’s that @OleRed red and I used. In the end You will find what ultimately works best for you. ;)
 
Last edited:
  • Like
Reactions: BWAF
O

OleRed

Well-Known Member
Lifetime Member
Sep 6, 2018
142
276
63
Wisconsin
Ownership

  1. 1000-5
use that molded hose for sharp corners and i think you need rust inhibitor in coolant if contact with brass or copper but there might be some in the stock honda stuff .
 
  • Like
Reactions: Remington
Remington

Remington

POIDH Enforcement Officer
Lifetime Member
Supporting Member
Jul 24, 2016
20,253
115,817
113
Michigan
Ownership

  1. 1000-5

  2. Talon X
use that molded hose for sharp corners and i think you need rust inhibitor in coolant if contact with brass or copper but there might be some in the stock honda stuff .
Yes, the Honda OEM and the Prestone Blue that I posted above have rust and corrosion inhibitors/protection so should be good with whatever type of fittings you use as long as you don’t use black pipe and galvanized pipe, only because they have a tendency to plug up and fluid dosnt usually flow well in time with them.
Black/cast pipe is more suited for national gas/propane vapor, steam boiler pipe and some hydronic boiler applications. I know that’s more info than needed here, just thought I’d throw that out there just in case.
 
Last edited:
advertisement

About us

  • Our community has been around for many years and pride ourselves on offering unbiased, critical discussion among people of all different backgrounds. We are working every day to make sure our community is one of the best.

User Menu

Buy us a beer!

  • Lots of time and money has gone into making sure the community is running the best software, best designs, and all the other bells and whistles. Care to buy us a beer? We'd really appreciate it!

    Beer Fund!

    Club Membership!